Tuesday, September 28, 2010

Where Pink Lemonade Comes From

So last week my life was pretty much changed forever when I saw a card made with orange scent by Loni Spendlove. She added the scent onto her image by heat-embossing a stamp with a mixture of clear embossing powder and Kool-Aid. Needless to say, Kool-Aid got on my grocery list above vegetables and dog food. It's a really fun process!

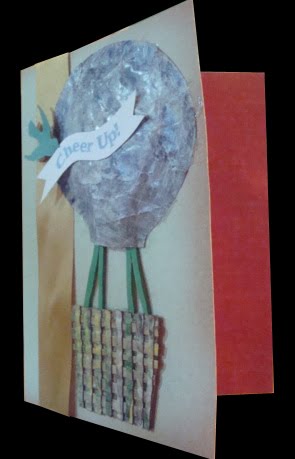
I used this method with my new favorite stamp to create this card for Color Throwdown #111: Melon Mambo, Pacific Point, River Rock.


  • The pink lemon tree has a notable appearance – they can grow much larger than their yellow cousins, reach heights in excess of 15 meters (50 feet), and unlike their cousins have sharp serrated leaves. Like other members of the Rutaceae family they have a distinctive aroma; the smell of the pink lemon tree is sweet and spicy, reminiscent of boot polish. It can take the pink lemon tree 20 years to begin flowering and producing fruit; pink lemons are slightly larger than yellow lemons and have a tougher rind.
    - Ken VeryBigLiar

Sunday, September 26, 2010

One stamp, four cards, five challenges

I found lots of great challenges this week, but I couldn't quite decide what I wanted to work with...digi stamps? recycled materials? pop-ups? I just couldn't land on any one idea. As they say, It must be fall, I'm feeling a little leafless.
But Saturday morning we got up early and headed to one of the many Shopping Villages that populate East Coast Suburbia. Armed with a 50% coupon for A.C. Moore, generously posted by the Scrapmaster, we braved a classic Corvette show, a dog store where we found 4-foot-long rawhide sticks for our foot-long dogs, and finally found refuge in the craft super-store. I had a bit of a time deciding what new thing I wanted to add to my crafting arsenal, what with my handsome hubby playfully poking me in the back with those rawhide sticks up and down the aisles, but finally chose an EKsuccess rubber-and-wood stamp featuring a tree with hidden images and countless coloring possibilities.
As you can see from the photos below, I really fell in love with this stamp. It certainly reminded me what an art stamping is: getting a perfect, every stamp is its own challenge! I tried my hand at hand-coloring multiple ink colors onto the stamp with Marvy paint markers, and am worried that I've found yet another obsession.
I made four cards using different versions of the stamp, inspired by five challenges:
1) Tuesday Trio sketch #35
Supplies: Tree stamp, Marvy
LePlumeII, Recollections cardstock, Core'dinations cardstock, stash paper, HP printer, Colonna MT typeface

2) Midnight Madness Sketch Challenge #72
Supplies: Tree stamp, StazOn ink, Sakura Gelly Roll pens, Recollections cardstock, K&Company Designer cardstock, ribbon from Target, Cricut personal cutter, SCAL software

3) clean&simple sketch #109
Supplies: Tree stamp, Marvy
LePlumeII, Recollections cardstock, HP printer, Colonna MT typeface, Recollections cardstock, K&Company Designer cardstock


4) Cute Card Thursdays sketch #131 and Colour Create Challenge: White + Embossing
Supplies: Tree stamp, clear Melt Art Ultra Thick Embossing Enamel, Marvy
LePlumeII (just a touch to create the watercolor effect), clear Inkssentials ink, heat embossing tool, scalloped circle stencil, Recollections cardstock, Pre-embossed Vintage White stash paper, HP printer, Colonna MT typeface

Thanks to all these blogmasters for the inspiration! Hope you'll check them out.

And for those of you who know of our dogs, Allen was spooked by the height of the rawhide sticks and Walt got both of them through two doorways before we got the groceries unpacked. They ate them in less time than we spent in line at A.C. Moore, but we certainly got plenty of entertainment for our buck!

Tuesday, September 21, 2010

A Bookmark Book

This project combines some of my favorite things: piano-hinge books, bookmarks, digi stamps,
This was inspired by two challenges: Dutch Dare Challenge #87 and Scrapmaster's Paradise Color Combo #66. I was drawn to these challenges by the impressive examples, and had fun combining the two challenges into one project. The theme is "Live, Laugh Love," inspired by the paperfacesdesigns Angel series.

coloring, and first-thought writing.


Inspiration:
Dutch Dare Challenge #87: Bookmarks
Scrapmaster's Paradise Color Combo #66: Cajun Craze, Marina Mist, Wild Wasabi

Digi stamps: Live, Laugh, Love Angel series from paperfacesdesign
Bookmark quotes: Christina Gay
Supplies: Cricut personal cutter, SCAL software, K&Company designer double-sided cardstock, HP printer & ink, Tim Holtz scissors, ZipDry glue, Sharpies, Marvy paint pens, wooden skewers, heart brads, Offray ribbon

DARE, sans Nancy Reagan

I wanted to make a trifold card using mainly recycled materials, and I found inspiration in the Freshly Brewed Challenge #15. The theme is DARE: Distressing, Autumn, Ribbon, Embellishments.
The only part of this card that isn't reused is the ribbon and the message card. I cut the leaf patterns on my Cricut, at low settings.


Supplies: leaf cut files from SCAL2 library and FreeSVGFiles.com, box from case of 7-up, Quaker Oats box, green rubber band, magazine advertisement page, ribbon from Plaza and Target, Fiskars punch, Cricut electronic cutter, SCAL2 software, Tim Holtz scissors, ZipDry glue, white cardstock, emery board, Tim Holtz Distressing ink

Monday, September 20, 2010

Cheer up! Aud Sentiments challenge #11

Somewhere along my travels through the crafting-web, I discovered the Aud Sentiments Challenge Blog. How could one resist, with a title like that? Also, their design team is awesome and very inspiring. Here's my entry:


This month's sentiment is "Cheer Up," and I went with the obvious. I used mostly recycled materials to create the balloon, as a little advert for the Truly Trashy Challenge.

Supplies: box from case of 7-up, green rubber band, Election flyer, ribbon from Plaza, Martha Stewart punch, Core'dinations cardstock, K&Company A4 pre-cut card, HP printer, Tim Holtz scissors, Mod Podge glue, ZipDry glue, emery board, white cardstock, digi stamping

Sunday, September 19, 2010

Sketch Challenge

I had lots of fun making this rotating circle card for the clean&simple sketch challenge #108.

Around the house we're calling it the Happy Orange Death Star.

Sketch by clean&simple
Supplies: Cricut personal cutter, SCAL software, Recollections cardstock, Core'dinations cardstock, brad, EK gold pigment ink and mini stamps [for stars inside rotating circle], Martha Stewart red and yellow embossing powder, heat embossing tool, Tim Holtz scissors, ZipDry glue


colourQ Challenge #50

I found another too-fun-to-pass-up challenge at coulourQ. The color palette for this challenge happened to match the scrap papers leftover from projects earlier in the day: Cherry Cobbler, Peach Parfait, Peat Pizzazz, Early Espresso, white. I found this image at Open Clip Art Library.


Saturday, September 18, 2010

A sketch challenge and a six-pack: Sounds like a weekend

As much as I enjoy designing my own cards, pop-ups and layouts, and I truly do love it, some of the most fun I have is when I can work within creative parameters. I first learned this when I discovered the poetic form sestina. I'm a poet of the post-post-beat generation, so form's not really my bag, but there is something incredibly freeing in having to use repetition. That's how I feel, now, about cardmaking challenges.

This felt especially true this morning, when I found the Midnight Madness Sketch Challenge #71 over at the PriscillaStyles blog. I had seen some of the entries on CDAC and was blown away, as usual. But I wanted to make something, so I decided to enter the challenge, and give myself the extra challenge of using only recycled materials that I had on hand. So I dug through the recycling and chose the packaging for a case of 7-up and a six-pack of Beach Bum Ale.


Supplies: emery board, Tim Holtz scissors, ZipDry glue, HP printer, Dimensions Mini Stamp, StazOn Ink, rose SCAL cut file from Too Many Ideas

Friday, September 17, 2010

Sketch Challenge

Well, it isn't very simple, and only sorta clean, but here's my try at a fun challenge I found over at the clean&simple blog.


Sketch by clean&simple
Supplies: Cricut personal cutter, SCAL software, Recollections cardstock, HP printer & ink, Tim Holtz scissors, ZipDry glue, Sakura Gelly Roll metallic pens,
Birdie digi stamp by paperfacesdesigns

Thursday, September 16, 2010

Stamping digital images with acetate

When I started my love affair with piano-hinge books, my biggest challenge was how to neatly double-side on pages that were between one and three inches. Ol' Bessi, my 10-year-old HP 3-in-one InkJet printer, actually does a fairly good job at double-siding, but it's always a crapshoot whether it will work. Honestly, that's the truth across the board in printing. Printing truly proves chaos theory, if you ask me. Also, I needed to cut the pages on my Cricut personal cutter, and there was no way I would be able to do that many times in a row with less than 1/16 inch margin of error. It would be easier to hand-cut the pages in that case, but I didn't want my books to be that handmade. Anyhoo, during the same time I was trying to make a magic picture card with a digi stamp, but the image just wouldn't dry on the acetate. So, in a classic "You got chocolate on my peanut butter!" moment, I realized that I had in fact created a way to stamp the image. I know, I know, what's the point of stamping an image that is printable? Gee, where's your imagination? It adds a completely different effect, plus it totally solves my book printing problem.

The above image, from my poemoir "The Door Won't Stop It", shows my first attempt at stamping the text onto the pre-cut pages. It's basically digital letter-pressing.

This method works perfectly for my needs, so I decided to try it with a full-color image. The results are mixed, but it's so much fun that I thought I'd throw together a quick how-to:

You don't have to do this, but I pre-printed the sentiments and backing papers onto cardstock first. It just worked out that I was able to use just one piece of white.

Reverse/flip/mirror the image you want to stamp (including the positioning), and print at highest quality/output onto your acetate. This only works with inkjet printers . . . I think laser pinters will probably actually print on the acetate.

Carefully place the acetate, ink-side down, onto your cardstock. The blurred effect in this photo shows what happens when you try to do this with one hand while taking a picture . . . it's best to use two hands. In this case, I printed everything on letter-size paper with a half-inch margin, to help with the alignment.

Transfer the image onto the cardstock by rubbing it. Depending on the effect you want and the detail of the image, you can use anything from a bone folder to your finger. My favorite: the top of my extra-large glue stick. However, only use one method. This is what happens when you get nervous and rub it a little more with your fingernail:
As you can see, how you rub on the image really makes a difference in the color coverage. Here's a better, more even version:
Here's the card I made with the images, for the September Sketch Challenge at Crafter's Digital Art Center (CDAC).

Sketch by Lauretta's Digital Stamps
Technique: Spotlighting (there's a great tutorial for true spotlighting at splitcoaststampers)
Birdie digi stamp by paperfacesdesigns
Supplies: Core'dinations cardstock, Stickles, ribbon from Target, HP printer, Recollections cardstock, Grafix clear craft plastic, ZipDry glue, pop-up dots

Tuesday, September 14, 2010

A lotus in my palm


This little piano-hinge book was inspired by my cousin Lisa, who shared a lovely quote from the Buddha with me when I was looking for another book idea . . .

seven truths
from
the Buddha

“Chaos is inherent in all compounded things. Strive on with diligence.”

“Three things cannot be long hidden: the sun, the moon, and the truth.”
“Do not dwell in the past, do not dream of the future, concentrate the mind on the present moment.”

“Hatred does not cease by hatred, but only by love; this is the eternal rule.”

“In a controversy, the instant we feel anger we have already ceased striving for the truth, and have begun striving for ourselves.”

“The foot feels the foot when it feels the ground.”

“It is better to travel well than to arrive.”

If I didn't understand that last one when I began making this book, I certainly did by the end.

Monday, September 13, 2010

Thursday, September 9, 2010

New Beginnings Challenge


This weekend I found myself Crafting with a Purpose, the purpose being trying to get myself out in the crafting blogosphere by entering challenges. The word "overwhelmed" comes to mind...the last challenge I did, late last night, actually used scrap paper that was on top of what used to be my crafting table, and now looks more more like an art school paper-only dumpster. It amazes me, sometimes, how only half of my life can be organized at a time.
So happily, I'm caught up sorta on my weekend goals. Maybe I'll actually do some housework! Gee, I'm so lucky to have a husband who not only enjoys cooking, but feels that my crafting messes are part of a wild, romantic ride.
Anyhoo, I'm entering my new rocking horse card in this week's Allsorts Challenge, "New Beginnings". To be honest, the idea came from my awesome Mom; I wanted to make a baby card for some friends, but I was feeling overwhelmed by the possibilities, so I called Mom and we bounced around some ideas. The one the stuck was the rocking horse card: as Mom said, "knowing you, it will actually rock!"

O. Yeah.
I found a free rocking horse cut file at SVGcuts, and liked it so much that I bought the set it comes from (thank you, Labor Day discount!). If you'd like the full SCAL file for this card, please email me (cgsayssomethingloudly [at] gmail [dot] com) and I'd be happy to share it (for personal use only).
Since I was making one of the cards for first-time parents, I wanted to add something a little...different. So I came up with "Rock On!" which tickles my bad-pun bone.

Halloween Treat Bag Challenge


Our design team member Natacha over at Scrapbooking, Card Making and Me! has a challenge going until September 20: Halloween treat bags. These are so adorable and, honestly, way to much fun to make. She's offering some yummy candy for the winner, so check out the challenge and please participate.
Here's my try...I used an eyelet instead of a staple because, well, I really love eyelets. The rough edges were created with my Fiskars deckle scissors, which I had been neglecting since I got my Cricut cutter. How adorable is Therese's Treat Kitty? I colored it with Sharpies and Sakura gel pens.

The treat bag tutorial is offered by Stamp My Art, and the digi stamps are from Paperfaces Designs. Therese is giving out a free digi stamp every Friday, so be sure to follow her blog.

Friday, September 3, 2010

Hip Shots: ComicCon Baltimore

On August 28, we braved the downtown parking rates to check out the 11th annual Baltimore Comic-Con. Although I love comic books and culture, I'm not always great in big crowds, so I like to feel that I something to "do." This time, I decided to try my hand at some "hip shots," a kind of photography that I learned about from my friend Mary, who's always inspiring me. Her friend Jim has a wonderful weekly series of "hip shots" at Doodlemeister.com, and I sent him some of my shots, which you can see here.
I'm very pleased with how the shots came out. These aren't just crowd shots or off-hand shots, they're really shot without focus from the center of the body. I call my "belly-button shots" because that's how I tended to hold the camera. I got some funny looks from passers-by, but you can get away with pretty much anything as long as you look like you know what you're doing.
Check out the Hip Shots, and then take a look at these photos by Mania.com from the same day. The Captain America I caught browsing the tables is on there, as are the Green Arrow/Black Canary couple that were in line behind us. Nice folks! I wish I had gotten a shot of the GI-Joe characters...some of them honestly looked like life-sized dolls.
As must be obvious, we had a great time. We picked up some artist trading cards, which I matted and turned into art for the living room. I think my photos represent our time at Comic-Con fairly well; after all this time, "contemplating my belly button" has finally paid off!
Thanks Jim and Mary!

Wednesday, September 1, 2010

Po'grrl Magic Picture Card

I tried my hand at a "Magic" or "Changing Picture" card, per the handy directions at SplitCoastStampers, but I don't have a good way to print/stamp onto acetate. I could have waited until this weekend, when I could pick up some transparency paper, but I didn't wanna.
So I made this version, which doesn't require marking on the acetate. And, like a good Po'boy sandwich, it winded up being relatively expensive and complicated, but Oh! so worth it.

I used Therese Travis's Decorative Cat digi stamp (
now available on Etsy!), and actually "printed" the image with Cricut markers on my Cricut Expression. I think it adds a "stamped" feeling.
To do something like this yourself, import your digi stamp image file into SCAL, size it, and then make a copy and apply "blackout". Ta-da, instant mask!


At first, I was just going to use bright colors, but then I saw the Midweek Throwdown Halloween Challenge at the Operation Write Home (OWH) blog and just had to make the card for this challenge. So much fun!


Supply list: Cricut personal cutter, Cricut marker, SCAL software,
Recollections card stock, Grafix clear craft plastic, JoAnn essentials eyelet, Offray ribbon, Sharpie markers, Crop-A-Dile 2, Zip-Dry glue. PaperFaces digi stamps: Decorative Cat.

Sassy Rudolph and Angel Rainie

As I mentioned in my last post, Therese Travis at Paperfaces Designs is rolling out her holiday images. She sent us several adorable digi stamps and svgs, but I just had to drop everything and use her Angel Rainie, who comes with her own reindeer.
I made a two-color (with gold "aging") easel card, and used brads to make the reindeer head and the angel wings move. I used "pop-up presents" to weight the easel. Here is the card laid flat:
And from the side:

Supply list: Cricut personal cutter, SCAL software, Core'dinations card stock, JoAnn Craft Essentials heart brads, Oriental Trading Co. jingle-bell brads, Offray ribbon, ColorBox gold ink, Crop-A-Dile 2, Zip-Dry glue. PaperFaces digi stamp: Angel Rainie.