Sunday, October 30, 2011

Coffee Chat Card with Jen's Dig Stamps and Pile It On

Another week, another fun challenge at Pile It On! Their challenges are extra fun because you're expected to add the theme onto other challenges. This also makes the blog a great resource for finding challenges. This week's challenge is sponsored by Jen's Digi Stamps, and the theme is "Keep Warm."

I volunteer at Pile It On, helping with the winners postings and whatnot, but as soon as I saw this cute image from Jen's Digi Stamps, this card idea popped into my my mind and I just had to play along with the DT! Their cards are always so gorgeous (wait till you see this week's projects -- wowza!), I'm so honored to be listed amongst them!

Here's my coffee card, made for the following challenges:
Pile It On #44: Keeping Warm
Aud Sentiments: Make Us Laugh
Card & Things: Color Challenge (Night of Navy, Old Olive, Bashful Blue)
Scrap-Creations: Digi image & paper


Stamps:  Jen's Digi Stamps, Stampin' Up!, digi paper from Create with TLC
Paper: Recollections, Hammermill, Core'dinations, Mark's Finest Papers, stash
Tools: Fiskars papercutter & punches, Cricut, SCAL, HP printer & ink, Martha Stewart scissors, Marvy heat tool & punch, awl, needle, Crop-O-Dile
Other: Copic markers, Sakura gel pens, Pink Paisley baker's twine, Recollections embossing powder & pop-dots, Versamark & Memento inks, Stampenous embossing powder, variegated floss, Sweet Petites ribbon

Saturday, October 29, 2011

Autumn Camus #3

This is my third card using this Albert Camus quote Wordart freebie from Paper Makeup (my first card is here and my second card is here).For my color scheme, I followed Color Throwdown #165: Pool Party, Peach Parfait, Daffodil Delight, Old Olive.

I printed the sentiment onto China Blue linen cardstock from Mark's Finest Papers. I love this stuff. The blue changes depending on the light; for example, in these photos it looks almost white but in my living room it's a baby blue.
As with my second card I used the Vase with Gerbera Daisy stamp SP & Company's For Every Woman set so I used masking to incorporate a leaf stamp. I then used a reverse mask (Thank goodness for adhesive masking paper! Worth every penny!) over the whole thing and heat-embossed some green polka dots onto the vase (I did this for the Polka Dots challenge at Less is More, but totally flaked on the deadline!). This was tricky, but I love the see-through feel.

Because I was making this for Less is More, I tried to keep it CAS (Clean & Simple), which is why everything's stamped onto one layer. This seems simple, but it's certainly doesn't allow for mistakes! I colored the details with Copics, and punched the corners with my Martha Stewart flower corner punch.


The photo is too bright, but all the interior mats are embossed with polka dots:

Autumn Camus #2

This is my second card using this Albert Camus quote Wordart freebie from Paper Makeup (my first card is here). I wanted to revisit the idea of a vase with leaves in it (which I've actually done in real life, but our leaves are all wet and yucky right now). I also wanted to make a card for the current Digi Makeover Challenge.
The only vase stamp I have, from SP & Company's For Every Woman set, comes with a Gerbera Daisy, so I used masking to incorporate a leaf stamp. I paper-pieced the vase, and, as you can see, got lots of mileage out of my Martha Stewart flower border punch! I made Shrinky Dink buttons and sewed them onto the card with orange thread.

I followed the current Mojo Monday Sketch, where I got the tag idea. Mom recently sent me a baggy full of mini tags with color-matched eyelets, so I tied one onto the card with baker's twine. I colorized some of the Wordart text color, and hand-colored the tiny leaf.

Inspiration:

Candy Corn Cards

I'm so happy to see that Therese of Paper Faces Designs is back blogging, and as soon as I saw her Candy Corn freebies I just had to make a couple of cards.

Therese was kind enough to welcome me into her Design Team last year, and being a part of that team with Jeannie & Natasha was really influential. The DT has disbanded for the time being, but Therese has lots of wonderful digi image & cut files on her blog for free and for sale (just send her an email if you see something you like). You can see my many Paper Faces Designs projects in my archives.

For the top card, I imported Therese's Candy Corn digi stamp into Sure Cuts A Lot (SCAL) and separated the pieces into layers. For the insides, I used her Candy Corn SVG cut file.

For the second card, I simply added a big hole to the front! This is something I've wanted to do for a while: there's a piece of black tulle stretched across the hole, and that's what the image is glued on.

On the backs of both I stamped little candy corns and then hand-colored them. I love the look, but man that's a lot of candy corn!


Card 1 Inspiration:
Sentimental Sundays Challenge #78: Halloween (with freebies; thank you!)

The sentiment is a freebie from Sentimental Sundays; it fit perfectly!


Card 2 Inspiration:


Friday, October 28, 2011

Autumn Camus #1

Paper Makeup recently offered a Wordart freebie with a lovely quote by Albert Camus: "Autumn is a second spring when every leaf is a flower." A sentiment so nice, I used it thrice! (Thank you Paper Makeup!) I'll be posting the other two soon.

This was the first card I made; I really wanted to make a vase with leaves in it, so I cut a vase with my Cricut using the Walk In My Garden cartridge, and added some stamped & colored leaves.I wasn't working with a set color theme, but the main images are on kraft paper, and the off-white background is a leaf-embossed cardstock.

The window element was actually an afterthought... it seemed like a nice way to set the scene, and it gave me a chance to incorporate the cute carved tree digi stamp by SJ's Little Musings (see more photos below).

I cut the window frame on the Cricut, but everything else was done with punches.

I'm entering this card into the Forever Autumn Oldie But Goodie Challenge as well as the Fall challenge at Celebrate the Occasion. One of the requirements at the Oldie bu Goodie Challenge is to use a stamp older than 6 months... I've had the tree digi stamp about 8 months, and the leaf stamps are years old!

That's my not-so-mini schnauzer Allen in the photo above. Here's the card closed:
And the inside:

Hope everyone is doing well. The weather is acting up all over the world it seems; sending you all warm, dry, and safe wishes!

Dia de los Muertos Lantern Box

I just had to take the Magical Box (also called an Exploding Box) challenge at City Crafter, and decided to make it extra magical by turning it into a Day of the Dead lantern. I'm also entering this into the Paperminutes Skeleton challenge, the 4 Crafty Chicks Paper Piercing challenge, and the Halloween challenge at Allsorts.

Here's the box, all closed up. It's 3.5 x 4.25 inches. I used K&Co. paper, some pretty ribbon, and orange flower tape. I found the images online: the skull on the left is by KitKat79; the one on the right is by Kate Pullen (About.com). I colored them with gel pens and then pierced them with my awl. I wanted big holes, so I used a piece of corrugated cardboard as the piercing mat.

This box has a surprise, in that it contains a battery-powered tea light:

The tea light is velcoed onto another box inside the main box:
The interior box's lid is decorated with Cockscomb flowers, which are traditional for Dia de los Muertos. I love these flowers (my husband's aunt in Mexico has some); they're wrinkly and fuzzy and bright. To mimic the fuzziness, I added flocking to each.

Then you remove the lid on the smaller box to reveal a Dia de los Muertos play set:

The items aren't glued down, so you can set it up however you like.

I put easel backs on the skeletons so that stand up:

I bought the little clay dish while visiting said aunt in Mexico this summer, and added decoration on it with gel pens. The tiny Mexican lime, cup, and vase are polymer clay. I decorated them with gel pens and Copics. The flowers are supposed to be marigolds. These type of dishes are common in Mexico, but I was also inspired by this photo of a Dia de los Muertos altar.

Inspiration:
Allsorts #126: Halloween


Update: This placed in the Top 3 for 4 Crafty Chicks Challenge #61: Paper Piercing. Wow, thank you!

Thursday, October 27, 2011

Goin' Wild...again

I totally fell for the stamp sale at Michaels this weekend, and one of the sets I bought came with a pretty flower that goes well with some tropical DP I have. So I whipped together this bright card!

Before we look at the card, I want to remind you:
  • Dude Time Doodles November New Release Blog Hop
    You'll laugh the whole hop through! Through November 1.
  • Pile It On Challenge #43: Be Happy
    Another fabulous challenge at Pile It On, sponsored by JellyPark. Through November 29.
Here's my card for the following challenges:
Stamps R Us Challenge: Nature's Gifts


Monday, October 24, 2011

Solid Gold.

Boy I am having a great week! I've done a lot of house-cleaning & baking, fueled by the excitement of winning last week's Triplicate Trials Tuesday Challenge as well as the GDT position for November at Dude Time Doodles. Whoop! I even managed to make a few cards, like this bright fellow featuring a sentiment from Paper Makeup Stamps and a vintage image from Beyond the Fringe Crafts.
Triplicate Trials Tuesday Challenge #11: Sketch + Hot Pink, Jet Black, Solid Gold + Theme: Modern, Chic, Art Deco, Graphic

Saturday, October 22, 2011

Wild Birthday

I have a subscription to Raisin Boat, the stamp rental company, and love getting to choose 2 sets a month to play with. This month, I got the wrong set in the mail and they got right back to me -- on a weekend -- and when they sent me the correct set they included some free baker's twine. Now that's good customer service!

I decided to make a card around the golden yellow-and-white baker's twine from Raisin Boat and the light yellow-and-white baker's twine that my Dilo en Español stamp set came packaged in. A celebration of good fortune!

The stamp sets I rented this month are What a Zoo! And What a Zoo Too! and I used both for this card. I chose the White, Turquoise + Yellow color combo and photo inspiration at Sketchy Colors. Following the Inchies theme at Kaboodles Doodles, I stamped the scene onto this lovely DP from 7 Gypsies, paper pieced it and added details with Copics & Sakura gel pens, and then cut it into 1-inch squares. I wanted to make sure that the paper piecing stayed in place when I cut it down, so I ran the pieces through my sticker machine. The inchies are popped with foam tape, and I ran baker's twine behind them. The sentiment are strung horizontally with baker's twine as well.

Totally coincidentally, both of the challenges I'm entering are numbered 89!

Inspiration:
Sketchy Colors #89: White, turquoise + yellow
Kaboodles Doodles Challenge #89: Squares or Inchies

Stamps: Raisin Boat, Hero Arts
Paper: Recollections, 7 Gypsies, stash (mostly scraps)
Tools: Fiskars papercutter & deckle scissors, Cricut, SCAL, Martha Stewart scissors, Marvy heat tool, Xyron sticker machine
Other: Copic markers, Sakura gel pens, baker's twine, Recollections embossing powder & pop-dots, Versamark & Memento inks

Friday, October 21, 2011

R.A.D. Card

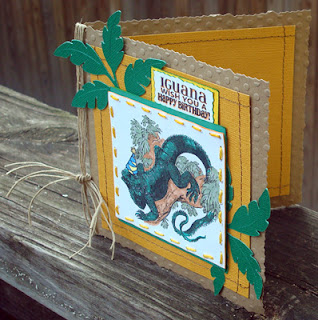
Happy Reptile Awareness Day (R.A.D)! I wonder why it's a day of awareness instead of appreciation? Does one need to be reminded to check oneself for reptiles on a regular basis?!

I am very reptile-aware, being the proud owner of an 11-year-old green iguana, Percy. He's the pride of the family, truly!

I found out about this Day via the current challenge at Die Cutting Divas, and made a point of visiting TLC Creations today because she always has freebies for Specials Days. She certainly didn't disappoint! I just had to use her vintage image & sentiment digis for the DCD challenge. For the layout, I went to the current sketch at Card Positioning Systems.
I whipped this up pretty quickly! I designed the front pocket & tabbed insert in SCAL, and used Cricut's Paper Dolls cartridge for the die-cut leaves. The insert has a photo of Percy himself:

Invaders, possibly from Space!

Don't you just love it when a card comes together? I received the Computer Fun Lili of the Valley rubber stamp for my birthday (thanks Mom!), and thought it would go perfectly with the paper from my Smirk for Men set. I've had the Space Invader stamp for years (well, my husband has; Mom gave it to him. Thanks again Mom!), and the little cut-outs are from a card set I designed last year for my husband's birthday.

This card was also inspired by the following challenges:

Tuesday, October 18, 2011

Felicidades

I made this card for my best friend, who's birthday is coming up, and was inspired by the following:
  • Sketch Saturday
    I rotated the sketch 90 degrees.
  • Lili of the Valley Challenge #116: Warm & Cozy
    I love this stamp by LOTV! Few things are as cozy as curling up with a book. I also added a bookish surprise on the inside (see photos below).
  • Die Cut Dreams Challenge #100: Use a Poem on your card
    I couldn't pass up this challenge! The poem I chose, In the Desert by Stephen Crane, is my friend's favorite.
  • Use It Tuesday Challenge #17: Metal
    Brads & nameplate are long-hoarded and metal!
  • Paper Crafting Journey Challenge #21: Orange, Black & White
    I had lots of fun with the paper. The striped & dotted papers are Echo Park, and the embossed/sanded layers are Black Magic cardstock from Core'dinations. The white linen paper I used for teh mini card, newspaper piece, and sentiment is actually the card I got with gift cards from AC Moore (a lovely present from my awesome mother-in-law!). Talk about upcycling!


Stamps: Lili of the Valley, Dilo En Español, Tiddly Inks
Paper: Recollections, Core'dinations, Echo Park, Hammermill
Tools: Cricut, SCAL, Cricut markers, Fiskars papercutter, HP printer & ink, InDesign, Tim Holtz paper distresser, Sizzix Texture Boutique, Sizzix & Cuttlebug embossing folders, awl, sandpaper, Martha Stewart scissors & punches
Other: Copic markers, Sakura gel pens, metal brads & nameplate from stash

Monday, October 17, 2011

Celebrating Autumn

I was introduced to Shadowbox cards by the Stampin' Dymonz Scrap Shack Cardmaking Group, and this is my second attempt (here's my first). I thought it would be a great way to combine this wonderful Fall Fence image by Shelly's Images with the whimsical Fall by Karen's Doodles.

Also also used a couple of leaf freebies from Shelly's Images, which I imported into SCAL (my cutting software). I "printed" them on my Cricut Expression using a brown Cricut marker, then used it with the blade to cut them out (I created a "shadow" layer in SCAL).

Here it is folded closed, and here it is pulled open:
You can see that the fence moves to the right. There's also a braided hemp rope going over the right fold. I also ran my embossing tool over the "veins" on the leaves. Dr Sonia and others have really been inspiring me to try that, and it does look good!

Here's the back, with this sweet First Day of Fall image from TLC Creations:
Inspiration:
Delightful Challenges: Colors of Fall

Shadowbox Card tutorial: Splitcoast Stampers

Digi stamps: Maple Leaf, Oak Leaf & Fall Fence by Shelly's Images (thank you!), Fall by Karen's Doodles, sentiment & image on back by TLC Creations (thank you!)
Paper: Recollections, stash, Hammermill
Tools: Cricut, SCAL, Cricut markers, Fiskars papercutter, finger knife & deckle scissors, HP printer & ink, InDesign
Other: Copic markers, Sakura gel pens, hemp twine

Friday, October 14, 2011

Quilted explorer

For my birthday (34, my goodness ... I'm just getting started!), Mom bought me some Lili of the Valley stamps and die cuts, and I'm been itching to use some of the adorable little boy stamps! The Little Pirate and Sleeping Reader make a nice set.

In order to use two stamps on one card, I decided to make what I'll call a Notch Swing Card. The concept is simple: secure a piece of paper slightly larger than the cut-out space by cutting small slits, or notches, in both. I put this card together in SCAL, and if you'd like to try it you can download my SVG files via the link at the bottom of this post (please leave a comment if you do).

I couldn't resist making something for the Columbus Day challenge at CCEE Stampers ("Make a card with a ship, ocean, or anything that relates to this day."). I grew up near Puerto de Santa María, where Columbus set sail for his second voyage to the New World. For seven years, I spent Columbus Day with the Girl Scouts, trekking to the church where he prayed before his voyage. Columbus Day isn't very popular in the States these days, since people doubt his "discovery" legacy, but I've always enjoyed the lesson of Columbus: Follow your dreams; They might not lead where you imagined, but it will be a great adventure.

The background was inspired by the Photo Inspiration/Use Your Scraps challenge at DYSU. Not only are the colors in the photo example beautiful, I liked the idea of using up my scraps to create a quilted feeling.

I sewed on the buttons, and I'm entering this into the Button Up! challenge at Divas by Design. I stamped & colored the images on Hammermill cardstock, fussy-cut them, and glued them onto the blue linen paper.

Here's card closed flat:
Here it is winging open one way (see photo at the top of this post for the view with it swing the other way):
I put the message section on the back so that the inside served as a sort of background for the front. Here's the inside:
And here it is open from the back:
Inspiration:
CCEE Stampers / CCEE1141: Columbus Day
DYSU #41: Use Your Scraps + Photo Inspiration
Divas by Design #12: Buttons
Stamps: Lili of the Valley
Paper: stash (scraps), Hammermill, China Blue Eyes Linen Finish Card Stock from Mark's Finest Papers
Tools: Fiskars papercutter & deckle scissors, MS detailing scissors, Marvy heat tool, sewing machine
Other: ZipDry glue, Simplicity thread, Recollections embossing powder
Copics: E13, YR00, E35, E31, E47, E37, YR09, B18, B39, B32, B23, B00, BG15, BG10, RV11, YG67, YG63, G99, G07, YG03, YG41, Y000, YR31, YR12 (I also used YR12/Loquat for all the edging)

Download card cut files (svg)

Thursday, October 13, 2011

Shakin' it up for Dia de los Muertos

I so fun much making a shaker card with these cute stamps, that I had to try it again with this lovely sketch from Addicted to Stamps.
I'm also entering this into the Halloween challenge at Drunken Stampers.
Inspiration:
Addicted to Stamps Challenge #14: Sketch

Stamps: Studio g, Queremos Pastel set from Dilo En Español
Paper: Recollections, Core'dinations
Tools: Fiskars papercutter & deckle scissors, stamp block, MS detailing scissors, Marvy heat tool, awl, Cricut, SCAL, Sizzix Texture Boutique & embossing plate
Other: ZipDry glue, Recollections adhesive rhinestones & micro beads, Versamark inks, Copics, Sakura & Elmer's gel pens, Studio g ribbon, Shake It set from Impression Obsession, Stampendous, Recollections & Speedy the Cat (from Mark's Finest Papers) embossing powders, flowers from Sandra