 So one of my blogging buddies, Anne-Marie of Little-Applefalls, always leaves me the most ego-boosting & funny-bone-tickling comments, and she said this in response to my recent purple-themed card: "Purple....ok....I'm tryin' to like the colour....er...still tryin'....nope, can't do it....BUT...love the ickle birdhouse...lol! So....nuff with the purple, girlie!" Sorry sweetie, too late!!! So Anne-Marie, my challenge to you is to make something all in pinks 'cause I can't get into that color! Like many of you, I've gotten caught up in Holiday card challenges, and this week there's a nice group of choices that I pulled from for this project: I think one of my favorite things about the color purple is that it doesn't occur frequently in nature ...it's closest to Violet, but that's just sorta between Indigo and Blue... It's also the shared favorite color of myself & my husband, so it makes me feel good. I've enjoyed its incorporation into the Christmas Colors; as soon as I saw this Bugaboo image, I just saw her all dressed in purple! There's something so royal about purple...and red...and green!
 As I mentioned at the beginning of this post, I bought paper especially for this project. I don't usually do that; I like to work with what I have. But I didn't have any real purples of anything (it's my favorite color, but I don't often craft with it). So I grabbed 3 different sheets for about $1.50 all together, and I think I made good use of it! Plus, I have some scraps for a future purple-themed project...Anne-Marie, I'm sure you're looking forward to that, ha ha!
I also took a cue from last week's Christmas Card theme at SDSS -- Make your own backing paper -- and made some complementary paper by spraying Haunted Shadows glimmer mist onto regular cooking parchment from the kitchen (Honey, remind me to put it on our shopping list before we bake anything!). I let the spray-ink dry for 10 minutes or so, then dried the parchment with my heat tool. There were still large dots of ink, which I mashed down by placing a paper towel on top on it. Those dots became the lovely soft glitter color. Then I folded a small piece as if I were wrapping a package. Stamps: Bugaboo Digital Stamps (thank you!)
Paper: Recollections, Brazzill, Hammermill, kitchen parchment
Tools: Martha Stewart border punch, Fiskars papercutter, Sizzix Texture BoutiqueOther: ZipDry glue, ATYOU Spica glitter pen, Sakura GellyRoll pen, Simplicity lace, Tattered Angels glimmer mist, English Christmas gift wrap ribbon (thanks Sandra!), Sprite can, Around the Block brads, Polar White FlowerSoft
Copics: E000, E13, YR01, E17, RV02, BV02, BV00, BV000, B63, V17, BV04, BV08, V06
 In case you haven't heard yet, TLC Creations is having a contest to celebrate its first year on the Crafter's Digital Art Center (CDAC). [It took me forever to put together that the hostess for the CDAC group is none other than the Purple Card Lady.] It's a fun challenge: you choose from 2 digis and come up with a sentiment for it. Winners will have their sentiments transformed in Paulette's beautiful wordart. I didn't want to over-think this, as we only have 3 days until the deadline, so I made this quick card (but truly heart-felt) with some of my favorite papers. Can't wait to see everyone's projects!
 Inspiration: TLC Creations at CDAC 300 Member Party & 1 Year CelebrationImages & Linky: Create with TLCRules: CDACStamps: Vintage Learn to Walk by TLC Creations (for contest)Paper: Core'dinations, Graphics45, Five&Dime, HammermillTools: HP printer & ink, Marvy heat tool, Fiskars papercutter & punch, Marvy punch, Crop-O-Dile, Tim Holtz paper distresser & scissorsOther: ZipDry glue, Stampendous embossing powder, Versamark ink, AtYou Spica glitter penCopics: B05, B23, B32, B00, B0000, YG63, YG41, YG67, G21, YG03, RV11, E13, YR01, YR31, E50, E000
I simply couldn't pass up coloring this yummy Just Inklined freebie for this week's CDAC Sketch challenge. In my family (and, happily, also the family I married into), there is nothing more inviting than fruit, cheese & wine. They represent the sweetnesses of life: youth, caregiving, and experience. Inspiration:
CDAC Sketch Challenge 26, sponsored by Just Inklined
Stamps: Digital stamp by Just Inklined, sentiment by TLC Creations
Paper: Hammermill, Recollections, Core'dinations
Tools: InDesign, HP printer & ink, Sizzix Texture Boutique, Fiskars papercutter, Marvy heat tool, Recollections punch, hand-punch, MS detail scissors
Other: ZipDry glue, Offray ribbon, ZING embossing powder, Versamark ink, sandpaper
Copics: 0, G02, YG41, YG03, YG63, FY1, Y02, Y000, C-1, C-5, E000, E50, E51, E02, E31, E33, E35, E37, E47, E17, R27, R59, B0000
 After the creative whirlwind last week that was the Stampin' Dymonz 10-day Tag Challenge, I'm having some trouble going back to good ole cardmaking! As always, there is plenty of inspiration at this week's CDAC challenges. I started with the Embellishment challenge sponsored by Shannon's Sentiments & the Sketch Challenge sponsored by DigiDrawn. Not only did I have a great time making them, I'm very happy with how they came out.
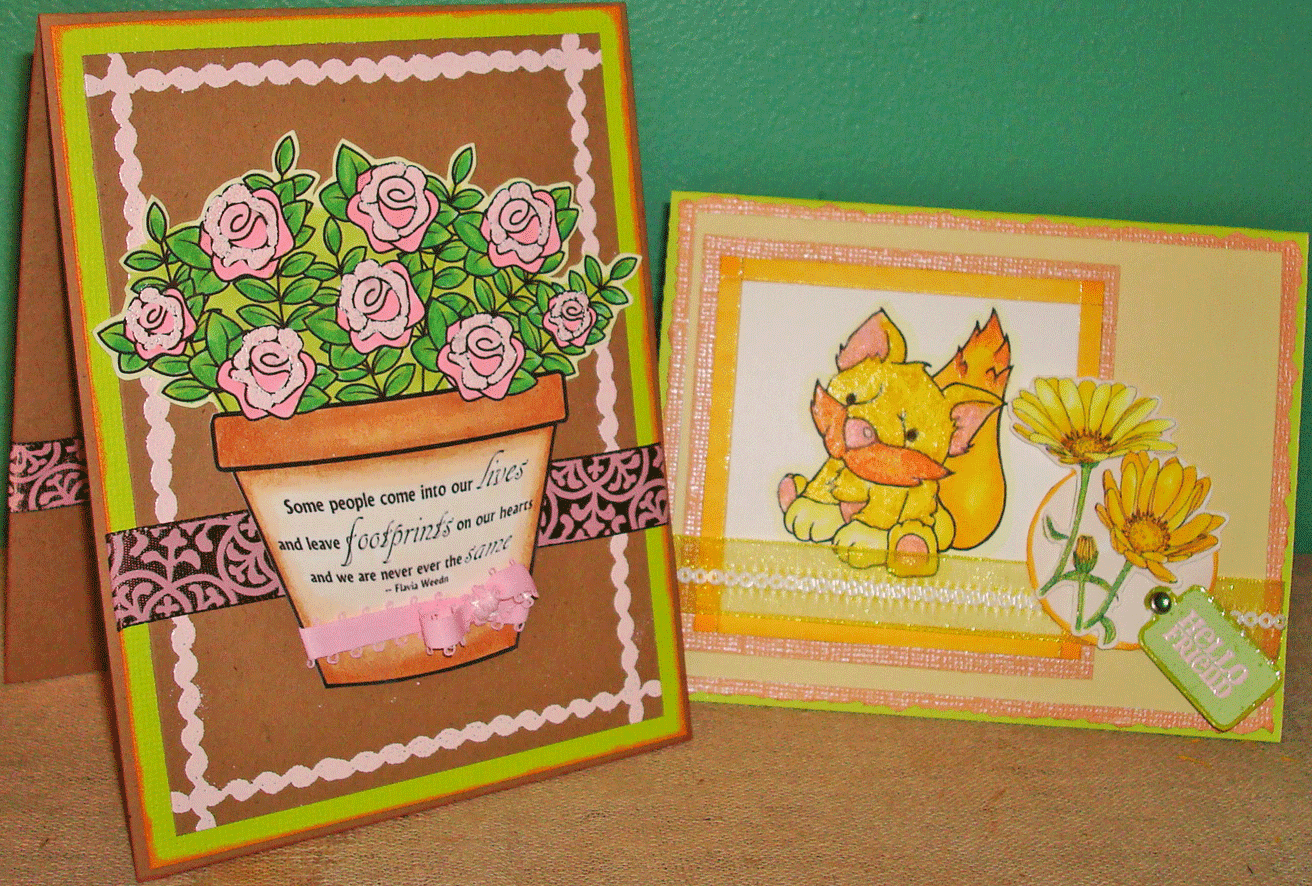
  For this card, I tried my hand at "warping" the sentiment in Photoshop, with okay results. I need to practice that.... I added some pink, heat-embossed detail to the flowers by using a Versamark watermark pen.
Inspiration:CDAC Embellishment Challenge sponsored by Shannon's SentimentsSupplies: Digi stamps by Shannon's Sentiments (thank you for the freebies!), silicon border stamp by My Mind's Eye, Recollections, Brazzill and Hammermill cardstocks, Celebrate It and Offray ribbons, ColorBoz pigment ink, ZipDry and ZIG glues, Fiskars papercutter, MS detailing scissors, Versamark watermark ink, Stampendous embossing powder, Adobe PhotoShop & Indesign, HP printer & inkCopics: Y000, Y08, Y17, Y04, E02, RV21, YR04, YG03, G07, E000
 Despite appearances, part of this Sketch challenge was K.I.S.S. (Keep It Simple Silly), and I kinda did. You know, kinda. I really wanted to use the freebie Daisy image by DigiDrawn for the corner element, so I used her Fox digi to complement it.Inspiration:CDAC Sketch Challenge sponsored by DigiDrawnDigi stamps: Fox and Daises by DigiDrawn (thank you for the freebies!)Supplies: Hammermill cardstocks, Celebrate It ribbon, Versamark watermark ink, ZipDry and ZIG glues, Fiskars papercutter and deckle scissors, MS detailing scissors, Pop-dots, Stampendous fun flock and embossing powders, Adobe PhotoShop & Indesign, HP printer & ink, Recollections bradCopics: Y000, Y08, Y17, Y04, E02, RV21, YR04, YG03, G07, E000
 I have at least four projects I need to complete like yesterday, so naturally the other morning I found myself looking at the new CDAC challenges and ended up spending much of the day having a blast with their Embellishment Challenge (and its freebie!) sponsored by Stamp-n-doodle. The card just came together all at once, but it then took me a few days to complete this post!The challenge is to "fill your project with embellishments - pinks, purples, glitter, flowers, break out your faux pearls, shiny stones, etc." and I'm not sure how well my card applies to the challenge...but this is where my ideas took me. Oh, and I don't have many of the aforementioned embellishments, which was also a major issue!Hopefully this sweet poodle skirt (dress?) cut file counts as an embellishment! As soon as I saw this image by Stamp-n-doodle, I just knew I wanted to cut some poodle skirts! I can't believe this beautiful file was a freebie; I edited it just a bit, in that I cut a separate poodle (I had to cut out the path points on the leash in SCAL...there's gotta be an easier way?) and put a slight "shadow" on the leash to make it a bit easier to cut out.
 This wonderful image put me in my mind of the first Grease movie; if you've ever done much local theater, no doubt you've seen a version or two of the musical. My favorite song is "There are Worse Things I Could Do": "...I could hurt someone like me / out of spite or jealously. / I don't steal and I don't lie / but I can feel and I cry, / a fact I bet you never knew. / But to cry in front of you... / That's the worst thing I could do." Rizzo always seemed to me as a slightly better role model for the young woman than Sandra Dee's hopeless devotion, in the grand scheme of things.Inspiration:CDAC Embellishment Challenge: We are going GIRLY!Digi stamp: 50s Dreamin' by Stamp-n-doodleCut files: Poodle Skirt by Brittany's SVG FilesSentiment border: Guitar Hero set by StudioGSupplies: Core'dinations glittered cardstock, DCWV paper, Offray ribbon, Recollections cardstock & border punch, ZipDry glue, MS deatil scissors, Fiskars papercutter, tulleCopics: E000, E02, E50, E51, E31, E33, E17, Y17, RV21, RV23, V06, V17, C-1, YG63, YG67, FB2, FRV1, FYG1
 Update 5/5/11: This card was awarded this badge from the CDAC Dream Team. Thanks ladies!
 I couldn't resist trying the Copic Family Challenge at Mad for Markers: you can only use YR, RV and BG Copics. I have 12 markers that qualify, and I really like the resulting combinations.I also couldn't resist combing the CDAC Sketch challenge (sponsored by Shelly's Images) with the Easter challenge at Catch the Bug (Bugaboo's challenge blog). I wanted to use the freebie Shelly offered for the CDAC Embellishment challenge (sponsored by Bugaboo), so I did a little swapping. I'll post my other project soon.Although this isn't my card for the Embellishment challenge, I did keep with the theme of Favorite Emebllishment and used eyelets. This is also my first try with plastic tape. Worked great!
 As you can tell, I had some fun with the backgrounds. The edging was done with the chisel tip of a Copic against a ruler. The bunny's background was a new-to-me technique: using the Copic Colorless Blender liquid to create texture on colored pieces. Eek, what a cool technique!!! Instead of coloring the background with my marker, I applied BG10 solution with sponge (I've ended up with two big refills for that color!). I used terrycloth for the texture. For get a similar look on the bigger piece without using copic ink, I applied Marigold Distress Ink (thanks for the candy Stampin' Dymonz!) with the same kind of terrycloth.I actually learned quite a bit making this card; thanks to everyone for the continuing inspiration!Inspiration:CDAC Sketch Challenge (sponsored by Shelly's Images)Mad for Markers Challenge: YR, RV and BG Markers onlyCatch the Bug Challenge: EasterDigi Stamps (thank you!):Easter Bunny with Tulips: Bugaboo StampsEggs: Shelly's ImagesCopics: BG10, BG49, FBG2, RV29, RV04, RV23, RV21, RV42, YR01, YR00, YR09, YR12Supplies: Colorbök decorative tape, Hammermill cardstock, flower brads (Oriental Trading Co.?), Crop-O-DileII, ruler, terrycloth, Copic Colorless Blender Solution, Scotch foam tape, ZipDry glue
 Wow, I had a super duper weekend! I met lots of new crafters thanks to Stampin' Dymonz Scrap Shack's Mad About Paper Blog Hop, and find myself with several new followers. Helloooo everybody!
 I didn't do really any challenges last week, so this week I decided to start anew with the sketch challenge at CDAC and the color combo at Color Throwdown. The freebie Butterfly digi stamp offered by McMahon Five Designs for the CDAC challenge really lent itself to this lovely palette. Thank you!
Since I was working digitally anyway, I took the color combo image into PhotoShop and matched the colors: I used the eyedropper to grab the color and then put it as a color overlay onto the butterfly (Layer/Layer Style/Color Overlay/Screen mode). I always printed butterflies in the combo colors onto the inside of the card.
 I was inspired to try stacking differently colored layers by Anne Baity on CDAC (here's her incredible cherry blossom card on CDAC; I'll post her blog if I can find it.)I used physical stamps for both the tag and and the sentiment, which was super fun. The sentiment is also clear-embossed, because why not!


 Digi stamp: Butterfly Breeze by McMahon Five Designs
Inspiration:
Color: Color Throwdown #133Sketch & image: CDACsc19Supplies: Paper Studio. Brazzill and Core'dinations cardstocks, ZipDry glue, embroidery thread, StazOn ink, Martha Stewart chalk ink and detailing scissors, CraftSmart(?) scalloping scissors, Crop-O-DileII (for border on plum pieces), SCAL & Cricut, 09KutUps font (for scalloped circles), Adobe PhotoShop & InDesign, HP printer & ink, emery board, pop-dots, Copic markers for (coloring pop-dots)
I ran across Crafty Ann's Digi Stamps when I bought her adorable Easy Chair for some Holiday Thank-you notes, and was later pleased to see that she's also on the Crafter's Digital Art Center (CDAC). So I was really excited to see that Crafty Ann's is hosting this month's CDAC Color Challenge, and is offering a lovely freebie for us to use. The challenge is to use purple, lilac and pink, which aren't usual Chinese-theme colors, but boy are they gorgeous!This project overlapped with the arrival of a box full of crafting goodies from my mom, including Chinese-inspired stickers and a TON of glitter mist. I really had a tough time not using all my pretty new stickers (did I mention they are glitter-embossed?!), but I really wanted Crafty Ann's Good Fortune Lantern the star. I guess I could have omitted the use of stickers all together, but I couldn't pass up this lovely frame. I know that it sorta messes up the color scheme, but I just really like how it works!As for the glitter spray, it's all over this project! I stamped the lantern pattern in three shades of purples onto pink cardstock, and then gave each corner a spray of purple. I used the same spray to color the lantern. First, I printed the image onto vellum and then clear-embossed it. Boy, that works great! Many thanks to CDAC for the tutorial. Then I sprayed it (before cutting it out), and added details with gel pens. I also added a little color with Copics onto the back of the piece.I think my favorite part about this card is all the texture. It's lovely to look at, even better to touch! Inspiration: CDAC Color Challenge cdaccc19: purple, lilac & pinkDigi Stamp: Good Fortune Lantern by Crafty Ann's Supplies: HP printer & ink, Recollections and DCWV cardstocks, Recollections vellum, MS detailing scissors, ZipDry glue, Fiskars papercutter, MS and ColorBox inks, Inkadinkado stamp, Tattered Angels glimmer mist (Haunted Shadows), Elmer's and Sakura gel pens, Copic markers, Sparkling Embossed sticker by Joy!Crafts
The Crafter's Digital Art Center (CDAC) is celebrating reaching over 5000 members with a bunch of giveaways and contests. Check out all the yummy stuff you could win:
 So click on over to CDAC and check it out. If you're not already a member, I highly recommend joining the fun. I've learned lots from this group, and know you would too.
 Don't get me wrong, I must have a certain amount of confidence to enter—what is it now?—seven challenges a week, but sometimes the enormity of the talent out there weighs on me. You know how it is: You're standing in the kitchen with your glasses fogging up from the heat of the embossing gun and you think to yourself, Perhaps I should leave this to the professionals. But then you suck on your fingers and remember how good it feels to sound your barbaric yawp over the blogs of the world...
The Midnight Madness Sketch Challenges by priscillastyles especially make me feel like this, which is in fact a compliment. So many talented people inspiring so many talented people! But I find myself entering their challenge week after week, I guess because of that yawp thing I mentioned earlier (original quote from Walt Whitman.) I still feel very green and creatively raw when it comes to cardmaking, but challenges like these help me develop my skills and keep me happily occupied. Thanks to all who've peeked at my cards! and especially thanks for commenting.
Anyhoo, I had lots of fun with this week's sketch:

 I've really taken to coloring stamps on vellum, because it's a bit easier to keep within the lines and the end result really pops. I read about this technique somewhere in the blogosphere, where you color on the back of stamped vellum. I also broke out my brand new mist, and I'm hooked. I used painter's tape to mask the main stamp and spray on the mist background. It worked so well I couldn't believe it.
I choose a green/brown color palette because I'm in a flowery mood but can't separate myself from the autumn tapping on my window.
Inspiration: Midnight Madness Sketch Challenge #78
Stamps: Russian Dolls & Flower Circle Border by Hero Arts; silicon stamp by gstudio
Supplies: Tsukineko walnut ink antiquing solution (Eucalyptus); Recollections cardstock & vellum, StazOn brown ink, Marvy & American Craft paint pens, Copic markers E33 & E35, Tim Holtz scissors, Fiskars papercutter, Cricut personal cutter, SCAL2 software
 When I started my love affair with piano-hinge books, my biggest challenge was how to neatly double-side on pages that were between one and three inches. Ol' Bessi, my 10-year-old HP 3-in-one InkJet printer, actually does a fairly good job at double-siding, but it's always a crapshoot whether it will work. Honestly, that's the truth across the board in printing. Printing truly proves chaos theory, if you ask me. Also, I needed to cut the pages on my Cricut personal cutter, and there was no way I would be able to do that many times in a row with less than 1/16 inch margin of error. It would be easier to hand-cut the pages in that case, but I didn't want my books to be that handmade. Anyhoo, during the same time I was trying to make a magic picture card with a digi stamp, but the image just wouldn't dry on the acetate. So, in a classic "You got chocolate on my peanut butter!" moment, I realized that I had in fact created a way to stamp the image. I know, I know, what's the point of stamping an image that is printable? Gee, where's your imagination? It adds a completely different effect, plus it totally solves my book printing problem.
The above image, from my poemoir "The Door Won't Stop It", shows my first attempt at stamping the text onto the pre-cut pages. It's basically digital letter-pressing.
This method works perfectly for my needs, so I decided to try it with a full-color image. The results are mixed, but it's so much fun that I thought I'd throw together a quick how-to:
 You don't have to do this, but I pre-printed the sentiments and backing papers onto cardstock first. It just worked out that I was able to use just one piece of white.
 Reverse/flip/mirror the image you want to stamp (including the positioning), and print at highest quality/output onto your acetate. This only works with inkjet printers . . . I think laser pinters will probably actually print on the acetate.
 Carefully place the acetate, ink-side down, onto your cardstock. The blurred effect in this photo shows what happens when you try to do this with one hand while taking a picture . . . it's best to use two hands. In this case, I printed everything on letter-size paper with a half-inch margin, to help with the alignment.
Transfer the image onto the cardstock by rubbing it. Depending on the effect you want and the detail of the image, you can use anything from a bone folder to your finger. My favorite: the top of my extra-large glue stick. However, only use one method. This is what happens when you get nervous and rub it a little more with your fingernail:
 As you can see, how you rub on the image really makes a difference in the color coverage. Here's a better, more even version:
 Here's the card I made with the images, for the September Sketch Challenge at Crafter's Digital Art Center (CDAC).
 Sketch by Lauretta's Digital Stamps
Technique: Spotlighting (there's a great tutorial for true spotlighting at splitcoaststampers)
Birdie digi stamp by paperfacesdesigns
Supplies: Core'dinations cardstock, Stickles, ribbon from Target, HP printer, Recollections cardstock, Grafix clear craft plastic, ZipDry glue, pop-up dots
![cg says [something loudly]](https://blogger.googleusercontent.com/img/b/R29vZ2xl/AVvXsEj0FPmCZqXj2-YcQaqnchsA3zKcMX4MIsNrt-Q1wM9gJSyUJH_a6g_V1m_JKR0tKEOGU6F1AFBv8al43phB58tEMIPcT3G0wXzmJpswV9I5mFB7zOhpv8a8dpEAR6i9uS0mkOQKp_pC6PE/s1600/blogheader.gif)
 So one of my blogging buddies, Anne-Marie of Little-Applefalls, always leaves me the most ego-boosting & funny-bone-tickling comments, and she said this in response to my recent purple-themed card: "Purple....ok....I'm tryin' to like the colour....er...still tryin'....nope, can't do it....BUT...love the ickle birdhouse...lol! So....nuff with the purple, girlie!" Sorry sweetie, too late!!! So Anne-Marie, my challenge to you is to make something all in pinks 'cause I can't get into that color!
  As I mentioned at the beginning of this post, I bought paper especially for this project. I don't usually do that; I like to work with what I have. But I didn't have any real purples of anything (it's my favorite color, but I don't often craft with it). So I grabbed 3 different sheets for about $1.50 all together, and I think I made good use of it! Plus, I have some scraps for a future purple-themed project...Anne-Marie, I'm sure you're looking forward to that, ha ha!


