Friday, May 24, 2013

Always Let the Wookiee Win

I had so much fun making my Sewing Kit Matchbox that I just had to make another similar project, so I made this Galaxy Paper Tots matchbox playset.


I think my favorite part of all of this is the tiny "Wookiee" covered with Flowersoft!
The ship is double-sided, and has a little wooden clip glued to it, so that it can be attached to the box.


The theme this week at Drunken Stampers is "Star Wars," and I was especially inspired by DT member Donna's "Storm Pooper" card. Oh my gosh, pop right over there and check out the cuteness! She used images from Kiki & Company's Galaxy Paper Tots set, so you know I had to buy it (I've made Star Wars projects in the past)!  

The images come as a PDF, but I did resize it; hope I don't get into too much trouble for that...Kiki, I just had to make tiny dolls! These are about 1.25x1.25 inches. The matchbox is 2x2.5 inches.


The outer wrap is a shiny blue cardstock, embossed Kaleidoscope glitter powder with stars from a wine cork stamp made with wooden star shapes from the same pack I used for the stars on the front of the box (see above). I painted those wooden stars with a white glaze pen.

The slide-out box is made from a shiny silver paper (all the paper used in this project is Recollections brand), and the inside layer is embossed with a Tim Holtz embossing folder.


The images were printed on the back of a shiny white paper; I printed it at "best quality" and am very pleased with the quality.

To make the characters interactive, I made a triangular base out of a light yet durable gold paper. I folded it so that it could fold flat, or as an easel, or open completely to fit as finger puppets:


The images are all pre-colored, but I added detail with glitter and glaze pens. I think a child would have great fun with this, but the kids will have to come to us for now because I'm not sure I can part with it!

Inspiration/Challenges:
Drunken Stampers Challenge #128: Star Wars
Jellypark Challenges: Get your Geek On
Loves Rubber Stamps #53: Anything But A Card
Stamping Sensations May Challenge: Embossing and Texture
Top Tip Tuesday Challenge 101: Make a clever box


Update: This project was chosen as "Life of the Party" for Drunken Stampers Challenge #128. Thanks ladies, margaritas all around!

Update: This was chosen as a "Top 3" for
Top Tip Tuesday Challenge 101. No one can resist that Wookiee!


Update: This was also selected as a "Top 3" for Jellypark's "Geek" Challenge.
Thank you for visiting, and may the force be with you!

Sunday, May 19, 2013

Keep Calm & Ask Mom

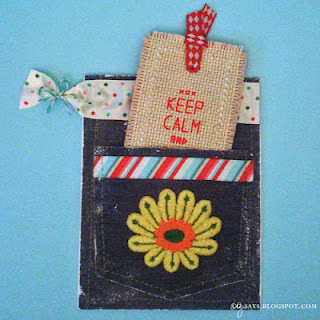
This week at Pile It On we're challenging you to use Fabric and/or Felt on your creations. I decided to use the opportunity to incorporate a cross stitch project into my cardmaking, with this pocket card and interactive bookmark:

I designed the cross stitch pattern using a background grid in InDesign. It's stitched with 2 strands in bright red DMC embroidery floss onto Oatmeal 14-count Aida cloth. It's pretty easy to stitch, as I mostly did the stitches over 2 rows (it didn't look so great in single stitches).

The Jean-patterned paper is from my stash; gee, I've had that for years and years! I made my own template for the pocket, and sanded both pieces with my Prima distressing tool. I added machine stitching to both pieces, but the pocket is adhered with double-sided tape.


It's difficult to see, but there's a white border on the front of the tag, cross stitched directly onto the red backing. Kinda tricky! but worth it.


When I showed my husband the bookmark/tag, he wondering if we could Velcro something to it, as he's using Velcro at work and once you use it you want to use it everywhere! This was a perfect suggestion, as I have some patches with Velcro on them in my stash. I put some adhesive Velcro on to the pocket, so you can switch around the pieces. 

Here's the back of the tag, with two Velcro-backed patches stuck on it.


Inspiration/Challenges:
Charisma Cardz #19: No Digis Allowed
The Crafter's Cafe Challenge: Mother's or for a female
Inspire Me Fridays #103: Anything Goes
Mema's Crafts Monday Challenge: Anything Goes and/or Mother's Day and/or May Flowers
Paper Shelter Challenge #112: Anything Goes
Squigglefly: Use a Pocket
Stamp n Doodle: Anything Goes
Stampotique Designers' Challenge #100: Anything Goes
WordArt Wednesdays: Anything goes + encouraging uplifting sentiment

Update: This was featured at Inspire Me Fridays. Thank you! I'm so honored to be in amongst the fabulous projects.


Thank you for visiting,

You're so sweet!

Time for a "Use a Digi" challenge at One Stitch at a Time (OSAAT)! If you're like me, you have tons of fabulous digis that are just wasting away on your hard drive!

For this card, I used Birthday Girl 1 by BBKakes; there's also a "boy" version. Isn't this just too cute‽


The cake and sentiments are actually polymer stamps from my stash. I used Liquid pearls for the borders.

Inspiration/Challenges:

4 Crafty Chicks #142: Birthday
Alota Rubber Stamps: Childhood
Bastel-Traum: Birthday
Crafts 4 Eternity Recipe Challenge #124: Sweet Tooth
Hobbycutz: More than one Fold
Pumpkin Spice #20: Candy or anything sweet
Simply Create Too #37: Anything Goes
Sister Act Card Challenge #7: Always Anything Goes
Stempelsonnen Challenge: In/from the bakery

Update: This placed in the Top 3 for Crafts 4 Eternity Recipe Challenge #124. Thank you!

Hope you'll join the Use a Digi challenge at One Stitch at a Time this week (and be sure to check out my teamies' fabulous projects)! Thank you for visiting,

Friday, May 17, 2013

Sew Buttons! matchbox sewing kit

Although I usually focus on cardmaking, I've made a few matchbox projects & recently got into embroidery. This project brings the two together! The box holds some pins, a tapestry needle, and a needle threader.


The box is 1.5x2 / .5 inches; I used less than one piece of 6x6 DP from 7gypsies's Mykonos pack. I distressed edges with Tea Dye ink. The pull is made with a tiny wooden spool, embroidery floss, and some gorgeous stitched ribbon I just received from Mom, along with the polka-dot & ric-rac ribbons and buttons.


I've never really used a needle threader, but I've wanted to make one ever since I saw the tutorial & adorable sample at Wild Olive. I used 3 ply nylon wire, and I should have used something thinner, but it just fits my embroidery needle. And it works really well; it certainly saved me time when sewing the thread onto those tiny buttons.

The Spool stamp is from a set that came free with an issue of Cardmaking & Papercraft Magazine. I stamped it in Memento brown onto an off-white cotton fabric that I backed with a light printer paper. For the spool on top, I just wrapped the green embroidery floss around it, but for the one on the needle threader I actually sewed it directly on to the ribbon before folding it over.


The "pin holder" is made from scrap foam (originally part of the packaging for an embossing folder set). I colored the foam with a Copic marker and wrapped it with measuring-tape Washi tape. I used the same tape inside the box.

The scissors are a chipboard piece, colored with a Copic marker & blue glaze pen and heat-embossed with Peacock embossing powder. 

I had a ton of fun making this, and the best part is that I can use it!

Many thanks to the following Challenges for inspiring me:
Kaboodle Doodles: Use Ribbon and at least 1 Button
Seemacrafts: Use a matchbox
Simon Says Stamp and Show: Use 6x6 paper pads (Mykonos pack by 7gypsies) + Shabby Chic

Update: This won the "Use a matchbox" Challenge at Seemacrafts!


Thank you for visiting,

Happier than...

It's time for a new Sunshine Mail Foundation Challenge (May 15 - May 31). Our theme is "On the Farm" and the only real rule is that you send in at least one card (Donation guidelines here). 

We're sponsored by Wings and Willows; I couldn't resist using their sweet Pig in Mud digi stamp:


I really enjoyed this week's Crafty Cardmakers "Use 3 techniques" challenge; I chose Distressing (inking on the card & image, and distressing on the flowers & leaves with a Prima tool); Embossing (the "mud" is applied with a Versamark pen and heat-embossed with Brown Sugar powder by ZING); and Making your own Flowers (I cut these on my Cricut years ago!). 

I colored the image with Copics; I used Blender Solution and Aida cloth to add texture to the grass & grass. The couds are filled with a white glaze pen. 

The sentiment is by TLC Creations; it and the image were cut/embossed on my BigShot with Spellbinders dies. I added some yellow Liquid Pearls to the sentiment piece. The flower brads & washi tapes are from my stash.


Tuesday Morning Sketches
Inspiration/Challenges:
Crafty Cardmakers #91: Pick at least 3 Techniques from list (Distressing, Heat Embossing, Making your own flowers)
Creative Creations Challenge Blog: For a Child
Digi Makeover Challenge: The Great Outdoors
Drunken Stampers #126: Farm Animals
Incy Wincy Designs: Animal Antics
Simon Says Stamp Challenge: Flower Power
Tuesday Morning Sketches #198: Sketch (rotated 90° CC) + Lots of Flowers


Thank you for visiting,

Monday, May 13, 2013

MAS/CAS

I saw a fabulous card using the Chalkboard Technique on my blog-roll recently, but of course now I can't remember where! If it was you, please let me know! I used Sharon Harnist's great tutorial on the Ellen Hutson website (think it was linked). It's really fun, because being messy is the goal! 

I won this Kraftin' Kimmie stamp ("Shine" and image), and it's so fabulous that I knew I had to make a CAS card. It's a rubber stamp, so I used the grid on my Fiskars Stamping Press to line it up for the double stamping. The "Your time to" part is from a stamp of the same sentiment by Verve Stamps.

Seems strange to use this technique for a Clean & Simple (CAS) card, but it seemed perfect this week's "One-layer card with colored card black" at Less is More. So I guess it's a MAS card (Messy & Simple)! [OOPS!!!!! I thought I had read their rules, but apparently I couldn't use black :( I always mess up my submission for Less is More...Sorry!]

I drew the border with a white pencil, and colored in the letters in a pink SU! crayon. I set it with a 3M matte spray coating, because the white ink (SU! Craft) takes a long time to dry. Like, forever. However, it washed out some of my white-pencil details, so I re-added those...It did bleed the crayon nicely, though, so I'll be playing with this technique. It really is fun, do try it!

The black card is from my stash...could be Recollections or Staples brand. The message section inside is cut from a bright white cardstock (Hammermill) with a Spellbinders die.

Inspiration/Challenges:
Kraftin' Kimmie Challenge 178: Use a Sentiment


Thank you for visiting,

Sunday, May 12, 2013

Spacey Teen Card

Happy Mother's Day!

Today begins another fun weekly challenge at Pile It On: Our theme is "For a Teen," and we're sponsored by Simply Betty Stamps. Betty generously allowed the DT to pick their own images, so I chose the fabulous We Come In Peace / Brittany digi.


The sentiment wordart is a freebie from Digital Doodling. I printed it on vellum, used a glitter pen on the front, and added color to the back with a glaze pen.

The globe pieces were cut with the Sizzix/Tim Holtz Vintage Fan & Globe Movers & Shapers die, but not by me! They were part of a card kit from a class I took with my mom in November (thanks Debbie!) The "water" piece is grungeboard, heat-embossed in silver. The sentiment banner is attached with a silver brad, and the whole thing is attached to the card with an Action Wobble. 


I used a Spellbinders die for the window; which actually caused me a lot of trouble because my BigShot is sorta broken (I lost the screw for the handle, so the pressure isn't correct). The silver paper is embossed with a Fiskars Texture Plate. The black-and-silver frame is actually a leftover from a wedding announcement project I did almost 2 years ago. The hexagon border is also a scrap; I had just this off-cut on my table from another project, and it ended up being the perfect touch to bring the card together.

The metal tags in the top left-hand corner are made especially for embossing by Imagine Crafts. The blue one was dry-embossed with a Cuttlebug folder. The "blue" is actually a protective film, but I liked the color so I left it on after embossing; eventually it will curl and peel, which I think will look cool! The little silver tag is heat-embossed with silver. I knew to take the blue film off first, as the metal heats super-quick.

I digitally placed the image on an actual photo of Mars:

I colored the image with Copics (mostly florescents) and Sakura glitter pens. It's so much brighter in person. Coloring with floursecents is a bit difficult, because it's almost 3d! I'll be sending this to a special Teen.


Inspiration/Challenges:
Crafty Bloggers Network: O's & X's Challenge (diagonal left to right: Die cut, Stamps, Tag)
Crafty Sentiments: Use a Sentiment
Divas by Design: Anything Goes
My Heart Pieces Digital Stamps Challenge: Anything Goes
Paper Minutes #268: Neon colour(s)
Shelly's Images: Kid Theme
The Perfect Sentiment: Dry embossing + sentiment
Wobble Wednesday Challenge #53: Anything Goes + Action Wobble (2nd entry)


Thank you for visiting,

Thursday, May 9, 2013

Rosey Snails

Mother's Day (in the U.S.) is only 4 days away, and that means I'm of course rushing to make cards! I bought this great digi, A Mother's Burden by A Day for Daisies, last year but I didn't manage to finish the card in time. I just made this just in time this year, though!


The polka-dot embossed Kraft paper is heat-embossed with glitter (Kaleidoscope embossing powder), so in real life it has quite a pink shimmer. I actually made it for a different project that didn't pan out, but I couldn't throw it away.

I really like this month's Color Challenge at Stamp and Create: Bright Pink, Turquoise, Lime Green, Brown (or Black). It gave me an excuse to use three of my favorite craft items: hot pink embossing powder, lime green Liquid Pearls, and turquoise chevron washi tape.

The scalloped circles and leaves were cut in my BigShot with Spellbinders dies. The sentiment stamp is from a Fiskars set. The corners of the white background are rounded with scalloped scissors, and the green banner is edged with a glitter pen.

The image is colored with Copics, mostly with Fluorescent Pink (FRV1), and is even brighter in person! The image is attached with an Action Wobble, so mom and the kids wiggle a bit! (All my projects featuring Action Wobbles are archived here.)


Inspiration/Challenges:
A Day for Daisies Challenge #69: Use Something Lace~y (Scalloped circles)
Shopping Our Stash #100: Mother's Day or Pink (All the papers are from my stash/off-cuts box)
Stamp and Create May Challenge: Color Combo (Bright Pink, Turquoise, Lime Green, Brown OR Black)
Technostamper's Monday Lunchtime Challenge: Sketch #262
Wobble Wednesday Challenge #53: Anything Goes + Action Wobble

Thank you for visiting,

Sunday, May 5, 2013

Bein' Krafty! Anything Goes at OSAAT

It' time for an Anything Goes challenge at One Stitch at a Time (OSAAT)! This week I got work with one of the images from the Three Faces of Eve set by Stitchy Stamps.


I printed the image onto Lunch Bag Kraft cardstock, and colored it with colored pencils. This is pretty time-consuming, but I do love the results. I sprayed it with a matte coating to "pop" the colors. I printed the sentiment (TLC Creations) in orange, but it was too light so I reprinted it in brown, giving it a cool shadow effect. I cut it out with an a•muse studio die.


For the background, I embossed a two-toned Core'Dinations cardstock with a Fiskars Texture plate, and sanded it to reveal both colors. For the corners, I used a sort of "faux marble" technique. I heat-embossed chipboard corners in white and then clear, and then dabbed them with Antique Linen distress ink to get them a "bone" look.

I finished the card with a ribbon from The Kraft Outlet, an orange feather, and some copper liquid pearls.


Here's another view, that shows that white piece behind the image:


I'm entering this into the following fabulous challenges:
A Little Bit Crafty: Use Kraft of some type
Bloggers: A Feminine Touch
Left of Center Creative Challenges #5: Use a Digi Image + LOC theme (I think this is "edgy"!)
My Heart Pieces Digital Stamps Challenge: Embossing, wet or dry
Paper Crafting Journey: Anything Goes
Simon Says Stamp: Just Because (not for a special occasion)
Sister Act Card Challenge: Always Anything Goes
Southern Girls #68: You can say that...quote or sentiment on card

Thank you for visiting,

Saturday, May 4, 2013

Lightsaber Love

The fact that today is "May the Fourth" (a pun on "May the Force be with You") inspired me to make a Star Wars-themed card, for a wedding or anniversary:


I made a stamp with scrap rubber, inked it with yellow-orange/blue-purple & silver ink, and used a glue pen to cover the "light" part with glow-in-the-dark glitter. I then enriched the colors with Copics (I did do some research on appropriate lightsaber colors), and added some dimension to the handhold with a clear glaze pen (Sakura).

The sentiment is from a SU! stamp and heat-embossed in gold (Stampendous). The main image is cut with a PageMaps die and popped with foam tape on a shiny white base (Recollections cardstock).

The colors were inspired by the Less is More "Opposite Colors" Challenge.

As much as today's an excuse to be nerdy, it's also a day to think about the tenants of the Jedi: Quiet your mind and listen to the force within you! Thanks for visiting,

Wednesday, May 1, 2013

Beautiful Balloons with Sunshine Mail

It's time for a new Sunshine Mail Foundation Challenge (May 1 - May 15). Our theme is "Balloons" and the only real rule is that you send in at least one card (Donation guidelines here).

Our sponsor is Bugaboo Digi Stamps, so I used their Monkey Love Balloon to make this simple card:

click to enlarge

I'm entering this into the following fabulous challenges:
Cards For Men: Animals
Crafty Sentiments: The Letter B (Balloons, Blue, Baker's twine)
Creative Craft Challenges: All About Animals
Drunken Stampers #125: Balloons
Pause, Dream, Enjoy: Outdoor Critters
Pumpkin Spice #17 (shop at ShopPumpkinSpice.com): Nature
The Squirrel & the Fox: Furry Friends


Thank you for visiting & hope you'll join us for the Sunshine Mail Foundation Challenge,