This week's freebie at Too Many Ideas, PaperFacesDesigns' blog, is this cute heart-themed tag cut file. Therese had made a pumpkin tag in the Fall and I found myself in need of a heart-themed version, so I bugged her about it and ta-da! Ah, the power of the DT! I had planned on using the tag for a magnet card that I saw on the Fiskars blog, but with only a couple of days until Valentine's, it will have to wait for another time...the Moms already have cards in the mail!The card on the right is a window version I made for fun; I freehand cut the window and stamped it all over with three shades of red. I love the effect you can get with Core'dinations cardstock and an emery board!
 There are still a few Valentines-themed challenges that I wanted to try, so I made the tag on the left.I had too much fun coloring this Penny Black stamp again.Inspiration:Crafty Cardmakers Challenge #39: HeartsDelicious Doodles Challenge #12: Valentines DayDutch Dare Challenge #99: Love is in the Air
Cut file: Heart Tag by PaperFacesDesignsSupplies: Recollections, Hammermill, and Core'dinations cardstocks, textured paper by the Paper Studio (I think), ZipDry glue, pop-dot, Fiskars papercutter and scallop scissors, CelebrateIt! ribbon, Versamark and StazOn inks, Martha Stewart detail scissors and embossing powder, stash silicon frame stamp, gstudio sentiment stamp, Crop-O-Dile II, Bountiful rubber stamp by Penny Black Copics:Hedgehog: E11, YR00, E02, E51, E50, 317Poppies: YR04, RV29, RV59, R27, R29Daisies: RV29, E04, R59, Y06, Y08Roses: RV 29, RV04Mums: RV21, RV23, RV04Foliage & Background: BG10, YG41, G21, G02
 Last night I was in need of a little Shopping Therapy, so I splurged and bought the brand-new Tree Carving digi collection from Little Musings. I love how it comes ready-to-color as well as pre-colored. Handy! I used the letters as its own image for the backing paper. Just for the sheer thrill of it, I used the "braid" texturing plate on the backing papers.I'm also entering this card into the Let's see some Love challenge at Spoonfull of Sugar Challenges, which I haven't participated in some time (although I always enjoy looking at their DT projects!).
 Digi stamp set: Tree Carving by Little MusingsCut file: Heart and Roses Border by PaperFaces Designs
 Inspiration:Midnight Madness Sketch Challenge #90Spoonfull of Sugar Challenge 138
:
Let's see some loveSupplies: K&Company Valentine's Designer double-sided paper pack, Hammermill and Recollections cardstocks, HP printer & ink, Copic Ciao markers, MS detail scissors ZipDry glue, CraftSmart ink, Cricut Expression, SCAL, silicon stamps by Alys Paterson for Quick Cards, Fiskars papercutter and texturing plate & tool, Recollections border punch, Post-it Notes (see tutorial at There She Goes)
 I took a little time during the past coupla days to actually read my blog feed, which is filled with yummy craft sites, so by the time I got around to starting a project my head was filled with ideas. And they all poured into this one card...Now that I've discovered slider cards, I'm going to have a difficult time going back to flat ones! I love the way you can layer elements but still see each element when it's in the "up" position. I have a cheat-sheet with the dimensions taped up in my craft space, and once you get the hang of the folding/gluing part, it's really easy.I started with Curtain Call's Act 68 color combo (Melon Mambo, Whisper White, Wild Wasabi, Pink Pirouette), even though I knew I didn't really have great matching marker nor ink colors. I did, however, have an gorgeous Core'dinations cardstock that was a great match for the Melon Mambo, so I dry-embossed it with one of my new Fiskars texturing plates. I did the same with a white cardstock for the slider strip and pop-up pieces.I had taken the energy to watch a video tutorial on making a Go-To-Sentiment card at Papertrey Ink (with the sound on, which sometimes I don't bother with, because I'm at best a visual learner. As mom said about the SuperBowl Commercials, "Some were really great, but of course we never watch them with the sound on. We're not interested in advertising.") The concept behind the Got-to Sentiment card is simple: put together all of your similarly-themed sentiments to create one image. However, if you know anything about stamping, this is a real trick of stamping skill and luck. Because I have few sentiment stamps (I'm still looking for a good, affordable collection), the largest group I have is Made for You themes. I started by printing a TLC Creations digi stamp sentiment, to mix it up. I printed two, in case I messed one up, but I ended up using both. I had lots of fun lining up the stamps, but the fact that 3 of them were rubber made it a bit more exciting...For the pink "framing" on the front sentiment piece, I used the old Post-it trick, inspired by a tutorial at There She Goes. Ah, where would the crafty office worker be without Post-its‽ I once helped a student use them for a stop-motion animation project; Brilliant! I used this trick years ago when I was dabbling in spray-paint art, but really felt like the tutorial helped me see it in a new way. I deckled the edge of the Post-its before I stamped the paper with chalk ink.I thought that the sentiment group really lent itself to a Valentines card, so I added PaperFacesDesigns' I Heart U Couple. The moment I saw Mad for Markers' Crazy Hair Colour Challenge, I knew I wanted to make something that my husband would like, since his #1 suggestion for my coloring is "Bright Hair". He never suggests Bottled Blonde or Auburn, rather fluorescent blue or Chartreuse. So, I gave these kidlets Wild Wasabi-inspired tresses. I can't decide if this is my official entry into this challenge, just because it's really fun and I'm only 75% satisfied with the result.
 Digi Stamp: I heart U couple by PaperFacesDesignsDigi Sentiment: TLC CreationsThere She Goes Wednesday Trends: Post-it NotesMad for Markers Challenge: Crazy Hair ColourCurtain Call Color Challenge: Act 68: Melon Mambo, Whisper White, Wild Wasabi, Pink PirouettePapertrey Ink Make It Monday Series: Go-to Sentiment CardSliding Pop-Out Card Tutorial: Kim Score for SplitcoaststampersSupplies: Hammermill and Core'dinations cardstock, MS detailing scissors, ZipDry glue, HP printer & ink, Fiskars papercutter, deckle scissors, corner punch, texturing plate & tool, Copic Ciao markers, HP printer & ink, Memento ink, ColorBox chalk ink, stash eyelet, CelebrateIt! ribbon, sentiment stamps from gstudio, Hero Arts, Alice in Wonderland set, Beatrix Potter Two Bad Mice set, and Bentley the Bear set from Cardmaking & Papercraft Magazine, Post-it notes
 So I've only had my Copic markers since Dec. 24, and I'm already low on several of my blue shades. But I find myself getting better at coloring with them, so I continue to indulge myself and just try not to color with blue. This week's Picture Perfect Creations Color Combo fit the bill: Concord Crush, Certainly Celery, Crumb Cake.
I had lots of inspiration (see my list below) for this card, but the part that took me the most time is the most difficult to see: I stamped the front cardstock with hearts in Antique Linen distress ink, and did the same for the XOXO circle. I sanded down the circle to give it more depth, and added a bow because I had just that much ribbon leftover!

 Digi stamp: Lovebirds 2 by PaperFacesDesigns
Inspiration:
Sketch: Mojo Monday #177
Color: Picture Perfect Creations Color Combo 48
Sketch: Critter Sketch Challenge #51: critter/animal image
Theme: PaperPlay Challenge '11 Week 5: Stamp It Out

Supplies: Core'dinations cardstock, Xpress Copic paper, MS detailing scissors, ZipDry glue, HP printer & ink, Fiskars papercutter, deckle scissors, and corner & circle punches, Copic Ciao markers, Tim Holtz distress ink, InkItUp! ink, silicon stamps from gstudio and Hero Arts, Recollections border punch, Celebrate It! and Offray ribbons
 As a personal celebration for my Pink Hedgehog card winning Freshly Brewed Designs Challenge #32 (Thanks so much!), I decided to make something really wild with the image I chose as my prize. I love all of FBD's stamps, but I just had to get my hands on the groovy Mirror Mushroom digi from their "Alice in Wonderland" series. As soon as I saw it, I knew that I'd be making little clay mushrooms!
I was inspired by the current Delicious Doodle, and the Crafty Cardmakers Spotlight Challenge to use "something you add water to, or water has been added," and I hardly need an excuse to pull out my spray inks and watercolor pencils! I wanted to play with the green made by mixing yellow and blue inks again, so I cut a couple of borders with a PaperFacesDesign cut file and used them as masks to make some patterned paper. I went ahead and used the well-coated borders so the front and inside. While my tiny clay mushrooms were cooking, I threw together a little "Groovy" sentiment.

 Digi stamp: Mirror Mushroom by Freshly Brewed Designs
Cut file: Flower Border by PaperFacesDesigns
Inspiration:
Delicious Doodles Challenge #11
Crafty Cardmakers Spotlight: Water
Digi stamp: Mirror Mushroom by Freshly Brewed Designs
Cut file: Flower Border by PaperFacesDesigns
Inspiration:
Delicious Doodles Challenge #11
Crafty Cardmakers Spotlight: Water
 Supplies: Hammermill, ColorBok, and Recollections cardstocks, Tattered Angels glitter mist, Inkadinkado spray ink, Fiskars papercutter, corner punch, and scallop scissors, Loew-Cornell watercolor pencils, MS detailing scissors, Sculpey polymer clay, Cricut & SCAL, HP printer & ink, Adobe InDesign, Frosty font (all caps)
 I had some pieces left over from my window card, so I whipped up this simple Valentine in about 10 minutes! Happily, the paper colors lent themselves well to this week's ColourQ challenge: Poppy Parade, Cameo Coral, Blushing Bride, Early Espresso + vanilla.I had this PaperFacesDesigns image already printed on lovely Copic paper, so after I colored the angel and details I simply added shadows with my Eggshell Copic marker (E50). For the "early espresso" color element, I used some of the lovely ribbon I bought this weekend.
 Digi stamp: I heart U Valentine by PaperFacesDesignsInspiration: ColourQ Challenge #70Supplies: K&Company Valentine's Designer double-sided paper pack, Relaxed textured cardstock, Copic paper, HP printer & ink, Copic Ciao markers, ZipDry glue, Sakura gel pens, Cricut Expression, SCAL, 09 KutUps dingbat font for flower shape, Celebrate It! ribbon
 February is American Heart Month (although Heart Disease Awareness extends to everyone, we're just really in need of some awareness), so on Feb. 4 a bunch of people on FaceBook posted as their status something about their heart, ending with the phrase And it's RED! I put "Is cautious yet optimistic," but others came up with really beautiful descriptions. Inspired by this, Mojo Monday's square sketch, and TLC Creations' special freebie that day, I whipped up this 4x4 card with a PaperFacesDesigns digi that I had handy. I'm also entering this card into Craft Your Passion's Bling on Your Love challenge, although it's a little low on the bling.
This seemed like the perfect opportunity to use some of the gorgeous ribbon from heaven-knows-where that I found in the attic. I was recently complemented on my Ribbon Treatment (or RT, to the cool kids), so I tried some light "puckering" with ZipDry. Yikes, I'm hooked. Guess who bought more ribbon today‽ For the wings, I used some of the red-and-yellow paper I distressed for my slider card. For the "lace" element, I cut a scrap of glittered paper with scallop scissors and added the holes with my Crop-O-Dile punch.
February is American Heart Month (although Heart Disease Awareness extends to everyone, we're just really in need of some awareness), so on Feb. 4 a bunch of people on FaceBook posted as their status something about their heart, ending with the phrase And it's RED! I put "Is cautious yet optimistic," but others came up with really beautiful descriptions. Inspired by this, Mojo Monday's square sketch, and TLC Creations' special freebie that day, I whipped up this 4x4 card with a PaperFacesDesigns digi that I had handy. I'm also entering this card into Craft Your Passion's Bling on Your Love challenge, although it's a little low on the bling.
This seemed like the perfect opportunity to use some of the gorgeous ribbon from heaven-knows-where that I found in the attic. I was recently complemented on my Ribbon Treatment (or RT, to the cool kids), so I tried some light "puckering" with ZipDry. Yikes, I'm hooked. Guess who bought more ribbon today‽ For the wings, I used some of the red-and-yellow paper I distressed for my slider card. For the "lace" element, I cut a scrap of glittered paper with scallop scissors and added the holes with my Crop-O-Dile punch.
 Digi stamp: Angel Meggie by PaperFacesDesigns
Inspiration:
Mojo Monday Sketch 176: square
Craft Your Passion Challenge #43: Bling On Your Love (Use Bling & Red or Hearts on your creation)
Supplies: K&Company Valentine's Designer double-sided paper pack, Core'dinations cardstock, Marvy punch, ZipDry glue, Martha Stewart detailing scissors, emery board, Sakura gel pens, HP printer & ink, Fiskars papercutter and scallop scissors, Copic Ciao markers, Tim Holtz distress inks (fired brick, antique linen, mustard seed), stash ribbon, Crop-O-Dile II
Digi stamp: Angel Meggie by PaperFacesDesigns
Inspiration:
Mojo Monday Sketch 176: square
Craft Your Passion Challenge #43: Bling On Your Love (Use Bling & Red or Hearts on your creation)
Supplies: K&Company Valentine's Designer double-sided paper pack, Core'dinations cardstock, Marvy punch, ZipDry glue, Martha Stewart detailing scissors, emery board, Sakura gel pens, HP printer & ink, Fiskars papercutter and scallop scissors, Copic Ciao markers, Tim Holtz distress inks (fired brick, antique linen, mustard seed), stash ribbon, Crop-O-Dile II
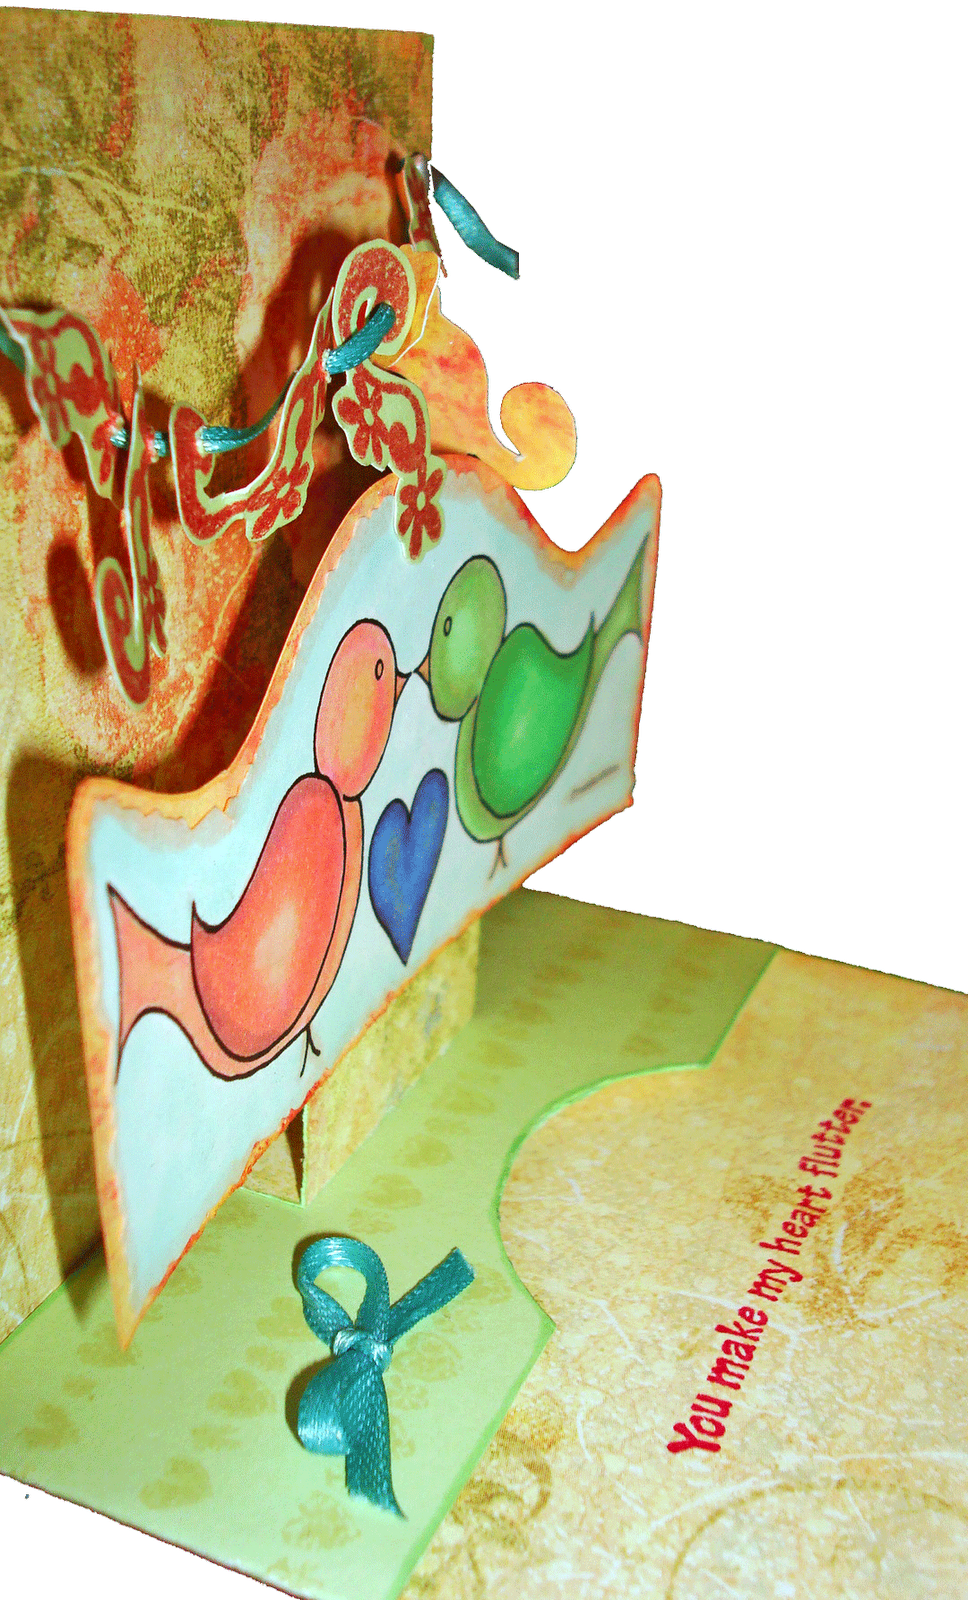
Ah Valentine's Day, when pink and glitter seem like good ideas. My favorite part about this holiday is that it gives us an excuse to tell people we love them...plus, make them cards. I've seen some really fun Valentines online, from punny Patent Illustration Valentines to SuperFriends Action Valentines from the 1980s, to ninja-themed Kawaii Mini Valentines. Many, including these, are free to print at home!But I'm low on printer ink, so I decided to make another hand-made Valentine, inspired by the Aud Sentiments Corny Sayings challenge and the "slider pop-out card" tutorial I found yesterday at SCS. I'm also entering this card into the Cards for Men Valentine Challenge, because I think it keeps a classic Valentine feeling without being too girly. I'd give it to my sweetheart (but he'll read about it here first)!This card features this Friday's PaperFacesDesign Freebie, Lovebirds 2.

 The card design is quite simple (if you follow the directions, which only took me twice), and once you have the base together, you can decorate to your heart's desire. I stamped a heart-and-star border from a Christmas set onto the "sliding wrap" with Antique Linen distress ink, for a wood-block, vintage feel. Then I got a little funky and "distressed" the white side of a light green paper with red, yellow, and linen inks. I was inspired by Stamping 411's Technique Thursday / Reinker Background post, but I don't have the right tools so I just used a damp paper towel. After it dried, I stamped the flowering vine stamps onto the green side, for the garland, and made a backing piece for the Lovebirds. I even ran the ribbon over the Antique Linen ink to tone it down. The garland is affixed with heart brads; I hid the backs with a couple of the vine stamps.Sliding Pop-Out Card Tutorial: Kim Score for SplitcoaststampersDigi stamp: Lovebirds 2 by PaperFacesDesignsInspiration:
Aud Sentiments Challenge #21: Corny Valentine
Cards for Men Challenge #3: Valentines/Love
Supplies: decorative papers by Paper Studio, MS detailing scissors, ZipDry glue, Sentiment stamp by gstudio, HP printer & ink, Cricut + SCAL, Fiskars papercutter and deckle scissors, Copic Ciao markers, Tim Holtz distress inks (fired brick, antique linen, mustard seed), silicon stamps from gstudio and Scrappy Cat, stash eyelet & heart brads, Crop-O-Dile II, Offray ribbon
Happy February! This month is my PaperFacesDesign (PFD) month, and I hope you'll join me and the DT for a challenge and some fun!
I'm sponsoring this, the first monthly challenge at PFD (ThereseTravis.net):
I want to see your projects that focus on the color blue. Use your imagination, and share your projects on the PFD website:
Rules:- Make a card, scrapbook layout, or whatever, using this month's theme.
- Leave a direct link to your project in the Comments section of the Contest Post, or Email your project to: cgSaysSomethingLoudly [at] gmail [dot] com
- You may submit to more than one challenge, but please mention PaperFacesDesigns and no back-linking (entering a previously-published project).
- One winner will be chosen randomly, and will receive an image of their choice from the PFD Etsy store.
- Have fun with it!
More ways to win:
- You are not required to use a PaperFacesDesigns image, but if you do it will earn you an extra entry.
- Become a follower of Too Many Ideas and/or our Design Team blogs and receive an extra point for each! Follow through your favorite method and leave a comment on this post letting us know.
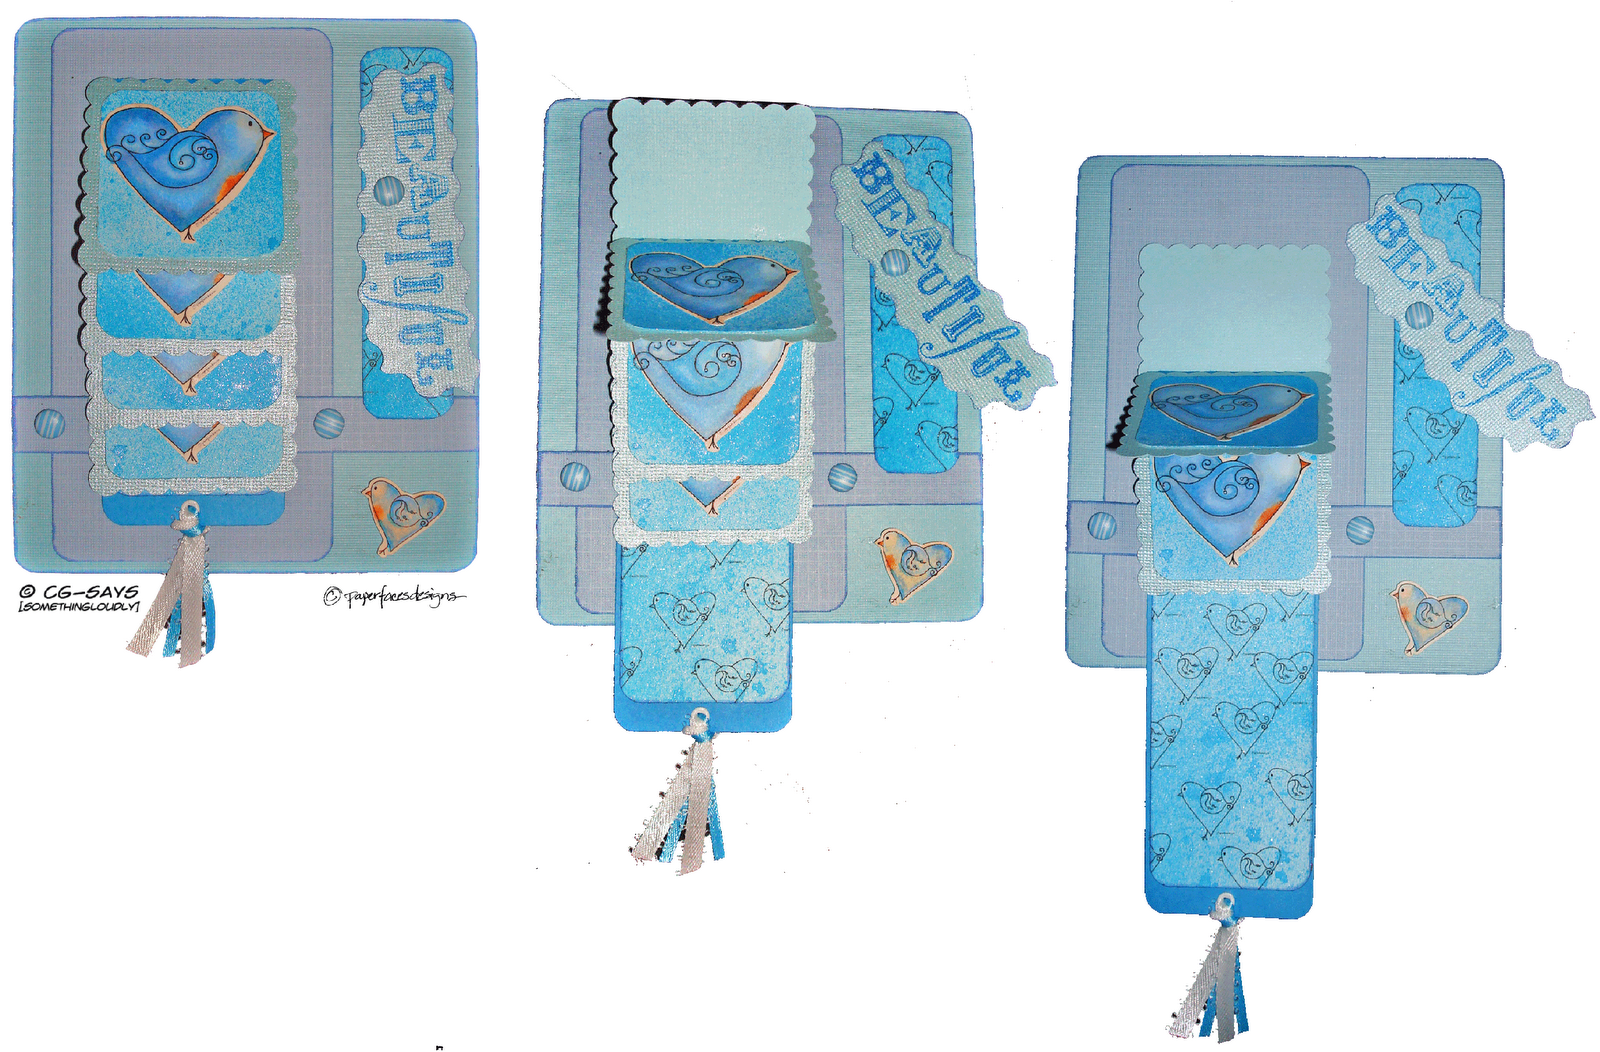
Be sure to check out everyone's projects, they're amazing! Here's my Blue card:

 Digi Stamp: Lovebirds 1 by paperfacesdesigns
Supplies: Recollections, PaperStudio and Core'dinations cardstocks, MS detailing scissors, ZipDry glue, HP printer & ink, Marvy punch, Fiskars papercutter, deckle scissors and corner punch, Offray ribbon, Kurio brads, stash silicon sentiment stamp, pop-dots, Copic Ciao markers, Tattered Angels "Jack Frost" spray mist
I tried my hand at a "Magic" or "Changing Picture" card, per the handy directions at SplitCoastStampers, but I don't have a good way to print/stamp onto acetate. I could have waited until this weekend, when I could pick up some transparency paper, but I didn't wanna.
So I made this version, which doesn't require marking on the acetate. And, like a good Po'boy sandwich, it winded up being relatively expensive and complicated, but Oh! so worth it.
I used Therese Travis's Decorative Cat digi stamp (now available on Etsy!), and actually "printed" the image with Cricut markers on my Cricut Expression. I think it adds a "stamped" feeling.
To do something like this yourself, import your digi stamp image file into SCAL, size it, and then make a copy and apply "blackout". Ta-da, instant mask!

At first, I was just going to use bright colors, but then I saw the Midweek Throwdown Halloween Challenge at the Operation Write Home (OWH) blog and just had to make the card for this challenge. So much fun!
Supply list: Cricut personal cutter, Cricut marker, SCAL software, Recollections card stock, Grafix clear craft plastic, JoAnn essentials eyelet, Offray ribbon, Sharpie markers, Crop-A-Dile 2, Zip-Dry glue. PaperFaces digi stamps: Decorative Cat.
![cg says [something loudly]](https://blogger.googleusercontent.com/img/b/R29vZ2xl/AVvXsEj0FPmCZqXj2-YcQaqnchsA3zKcMX4MIsNrt-Q1wM9gJSyUJH_a6g_V1m_JKR0tKEOGU6F1AFBv8al43phB58tEMIPcT3G0wXzmJpswV9I5mFB7zOhpv8a8dpEAR6i9uS0mkOQKp_pC6PE/s1600/blogheader.gif)
 This week's freebie at Too Many Ideas, PaperFacesDesigns' blog, is this cute heart-themed tag cut file. Therese had made a pumpkin tag in the Fall and I found myself in need of a heart-themed version, so I bugged her about it and ta-da! Ah, the power of the DT! I had planned on using the tag for a magnet card that I saw on the Fiskars blog, but with only a couple of days until Valentine's, it will have to wait for another time...the Moms already have cards in the mail!
 There are still a few Valentines-themed challenges that I wanted to try, so I made the tag on the left.
 Copics: