Showing posts with label paperfacesdesign. Show all posts

Saturday, October 29, 2011

Candy Corn Cards

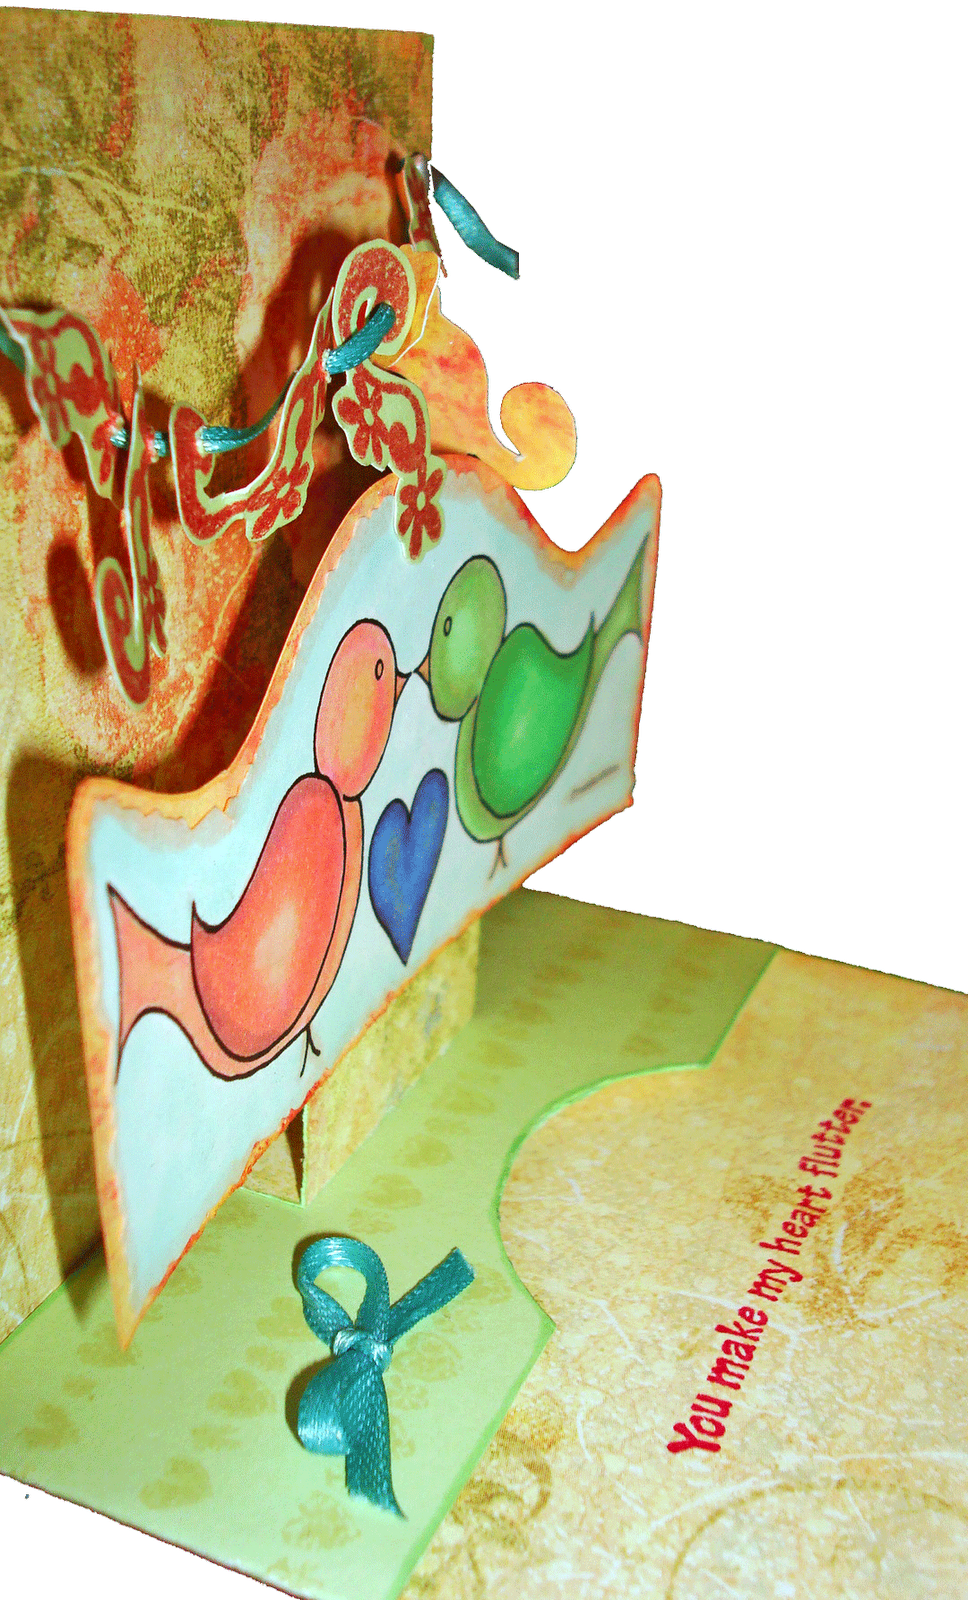
I'm so happy to see that Therese of Paper Faces Designs is back blogging, and as soon as I saw her Candy Corn freebies I just had to make a couple of cards.

Therese was kind enough to welcome me into her Design Team last year, and being a part of that team with Jeannie & Natasha was really influential. The DT has disbanded for the time being, but Therese has lots of wonderful digi image & cut files on her blog for free and for sale (just send her an email if you see something you like). You can see my many Paper Faces Designs projects in my archives.

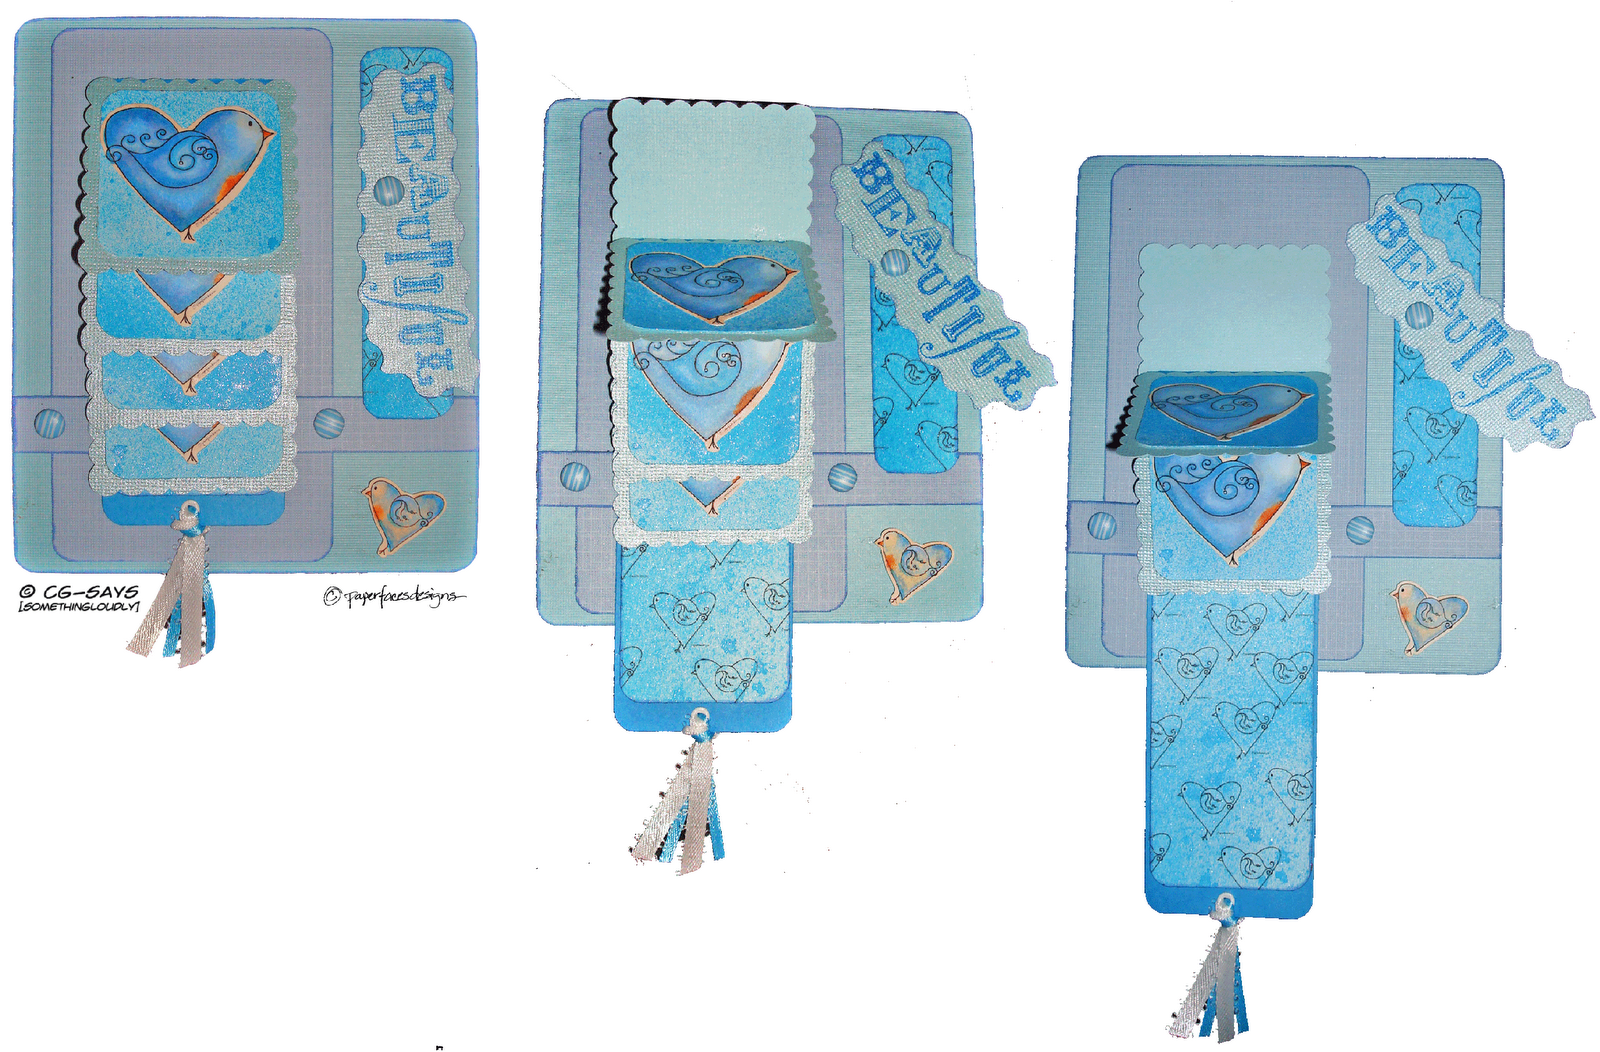
For the top card, I imported Therese's Candy Corn digi stamp into Sure Cuts A Lot (SCAL) and separated the pieces into layers. For the insides, I used her Candy Corn SVG cut file.

For the second card, I simply added a big hole to the front! This is something I've wanted to do for a while: there's a piece of black tulle stretched across the hole, and that's what the image is glued on.

On the backs of both I stamped little candy corns and then hand-colored them. I love the look, but man that's a lot of candy corn!


Card 1 Inspiration:
Sentimental Sundays Challenge #78: Halloween (with freebies; thank you!)

The sentiment is a freebie from Sentimental Sundays; it fit perfectly!


Card 2 Inspiration:


Monday, February 28, 2011

Namaste

Therese Travis of PaperFacesDesigns makes custom digi stamps, and she recently created a gorgeous one for fellow PFD DT member Jeannie. I was so excited about Angel Judy that Therese shared it with me. It comes in two versions: an SVG cut file and a digi stamp.

Jeannie used the image to create incredible, incredible gifts for her friend Judy. Please, please take a moment to read her post and learn more about the origin of this image.

Incredible, right‽ I also love what she says about religion; right on.

So I took the image and acted like I didn't know the backstory. Several years ago, my family was blessed to attend a wedding in Bangalore, India, so I channeled that experience to create a card for my mom. Man, shopping in India was SO FUN. Everything was bright, detailed, feminine, comfortable (although wearing a sari takes a fair amount of skill, so we stuck with the "pajama" styles). One of the most moving experiences for me was the appearance of Puja spaces in every home.

For the card itself, I was inspired by a lovely sheet of decorative paper I had in my stash (the wings, circles, and flower cut-out) and the fun sketch at Midnight Madness. I used mostly scraps.

Inspiration: Midnight Madness Sketch Challenge #92

Supplies: Core'dinations, Hammermill and Recollections cardstocks (plus scraps from my stash), MS detailing scissors, ZipDry glue, HP printer & ink, Fiskars papercutter and texturing plate & tool, bone folder, emery board, InkItUp! and ColorBox inks, Michaels brads, Sakura Gelly Roll and Elmer's gel pens

Copic markers:
skin: E11, E33, E51, E02
hair: E17, E47, E35
sari: RV21, RV23, RV04
shirt: RV21, R02, RV42
sash: V06, RV21

Sunday, February 27, 2011

Like a Rhinestone Cowgirl

I was totally excited to see the current challenges at Crafty Cardmakers (fairies & 2 punches) and Drunken Stampers (Rhinestone Cowgirl), because it gave me an excuse to use the sweet Angel Cheyene digi stamp by PaperFacesDesigns and my border punch. As you can tell, I had TOO much fun! The idea to put PFD's logo in the kerchief was respectfully scraplifted from Jeannie of the Polka Cabana (from her gorgeous project for PFD's Blue Challenge; There's still time to enter, no deadline!), and the pattern is the corner stamp from the K&Company Lotus Floral set. Who would've thunk it? My husband actually owns a much-traveled handkerchief that looks a lot like this one.

Thanks for the inspiration...this is another card I never thought I'd make!

Digi stamp: Angel Cheyene by PaperFacesDesigns

Inspiration:
Crafty Cardmakers Challenge #40: Fairies & at least 2 paper punches
Drunken Stampers Challenge #56: Rhinestone Cowgirl

Supplies: Core'dinations, Hammermill and Recollections cardstocks, MS detailing scissors, gemstones and border punch, ZipDry glue, HP printer & ink, Adobe InDesign and Rosewood typeface, Fiskars papercutter and circle punches, InkItUp! inks, corner stamp from K&Co. Amy Butler Lotus Floral set, Stampendous white embossing powder, Marvy heat tool, Michaels cord, Sakura Gelly Roll glitter pen, emery board, Sculpey clay

Copic markers:
vest: E17, E37, 0, E51
skin: RV21, E50, E11, E51, E33
jeans: B32, B23, B05, B39
T-shirt & belt: C-1, C-5, C-7
hat & kerchief: V17, BV08, V06, BV04

Sunday, February 13, 2011

Last-chance Valentines

This week's freebie at Too Many Ideas, PaperFacesDesigns' blog, is this cute heart-themed tag cut file. Therese had made a pumpkin tag in the Fall and I found myself in need of a heart-themed version, so I bugged her about it and ta-da! Ah, the power of the DT! I had planned on using the tag for a magnet card that I saw on the Fiskars blog, but with only a couple of days until Valentine's, it will have to wait for another time...the Moms already have cards in the mail!

The card on the right is a window version I made for fun; I freehand cut the window and stamped it all over with three shades of red. I love the effect you can get with Core'dinations cardstock and an emery board!

There are still a few Valentines-themed challenges that I wanted to try, so I made the tag on the left.
I had too much fun coloring this Penny Black stamp again.


Inspiration:
Crafty Cardmakers Challenge #39: Hearts
Delicious Doodles Challenge #12: Valentines Day
Dutch Dare Challenge #99: Love is in the Air

Cut file: Heart Tag by PaperFacesDesigns

Supplies: Recollections, Hammermill, and Core'dinations cardstocks, textured paper by the Paper Studio (I think), ZipDry glue, pop-dot, Fiskars papercutter and scallop scissors, CelebrateIt! ribbon, Versamark and StazOn inks, Martha Stewart detail scissors and embossing powder, stash silicon frame stamp, gstudio sentiment stamp, Crop-O-Dile II, Bountiful rubber stamp by Penny Black

Copics:
Hedgehog: E11, YR00, E02, E51, E50, 317
Poppies: YR04, RV29, RV59, R27, R29
Daisies: RV29, E04, R59, Y06, Y08
Roses: RV 29, RV04
Mums: RV21, RV23, RV04
Foliage & Background: BG10, YG41, G21, G02

Friday, February 11, 2011

V.D. Cootie-Catcher

Last week, I was moved to purchase the PhotoShop-ready Valentine's Day Cootie Catcher template by Creations by Julie. I've made them before, which is why I knew that $2 was a steal. The template is easy to use, if you understand Layers, so I was able to insert a digi paper pattern right into it. I've never used digi paper before, but I fell in love with the Cardscrapper's free set, especially the heart-circles. Love the blue! I put the "paper" behind the text at 60% opacity, and printed it at full opacity on the reverse side of the cardstock. I didn't change the text this time, but the font is PupCat, a freebie, so you can grab it if you don't have it.

Valentine's Day Cootie Catcher template by Creations by Julie for Gingerscraps

Digi stamps by PaperFacesDesigns: Angel Anna, Angel Chelsea, Angel Teaghan, and I heart U couple

Digi paper: Lollipop Press Blog Hop Rak - Page 027 by Natacha Diemer (FREEBIE!)


The day after I purchased this template, I was asked to whip up something for the MFA/Creative Writing & Publishing Arts program at UB to use at the AWP 2011 conference (the Association of Writers and Writing Programs). Nothing major, just something cheap, unique, and memorable. I live for this kind of project, and am very lucky to be able to do this kind of stuff. I whipped together this cootie-catcher. I'm not sure if they were used, but I wanted to share it anyway.

Sappy

Last night I was in need of a little Shopping Therapy, so I splurged and bought the brand-new Tree Carving digi collection from Little Musings. I love how it comes ready-to-color as well as pre-colored. Handy! I used the letters as its own image for the backing paper. Just for the sheer thrill of it, I used the "braid" texturing plate on the backing papers.

I'm also entering this card into the Let's see some Love challenge at Spoonfull of Sugar Challenges, which I haven't participated in some time (although I always enjoy looking at their DT projects!).


Digi stamp set: Tree Carving by Little Musings
Cut file: Heart and Roses Border by PaperFaces Designs

Inspiration:
Midnight Madness Sketch Challenge #90
Spoonfull of Sugar Challenge 138: Let's see some love

Supplies: K&Company Valentine's Designer double-sided paper pack, Hammermill and Recollections cardstocks, HP printer & ink, Copic Ciao markers, MS detail scissors ZipDry glue, CraftSmart ink, Cricut Expression, SCAL, silicon stamps by Alys Paterson for Quick Cards, Fiskars papercutter and texturing plate & tool, Recollections border punch, Post-it Notes (see tutorial at There She Goes)

Techniqued

I took a little time during the past coupla days to actually read my blog feed, which is filled with yummy craft sites, so by the time I got around to starting a project my head was filled with ideas. And they all poured into this one card...

Now that I've discovered slider cards, I'm going to have a difficult time going back to flat ones! I love the way you can layer elements but still see each element when it's in the "up" position. I have a cheat-sheet with the dimensions taped up in my craft space, and once you get the hang of the folding/gluing part, it's really easy.

I started with Curtain Call's Act 68 color combo (Melon Mambo, Whisper White, Wild Wasabi, Pink Pirouette), even though I knew I didn't really have great matching marker nor ink colors. I did, however, have an gorgeous Core'dinations cardstock that was a great match for the Melon Mambo, so I dry-embossed it with one of my new Fiskars texturing plates. I did the same with a white cardstock for the slider strip and pop-up pieces.

I had taken the energy to watch a video tutorial on making a Go-To-Sentiment card at Papertrey Ink (with the sound on, which sometimes I don't bother with, because I'm at best a visual learner. As mom said about the SuperBowl Commercials, "Some were really great, but of course we never watch them with the sound on. We're not interested in advertising.") The concept behind the Got-to Sentiment card is simple: put together all of your similarly-themed sentiments to create one image. However, if you know anything about stamping, this is a real trick of stamping skill and luck. Because I have few sentiment stamps (I'm still looking for a good, affordable collection), the largest group I have is Made for You themes. I started by printing a TLC Creations digi stamp sentiment, to mix it up. I printed two, in case I messed one up, but I ended up using both. I had lots of fun lining up the stamps, but the fact that 3 of them were rubber made it a bit more exciting...

For the pink "framing" on the front sentiment piece, I used the old Post-it trick, inspired by a tutorial at There She Goes. Ah, where would the crafty office worker be without Post-its‽ I once helped a student use them for a stop-motion animation project; Brilliant! I used this trick years ago when I was dabbling in spray-paint art, but really felt like the tutorial helped me see it in a new way. I deckled the edge of the Post-its before I stamped the paper with chalk ink.

I thought that the sentiment group really lent itself to a Valentines card, so I added PaperFacesDesigns' I Heart U Couple. The moment I saw Mad for Markers' Crazy Hair Colour Challenge, I knew I wanted to make something that my husband would like, since his #1 suggestion for my coloring is "Bright Hair". He never suggests Bottled Blonde or Auburn, rather fluorescent blue or Chartreuse. So, I gave these kidlets Wild Wasabi-inspired tresses. I can't decide if this is my official entry into this challenge, just because it's really fun and I'm only 75% satisfied with the result.

Digi Stamp: I heart U couple by PaperFacesDesigns
Digi Sentiment: TLC Creations

There She Goes Wednesday Trends: Post-it Notes
Mad for Markers Challenge: Crazy Hair Colour
Curtain Call Color Challenge: Act 68: Melon Mambo, Whisper White, Wild Wasabi, Pink Pirouette
Papertrey Ink Make It Monday Series: Go-to Sentiment Card

Sliding Pop-Out Card Tutorial: Kim Score for Splitcoaststampers

Supplies: Hammermill and Core'dinations cardstock, MS detailing scissors, ZipDry glue, HP printer & ink, Fiskars papercutter, deckle scissors, corner punch, texturing plate & tool, Copic Ciao markers, HP printer & ink, Memento ink, ColorBox chalk ink, stash eyelet, CelebrateIt! ribbon, sentiment stamps from gstudio, Hero Arts, Alice in Wonderland set, Beatrix Potter Two Bad Mice set, and Bentley the Bear set from Cardmaking & Papercraft Magazine, Post-it notes

Tuesday, February 8, 2011

Certainly Lovebirds

So I've only had my Copic markers since Dec. 24, and I'm already low on several of my blue shades. But I find myself getting better at coloring with them, so I continue to indulge myself and just try not to color with blue. This week's Picture Perfect Creations Color Combo fit the bill: Concord Crush, Certainly Celery, Crumb Cake.

I had lots of inspiration (see my list below) for this card, but the part that took me the most time is the most difficult to see: I stamped the front cardstock with hearts in Antique Linen distress ink, and did the same for the XOXO circle. I sanded down the circle to give it more depth, and added a bow because I had just that much ribbon leftover!

Digi stamp: Lovebirds 2 by PaperFacesDesigns

Inspiration:
Sketch: Mojo Monday #177
Color: Picture Perfect Creations Color Combo 48
Sketch: Critter Sketch Challenge #51:
critter/animal image
Theme: PaperPlay Challenge '11 Week 5:
Stamp It Out

Supplies: Core'dinations cardstock, Xpress Copic paper, MS detailing scissors, ZipDry glue, HP printer & ink, Fiskars papercutter, deckle scissors, and corner & circle punches, Copic Ciao markers, Tim Holtz distress ink, InkItUp! ink, silicon stamps from gstudio and Hero Arts, Recollections border punch, Celebrate It! and Offray ribbons

Monday, February 7, 2011

Shroomin'

As a personal celebration for my Pink Hedgehog card winning Freshly Brewed Designs Challenge #32 (Thanks so much!), I decided to make something really wild with the image I chose as my prize. I love all of FBD's stamps, but I just had to get my hands on the groovy Mirror Mushroom digi from their "Alice in Wonderland" series. As soon as I saw it, I knew that I'd be making little clay mushrooms!


I was inspired by the current Delicious Doodle, and the Crafty Cardmakers Spotlight Challenge to use "something you add water to, or water has been added," and I hardly need an excuse to pull out my spray inks and watercolor pencils! I wanted to play with the green made by mixing yellow and blue inks again, so I cut a couple of borders with a PaperFacesDesign cut file and used them as masks to make some patterned paper. I went ahead and used the well-coated borders so the front and inside. While my tiny clay mushrooms were cooking, I threw together a little "Groovy" sentiment.
Digi stamp: Mirror Mushroom by Freshly Brewed Designs
Cut file: Flower Border by PaperFacesDesigns

Inspiration:
Delicious Doodles Challenge #11
Crafty Cardmakers Spotlight: Water

Supplies: Hammermill, ColorBok, and Recollections cardstocks, Tattered Angels glitter mist, Inkadinkado spray ink, Fiskars papercutter, corner punch, and scallop scissors, Loew-Cornell watercolor pencils, MS detailing scissors, Sculpey polymer clay, Cricut & SCAL, HP printer & ink, Adobe InDesign, Frosty font (all caps)

Vanilla

I had some pieces left over from my window card, so I whipped up this simple Valentine in about 10 minutes! Happily, the paper colors lent themselves well to this week's ColourQ challenge: Poppy Parade, Cameo Coral, Blushing Bride, Early Espresso + vanilla.

I had this PaperFacesDesigns image already printed on lovely Copic paper, so after I colored the angel and details I simply added shadows with my Eggshell Copic marker (E50). For the "early espresso" color element, I used some of the lovely ribbon I bought this weekend.Digi stamp: I heart U Valentine by PaperFacesDesigns

Inspiration: ColourQ Challenge #70

Supplies: K&Company Valentine's Designer double-sided paper pack, Relaxed textured cardstock, Copic paper, HP printer & ink, Copic Ciao markers, ZipDry glue, Sakura gel pens, Cricut Expression, SCAL, 09 KutUps dingbat font for flower shape, Celebrate It! ribbon

A Recipe for Love

I realized that I haven't used my Cricut for my past several cards, so I spent a little time in SCAL with rounded squares to make a window card, following this week's sketch at Card Positioning Systems. For the theme, I turned to Supply Challenge at There She Goes: 3 patterned papers, 2 buttons, 1 sparkly element. This was really quite a challenge, because I wanted to use double-sided cardstock, and if I used two double-sided papers, that would be 4 patterns! So I found a cardstock that was patterned on one side and plain on the other; hope this doesn't count as cheating! I used a button brad to make the flower that I cut on the Cricut, and a button I found in my stash (from a mauve velveteen jacket I used to own) to hang the angel.

The angel is counting as my "sparkly element," as it's detailed with gel pens and is quite sparkly. It's actually something I made months ago, using the Live Angel from PaperFacesDesigns' Live-Laugh-Love digi stamp set. I imported the digi into SCAL, adding some holes for hanging, and cut out the shape on acetate. I found that cutting it twice with my Cricut on "high" worked well. Then, I printed the image at the same size and traced it onto the plastic angel with Sakura gel pens, which was the only thing I could find that would stick.
Digi stamp: Live Angel by PaperFacesDesigns

Inspiration:
There She Goes Challenge #93: 3 patterned papers, 2 buttons, 1 sparkly element
Card Positioning Systems Sketch #204

Supplies: K&Company Valentine's Designer double-sided paper pack, Relaxed textured cardstock, VersaMark chalk ink, ZipDry glue, stash buttons and thread, Sakura gel pens, Cricut Expression, SCAL, 09 KutUps dingbat font for flower shape

Saturday, February 5, 2011

is fully aware...and it's RED!

February is American Heart Month (although Heart Disease Awareness extends to everyone, we're just really in need of some awareness), so on Feb. 4 a bunch of people on FaceBook posted as their status something about their heart, ending with the phrase And it's RED! I put "Is cautious yet optimistic," but others came up with really beautiful descriptions. Inspired by this, Mojo Monday's square sketch, and TLC Creations' special freebie that day, I whipped up this 4x4 card with a PaperFacesDesigns digi that I had handy. I'm also entering this card into Craft Your Passion's Bling on Your Love challenge, although it's a little low on the bling.

This seemed like the perfect opportunity to use some of the gorgeous ribbon from heaven-knows-where that I found in the attic. I was recently complemented on my Ribbon Treatment (or RT, to the cool kids), so I tried some light "puckering" with ZipDry. Yikes, I'm hooked. Guess who bought more ribbon today‽ For the wings, I used some of the red-and-yellow paper I distressed for my slider card. For the "lace" element, I cut a scrap of glittered paper with scallop scissors and added the holes with my Crop-O-Dile punch.

Digi stamp: Angel Meggie by PaperFacesDesigns

Inspiration:
Mojo Monday Sketch 176: square
Craft Your Passion Challenge #43: Bling On Your Love (Use Bling & Red or Hearts on your creation)

Supplies: K&Company Valentine's Designer double-sided paper pack, Core'dinations cardstock, Marvy punch, ZipDry glue, Martha Stewart detailing scissors, emery board, Sakura gel pens, HP printer & ink, Fiskars papercutter and scallop scissors, Copic Ciao markers, Tim Holtz distress inks (fired brick, antique linen, mustard seed), stash ribbon, Crop-O-Dile II

"You Make My Heart" Pop-Out

Ah Valentine's Day, when pink and glitter seem like good ideas. My favorite part about this holiday is that it gives us an excuse to tell people we love them...plus, make them cards. I've seen some really fun Valentines online, from punny Patent Illustration Valentines to SuperFriends Action Valentines from the 1980s, to ninja-themed Kawaii Mini Valentines. Many, including these, are free to print at home!

But I'm low on printer ink, so I decided to make another hand-made Valentine, inspired by the Aud Sentiments Corny Sayings challenge and the "slider pop-out card" tutorial I found yesterday at SCS. I'm also entering this card into the Cards for Men Valentine Challenge, because I think it keeps a classic Valentine feeling without being too girly. I'd give it to my sweetheart (but he'll read about it here first)!

This card features this Friday's PaperFacesDesign Freebie, Lovebirds 2.

The card design is quite simple (if you follow the directions, which only took me twice), and once you have the base together, you can decorate to your heart's desire. I stamped a heart-and-star border from a Christmas set onto the "sliding wrap" with Antique Linen distress ink, for a wood-block, vintage feel. Then I got a little funky and "distressed" the white side of a light green paper with red, yellow, and linen inks. I was inspired by Stamping 411's Technique Thursday / Reinker Background post, but I don't have the right tools so I just used a damp paper towel. After it dried, I stamped the flowering vine stamps onto the green side, for the garland, and made a backing piece for the Lovebirds. I even ran the ribbon over the Antique Linen ink to tone it down. The garland is affixed with heart brads; I hid the backs with a couple of the vine stamps.

Sliding Pop-Out Card Tutorial: Kim Score for Splitcoaststampers
Digi stamp: Lovebirds 2 by PaperFacesDesigns

Inspiration:
Aud Sentiments Challenge #21: Corny Valentine
Cards for Men Challenge #3: Valentines/Love

Supplies: decorative papers by Paper Studio, MS detailing scissors, ZipDry glue, Sentiment stamp by gstudio, HP printer & ink, Cricut + SCAL, Fiskars papercutter and deckle scissors, Copic Ciao markers, Tim Holtz distress inks (fired brick, antique linen, mustard seed), silicon stamps from gstudio and Scrappy Cat, stash eyelet & heart brads, Crop-O-Dile II, Offray ribbon

Thursday, February 3, 2011

Glitterati

In honor of the Blue Challenge I'm hosting this month for PaperFacesDesigns, I'm using only PFD images this month. With so many cuties to choose from, it should be lots of fun!

I'm starting with Angel Claudia, with her gorgeous dress and hat. I printed her onto Copic paper (which I'm now totally hooked on) and colored her in purples, pinks, and reds for this week's iCopic coloring challenge. For the card design, I turned to the Midnight Madness sketch and the CDAC Embellishment challenge hosted by Michelle Perkett Studio.

Michelle has challenged us to use
glitter, hearts and rhinestones, and I find myself in a bling-a-lious mood. So I pulled out my long-hoarded gemstones, and painted on some Stickles. I also pulled out my favorite glitter papers from Core'dinations (Stiletto style, I think, but I can't find it on their site! Update 2/16/11: found it! It's Core'dinations Glitter Silk) and Colorbök. I used this fantastic freebie SVG from TLC Creations to cut out the "love" sentiment on super-glittered paper. I don't use this kind of paper often, because just thinking about it gets glitter all over, but it cuts beautifully on my Cricut. I could have kept adding gemstones all day!

And please join me for the PaperFacesDesigns Blue Challenge!


Digi stamp: Angel Claudia by Therese Travis for PaperFacesDesigns
Sentiment cut file:
Love Encircled by TLC Creations

Inspiration: CDAC Embellishment Challenge:
glitter, hearts and rhinestones
Color: iCopic Color Challenge #15: red, pink, purple
Sketch: Midnight Madness Sketch Challenge #89

Supplies: X-Press Copic cardstock, Valentine paper by K&Company, Core'dinations and Colorbök cardstocks, HP printer & ink, Cricut + SCAL, Fiskars papercutter, and deckle scissors, Stickles glitter glue, emery board, MS detail scissors and border punch, Xyron sticker machine, gemstones from Hero Arts, Michaels, and Bead Party

Copic Ciao markers used: RV23, 0, V17, BV04, E04, RV21, R02, YR00, RV29, R59, E02, E35, E51, RV42, E33, E47

Update 2/7/11: This card won (by random)
iCopic Color Challenge #15!

Tuesday, February 1, 2011

PaperFacesDesigns February Challenge: Blue

Happy February! This month is my PaperFacesDesign (PFD) month, and I hope you'll join me and the DT for a challenge and some fun!
I'm sponsoring this, the first monthly challenge at PFD (ThereseTravis.net):


I want to see your projects that focus on the color blue. Use your imagination, and share your projects on the PFD website:

Rules:
  1. Make a card, scrapbook layout, or whatever, using this month's theme.
  2. Leave a direct link to your project in the Comments section of the Contest Post, or Email your project to: cgSaysSomethingLoudly [at] gmail [dot] com
  3. You may submit to more than one challenge, but please mention PaperFacesDesigns and no back-linking (entering a previously-published project).
  4. One winner will be chosen randomly, and will receive an image of their choice from the PFD Etsy store.
  5. Have fun with it!

More ways to win:

  1. You are not required to use a PaperFacesDesigns image, but if you do it will earn you an extra entry.
  2. Become a follower of Too Many Ideas and/or our Design Team blogs and receive an extra point for each! Follow through your favorite method and leave a comment on this post letting us know.

Be sure to check out everyone's projects, they're amazing! Here's my Blue card:

Digi Stamp:
Lovebirds 1 by paperfacesdesigns

Supplies: Recollections, PaperStudio and Core'dinations cardstocks, MS detailing scissors, ZipDry glue, HP printer & ink, Marvy punch, Fiskars papercutter, deckle scissors and corner punch, Offray ribbon, Kurio brads, stash silicon sentiment stamp, pop-dots, Copic Ciao markers, Tattered Angels "Jack Frost" spray mist

Friday, January 14, 2011

Endless Inspiration

For a while now, I've been wanting to write a post featuring some of the great people who've inspired me this past year. The list could go on forever, so here's a short list (and check out my ever-growing list of crafting inspiration). And I especially want to thank you, the reader!

First of all, much of my creative inspiration certainly comes from my folks. Mom has been sending me crafting stuff for years, inspiring me to learn many new techniques and keep up with my crafting passion, and in the past year we've really bonded over cardmaking. I even sold some of her beautiful 3D Christmas cards to my in-laws! They were so taken with the cards that each person (Grammie, Grampy, parents, sisters & brothers) took the time to mention to me that Mom should really have a Copyright stamp. Thanks for the Christmas present idea! Happily, my folks had the foresight to send me to college, where I learned a bit of design which came in handy to design these pocket stamps through Vistaprint.


One of the first color challenges I discovered was over at Scrapmaster's Paradise, and winning their Challenge #70 was certainly an ego boost for me. Not only did I gain validation, for which I am a bottomless well, I won some actual stamps!

I used these stamps for several projects and found it perfect for last-minute cards.

2011 has brought some awesome changes for the Scrapmaster, and her color combo challenges now has its own site. And it's still one of my favorites.


My absolute inspiration for everything is my husband, who's loved me through a sea of paper ever since I started handcutting snowflakes in our first apartment. We don't really do gift-giving on special occasions, but we do enjoy spoiling eachother in surprising ways. So when I found a cheap copy of The Death of Bunny Munro by Nick Cave (sort of the bard of our relationship), I figured that, plus some kind of weird hand-craft, would make a great present for him to open on Christmas.

Now, if there's anything my Baby appreciates more than creative passion is good research, so I searched the Interwebs for a image to work with. Oh my stars, was I lucky to find this illustration by
Dominic Bugatto (center image; picture on the left of it is by my favorite husband).
In my younger days, I would have just copied this off his site and mentally sent good wishes to him every time I looked at it, but I figured it would be a better gift I took the time to ask permission. He generously allowed me to use it for free, and it came out beautifully. In fact, the quality of the color turned out way better than I had planned. I printed it onto printable fabric on my creaky HP; the color stood up to 3 full rinses! Then I glued it to an old frame I had lying around. The frame was very vanished, so I sanded it down to give it a softer look. It really fits into the "decor" of our home, and I'm really enjoying following Dominic's blog!


My life was changed in 2010 when I was invited to join the PaperFacesDesigns Design Team. I've learned so much from these images and fellow designers:Therese's designs certainly played a large role in my Christmas decorating & cardmaking this year!


Before I had even heard of digi stamps, I spent much of the winter & spring learning SCAL and researching orgamic architecture. I'm a total klutz with an X-ACTO, but my Cricut (with SCAL) gave me the opportunity to try some pop-ups.

I first discovered Extreme Cards & Papercrafting through a link to her pencil holder. I imported the image into SCAL and traced it. Then, I changed some of the elements to make my own version, which became a card for a friend's daughter who was coming home...and leaving for Law School. That simple card/pencil holder led to some nice bonding, so it has a particular place in my heart.

Since the cut file is just digital, I can cut it as many times as I like, which I do! I used it for some of my family Christmas cards.

My life was further changed by Extreme Cards' post about her
Naked Mole Rat magic picture card. I may have gone a little crazy with the idea! The magic cards are the right are a business card-sized version I made for a bookwarming party.


Last, but not least, I have to mention Passager, the literary journal & press I've been working with since 2003. Every single person I've worked with there has inspired me in many different ways. Our designer is Iranian-American and taught me about Yalda, the Persian celebration on the Winter Solstice. My family really enjoyed sharing a pomegranate on December 21st! So I made this pomegranate card for her...notice it opens the "opposite" way.

And if you're interested in bards, books & Baltimore, be sure to register for Passager's 21st Birthday Celebration, coming up in June. We'll be having readings and sharing books, and would love to meet you.