
 This weekend I found myself Crafting with a Purpose, the purpose being trying to get myself out in the crafting blogosphere by entering challenges. The word "overwhelmed" comes to mind...the last challenge I did, late last night, actually used scrap paper that was on top of what used to be my crafting table, and now looks more more like an art school paper-only dumpster. It amazes me, sometimes, how only half of my life can be organized at a time.
So happily, I'm caught up sorta on my weekend goals. Maybe I'll actually do some housework! Gee, I'm so lucky to have a husband who not only enjoys cooking, but feels that my crafting messes are part of a wild, romantic ride.
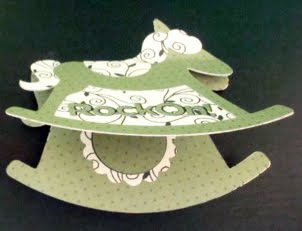
Anyhoo, I'm entering my new rocking horse card in this week's Allsorts Challenge, "New Beginnings". To be honest, the idea came from my awesome Mom; I wanted to make a baby card for some friends, but I was feeling overwhelmed by the possibilities, so I called Mom and we bounced around some ideas. The one the stuck was the rocking horse card: as Mom said, "knowing you, it will actually rock!"


O. Yeah.
I found a free rocking horse cut file at SVGcuts, and liked it so much that I bought the set it comes from (thank you, Labor Day discount!). If you'd like the full SCAL file for this card, please email me (cgsayssomethingloudly [at] gmail [dot] com) and I'd be happy to share it (for personal use only).
Since I was making one of the cards for first-time parents, I wanted to add something a little...different. So I came up with "Rock On!" which tickles my bad-pun bone.

Our design team member Natacha over at Scrapbooking, Card Making and Me! has a challenge going until September 20: Halloween treat bags. These are so adorable and, honestly, way to much fun to make. She's offering some yummy candy for the winner, so check out the challenge and please participate.
Here's my try...I used an eyelet instead of a staple because, well, I really love eyelets. The rough edges were created with my Fiskars deckle scissors, which I had been neglecting since I got my Cricut cutter. How adorable is Therese's Treat Kitty? I colored it with Sharpies and Sakura gel pens.
The treat bag tutorial is offered by Stamp My Art, and the digi stamps are from Paperfaces Designs. Therese is giving out a free digi stamp every Friday, so be sure to follow her blog.
On August 28, we braved the downtown parking rates to check out the 11th annual Baltimore Comic-Con. Although I love comic books and culture, I'm not always great in big crowds, so I like to feel that I something to "do." This time, I decided to try my hand at some "hip shots," a kind of photography that I learned about from my friend Mary, who's always inspiring me. Her friend Jim has a wonderful weekly series of "hip shots" at Doodlemeister.com, and I sent him some of my shots, which you can see here.
I'm very pleased with how the shots came out. These aren't just crowd shots or off-hand shots, they're really shot without focus from the center of the body. I call my "belly-button shots" because that's how I tended to hold the camera. I got some funny looks from passers-by, but you can get away with pretty much anything as long as you look like you know what you're doing.
Check out the Hip Shots, and then take a look at these photos by Mania.com from the same day. The Captain America I caught browsing the tables is on there, as are the Green Arrow/Black Canary couple that were in line behind us. Nice folks! I wish I had gotten a shot of the GI-Joe characters...some of them honestly looked like life-sized dolls.
As must be obvious, we had a great time. We picked up some artist trading cards, which I matted and turned into art for the living room. I think my photos represent our time at Comic-Con fairly well; after all this time, "contemplating my belly button" has finally paid off!
Thanks Jim and Mary!
I tried my hand at a "Magic" or "Changing Picture" card, per the handy directions at SplitCoastStampers, but I don't have a good way to print/stamp onto acetate. I could have waited until this weekend, when I could pick up some transparency paper, but I didn't wanna.
So I made this version, which doesn't require marking on the acetate. And, like a good Po'boy sandwich, it winded up being relatively expensive and complicated, but Oh! so worth it.
I used Therese Travis's Decorative Cat digi stamp (now available on Etsy!), and actually "printed" the image with Cricut markers on my Cricut Expression. I think it adds a "stamped" feeling.
To do something like this yourself, import your digi stamp image file into SCAL, size it, and then make a copy and apply "blackout". Ta-da, instant mask!

At first, I was just going to use bright colors, but then I saw the Midweek Throwdown Halloween Challenge at the Operation Write Home (OWH) blog and just had to make the card for this challenge. So much fun!
Supply list: Cricut personal cutter, Cricut marker, SCAL software, Recollections card stock, Grafix clear craft plastic, JoAnn essentials eyelet, Offray ribbon, Sharpie markers, Crop-A-Dile 2, Zip-Dry glue. PaperFaces digi stamps: Decorative Cat.
As I mentioned in my last post, Therese Travis at Paperfaces Designs is rolling out her holiday images. She sent us several adorable digi stamps and svgs, but I just had to drop everything and use her Angel Rainie, who comes with her own reindeer.
 I made a two-color (with gold "aging") easel card, and used brads to make the reindeer head and the angel wings move. I used "pop-up presents" to weight the easel. Here is the card laid flat:
 And from the side:
 Supply list: Cricut personal cutter, SCAL software, Core'dinations card stock, JoAnn Craft Essentials heart brads, Oriental Trading Co. jingle-bell brads, Offray ribbon, ColorBox gold ink, Crop-A-Dile 2, Zip-Dry glue. PaperFaces digi stamp: Angel Rainie.


 This weekend I found myself Crafting with a Purpose, the purpose being trying to get myself out in the crafting blogosphere by entering challenges. The word "overwhelmed" comes to mind...the last challenge I did, late last night, actually used scrap paper that was on top of what used to be my crafting table, and now looks more more like an art school paper-only dumpster. It amazes me, sometimes, how only half of my life can be organized at a time.


