Monday, July 15, 2013

Princesses at Sunshine Mail

It's time for a new Sunshine Mail Foundation Challenge (July 15 - August 1). Our theme is "Princess" and the only real rule is that you send in at least one card (it doesn't have to be the card you enter in the challenge; Donation guidelines here).

I used Princess Aurora Honey by our sponsor, Sassy Studio Designs:


The image is printed on 100# Hammermill and vellum, and colored with Copics. I placed the dress over the image, so you could see the die cut under it. The "Dream" die cut is by K&Company.

The yellow-and-white, cloudy background was made by inking a Cuttelbug embossing folder bfore running it through my BigShot. The patterned, yellow-green background is a DP from my stash; everything is backed in 2 shades of blue Recollections paper.

The corners are notched with a Marvy punch, and the very reflective gold ribbon is from my stash. The leaf die cut was cut with a Sizzix die.

I raided my embellishment drawer for this one! So many fun little things that I've been saving for the right moment. The heart lock is an eyelet, so I used my Crop-O-Dile to punch a hole & clip on the eyelet. I put the key brad through it. The pearls are self-adhesive, but everything else was adhered with Glossy Accents, so no small bits are falling off.

Did you know that the Sunshine Mail Foundation is July's featured organization for Split Coast Stamper's July Cards for a Cause Drive/Challenge? Hope you'll join in!

Inspiration/Challenges:
  1. Ladybug Crafts Ink TLT Challenge: Birthdays
  2. Loves Rubber Stamps #60: Use A Hoarded Item (the embellishments have been in my stash for quite some time; the plastic castle & crown have been saved for just such a project!)
  3. Paper Shelter Challenge #120: Swirly Girly
  4. Stamping Sensations July Challenge: Sketch with summer colors
  5. Try It On Tuesday: Metal (heart lock eyelet & key brad)
Thank you for visiting,

Cupcake Cutie

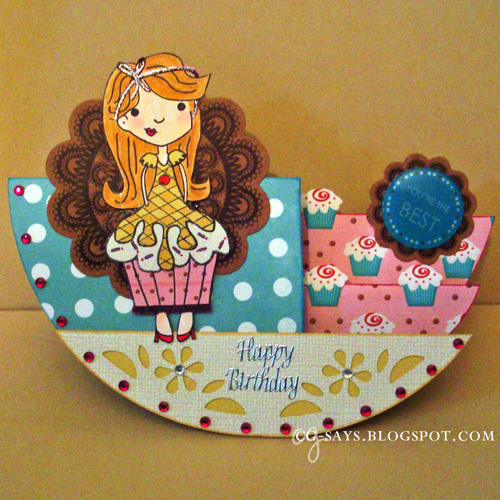
Oh how I love tutorial challenges! I rarely actually get around to entering them, but I thought that the Circle Step Card and/or Circles/Hexagons challenge at Top Tip Tuesday was perfect for a birthday card for our niece.


The "Cupcake Girl" clear stamp is from my stash; I know it was made by someone in Arizona, but sadly it doesn't say on the package. I've ended up loving this stamp more than I thought I would; it's so much fun to paper-piece (you can see another version here), and is easy to personalize. The dress, frosting, and wrapper are all pieced on from different papers, and the body & hair is a 100% Hammermill. I colored the image & dress with Copics, and added detail with Sakura glaze pens.

I made the base with Echo Park's double-sided Teal Small Dot DP (the inside is striped). The cupcake paper is from Digi Doodle Doo's free . I cut out some more tiny cupcakes and glued them on top of the paper to add dimension. The Cupcake Girl's wrapper is stamped on a digi paper I made by enlarging the same cupcake paper.

The bottom, flower-patterned portion is made from a textured, white-frosted yellow Core'Dinations cardstock. I punched the pattern with the "Flower" Mini Lucky 8 Punch from We R Memory Keepers, and backed it with the the yellow side. I used both sides for the frosting & dress on the Cupcake Girl.

The patterned kraft medallions die cuts are from my stash; I splurged on $2 worth of them at Scraps of Love, and I've been hoarding them for over 6 months! The 3D "You're the Best" epoxy sticker on the small doily is also long-hoarded. I embellished the card with adhesive gems and a silver "Happy Birthday" sticker.


I think our niece will like this card, as her family likes to bake!


Color Throwdown #250
Inspiration/Challenges:
Color Throwdown #250: Teal, Kraft, Hot Pink, Light Yellow
Quick Quotes: Add Dimension to your project
Top Tip Tuesday Challenge 105: Hexagons and/or Circles (and Circle Step Card tutorial)
Word Play Saturday: Birthdays

Thank you for visiting,


Inspired by an Evening with a Friend

My dear friend visited us the other day, and we spent a lovely summer evening marveling at the fireflies (neither of us grew up with them), and watching a concert by The Arcade Fire on TV. I wanted to make him a "thank you" card, so I used the chorus of their song "The Suburbs":

The color/pattern scheme was inspired by my friend's pajamas! They consisted of blue-and-white houndstooth-patterned flannel pants and a burgundy sleeveless undershirt. I don't know, I just loved the combo!

I used the Circle Step Card Tutorial at Top Tip Tuesday, and the Distressed Houndstooth Overay digital paper by Mel Stampz. The lyrics are set in the font Droplet Lite and cut out with IO dies. I made the city-topped half-circle in SCAL. The cityscape svg cut files are from my digital stash.

I added a strip of adhesive pearls that I colored with a Fluorescent Yellow Copic marker. Because the top of the strip was also sticky, I first covered it with glow-in-the-dark glitter. It's meant to reference those fabulous fireflies!

I'm entering this into this week's Top Tip Tuesday challenge, but with a Tip, not for theme. Here's my tip:
Formatting text to fit in dies
I like to type up my own text, print it out, and use my metal dies to cut out the shapes. To ensure that the text will fit into the shape, I use Text Boxes to help me design.
Here's how to do this in Word (these instructions are for Word 2004 for MAC, but should translate to other similar programs):
  • Measure your die.
  • Go to Insert/Text Box. Double click on the box and a format box will pop up:
    click to enlarge
  • In the "Colors and Lines" tab, select "No Fill" and "No Line". Go to the "Size" tab and put in the dimensions you want. 
  • Now you should be able type in your text and choose fonts. I recommend centering the text, depending on the die. For these cloud dies, I know that the top is smaller than the bottom, so I can adjust for that with line breaks.
  • Print out the text, giving yourself plenty of margin space. Use low-tack tape to line up the die over the text. Cut the die from the larger sheet of paper, and run it through your die cutting machine. Presto!

Many thanks to Annette at Top Tip Tuesday for the tutorial and inspiration!

Update: This was chosen as the Top Tip at Top Tip Tuesday #105.

Thank you for visiting, and Happy Crafting,


Sunday, July 14, 2013

Beary Best Wishes... Use a Digi Challenge at OSAAT

It's time for a "Use a Digi" challenge at One Stitch at a Time (OSAAT)! I love stamping, but digi stamps are so much fun too, and StitchyBear's Digi Outlet has hundreds from many wonderful artists.


This week, I get to show off this adorable Balloon Bear by Beary Dust Stamps:
The tiny balloons were cut on my electronic cutting machine using a cut file from SVGcuts.com's Premium Pop-Up Cards set. I used a shiny Recollections paper, and stamped them with wood-mounted rubber letters. I hand-drew the strings with a small PITT artist pen.

Sketch N Stash #117
Inspiration/Challenges:
  1. Artistic Inspirations: Bling
  2. Aud Sentiments Challenge: Two word sentiment (Best Wishes)
  3. Hanna & Friends: Birthday + cute/stamped/person/animal
  4. Creative Fingers: Anything Goes
  5. Paper Minutes #227: Anything Goes
  6. Papertake Weekly: Old New Borrowed Or Blue
  7. Sketch N Stash: Sketch + Stash
  8. Stamp with Fun: Celebrate 
  9. Tammy's Scrappin Corner: Animals
Thank you for visiting, and best to you & yours,


Friday, July 12, 2013

Sunshine Mail Foundation Blog Hop Day 5

Welcome to the fifth and final day of the Sunshine Mail Foundation Blog Hop! We're hopping all week (July 8 -12), with great prizes to be won every day.

Our sponsor today is Milk N Coffee Digital Stamps, and the prize is 5 digi images.


To be eligible to win the prizes all you have to do is:
  1. Become a follower of our blog
  2. Add our Badge to you blog and link back.
  3. Make sure you visit and leave comments on the DT members post:
I used Love Call Boy by Milk N Coffee:


The telephone dial sentiment is from TLC Creations'
Dial a Saying set. I tinted it in silver & gold in PhotoShop, and colored it with a Copic marker after printing. I added Glossy Accents to the middle to pop the sentiment.

The brick background

is made with a Core'Dinations cardstock and embossed with the brick-wall plate I made out of cardboard, using Creating in Carolina's Faux Brick Embossing Folder Tutorial.

And the inside:


Remember to leave a comment for your chance to win. Your next stop is Jessica. Thank you for hopping with Sunshine Mail!