Sunday, January 26, 2014

Horsey Hello

This week at Pile It On! we're focusing on Animals. January 31st begins the Chinese Year of the Horse, and I couldn't resist using this hilarious Saddle Up digi stamp and the corresponding Hay Bale digi set from Doodle Pantry.

I wanted a "model" for the horse, so I decided to color it based on Jubilee, the new horse of Chris, the coordinator at Paper Playful. I really enjoy working with Chris, and have enjoyed hearing stories about this beauty. You can see photos of Jubilee here on Chris's blog

The horse, pre-colored hay bale, sentiment, and backing papers are all from Doodle Pantry. The woodgrain paper are scraps of an October Afternoon DP. I colored the horse with Copics, and used a texturizing effect with Blender Solution on the background. The faux stitching on the sentiment banner was done with a TEKwriter gel pen.

For the background, I colored drywall tape with a gold leafing pen, and added some twine as well. The little metal horseshoe is actually a prong snap button, but I cut off the little prongs and attached it with Glossy Accents.

Inspiration/Challenges:
Challenges 4 Everybody #37: Anything Goes
Crafter's Cafe #47: Funny or Whimsical
Craftitude - Anything goes or Fluffy
Just Inspirational Challenges: Anything Goes
LEJ Designs #85: Anything Goes
My Sheri Crafts: Use a Digi
Paper Shelter Challenge #144: Digi image + sentiment
Simon Says Stamp: Humorous (3rd entry)
WordArt Wednesdays: Anything Uplifting Goes

Thank you for visiting, and hope you'll join us this week at Pile It On,

Saturday, January 25, 2014

Valentine's Card in a Box

I had so much fun making my first Card in a Box that I just had to try the technique again.


I completely forgot to take a photo of card closed! I took a lot of time lining it up too... but it's already in the mail to my mom, so you'll just have to use your imagination!

Most of the design/product notes can be found in my Mad Hatter Designs card post; I made these two projects at the same time. The vintage Girl with Cat image (and its opposite, pink side) are from an Authentique DP. The borders were created with a Recollections punch. The polka dot papers are from Echo Park, and are sponged with ColorBox and TH inks. The lace on the corners is aged with TH distress ink.

I followed the written tutorial at Splitcoaststampers, but used the measurements from Stampin T!'s video tutorial, and made two slight adjustments (center score and card height) so that the final card would be 5.5 inches tall, to fit in an American/A2 envelope. Here are the measurements for my smaller version (I'll leave the actual tutorial to the experts!):
  • Start with a 7.5 x 9 inch piece of cardstock
    Score lengthwise at 2.125, 4.25, 6.375, and 8.5. Score widthwise at 2.5.
    With the smaller squares on top, cut the paper to 5.5 inches.
  • You should now have a 5.5 x 9 piece and a 2 x 9 strip. Cut this in half, and follow the score lines to make the pop-up strips.
  • Mattes:
    Solid: Top 1: 2 x 2.375; Bottom 1: 2 x 2.875; Middle 1 (tall): 2 x 5.375
    Patterned: Top 2: 1.875 x 2.25; Bottom 2: 1.875 x 2.75; Middle 2 (tall / message): 1.875 x 5.25
This is such a fun card design, and I thank the talented person/people who came up with it!
 
Inspiration/Challenges:
Crafting from the Heart: Anything Goes / Fancy Folds
Lexi's Creations: Fancy Folds
Simon Says Stamp: Humorous (2nd entry)
Simply Create Too #53: Valentine's Day or Use Hearts (2nd entry)
The Pink Elephant Monday Card Challenge: Pink & Red + Color of your choice (Blue)


Thank you for visiting,

Thursday, January 23, 2014

You're Purrrfect! A very special challenge

Sammy, my teamie at Crafting with Dragonflies, is having a special Blog Candy + Freebie Challenge to promote her 14-year-old daughter's digi stamp company, Mad Hatter Designs. I just couldn't resist participating!

Do check out this challenge; you can enter for the awesome blog candy (did I spy LOTV?!), and you can help support a young artist by using this cute digi to be eligible for another great prize!

This image is called Neko (Cat), and I just happened to have the purrfect sentiment stamp already out on my craft table!

The image and paper-pieced dress are colored with Copics and TEKwriter gel pens. I had lots of fun coloring this, it's not my usual thing. The whites of the eyes are filled with a clear Sakura gel pen.

The three heart-patterned patterns are from a paper pack I acquired years ago...not sure the company. The polka dotted and striped paper are the opposite sides of an Echo Park paper, and the sentiment was heat-embossed on a scrap of DP (Authentique). The sentiment & pawprint are from the same stamp set (Studio G?), which I won a long time ago from Priscilla at the Midnight Madness Sketch Challenge. The image piece was sponged with hot pink ink, and the corners were decorated with a Recollection border punch. Everything was edged with Copics. Can't you tell I had fun with this‽

Tuesday Morning Sketches #233
Inspiration/Challenges:
Mad Hatter Challenge: Freebie digi
Simon Says Stamp: Humorous
Simply Create Too #53: Valentine's Day or Use Hearts
Tuesday Morning Sketches: Sketch #233


I'll be sending this card to the Sunshine Mail Foundation, to give a smile to child in the Northern Virginia area. You can even win a prize by entering their current challenge, "Anything Goes with a twist for Valentines Day" and sending in a card (Donation guidelines here).  

Update: This card was featured on the Tuesday Morning Sketches Facebook page.

Thank you for visiting, and a special thank-you to Kayleigh and Sammy

Tuesday, January 21, 2014

Crafting with Dragonflies

Crafting with Dragonflies is back with a brand-new challenge. Our theme couldn't be easier...just make a card, any card!

The Dragonfly is a free SVG from Scribbles Designs. I spent the better part of a morning designing this in SCAL, totally worth it. The patterned papers are from a Colorbök set, and I have some fun scraps left over!
The outer border was done with Liquid Pearls.

Inspiration/Challenges:
Craft It Up & Link It Up Linky Party by Craftin Desert Divas: Shaped Cards
Crafty Calendar: Celebrations
Fantasy Stampers Challenge #2: No digi / Anything with Wings

Thank you for visiting,and hope you'll join us at Crafting with Dragonflies,

Sunday, January 19, 2014

How now, brown cow! - Card in a Box

Click images to enlarge
This week at Pile It On we want to see wood items and themes (one of my favorites...which is why I chose it!). Our sponsor is A Day for Daisies, so I combined our challenge with their "Yellow" challenge to make this project featuring Cow in a Dress from ADFD.My wooden items are the Wood fence, Woodgrain DP, and Fence die cut.

The moment I saw the lovely Card in a Box at Calla Lily Studio, just yesterday, I knew I had to make one right away! There's a great written tutorial at Splitcoaststampers, but I took her suggestion and made the smaller version by Stampin T! (video tutorial). However, I trimmed my card down to be 5.5 inches tall, to fit in an American/A2 envelope.

Here's the card all closed up:
It was fun to design this as a card and as a box. I added some gold Stickles to two of the corners for a little balance. I decorated a little clothespin to hold it down for this photo; it really wants to pop up!

And here it is as a box:
I typed up the sentiment, printed it on shiny yellow paper (Recollections), and heat-embossed it in gold (Stampendous). I colored the sweet image with Copics, and used a yellow gel pen for the ribbons on its legs.

I received the wood fence from Linda as part of a City Crafter swap some time ago. I cut it down for this project, and painted with white Crackle Paint.


The Garden Fence cut file (designed by Claire Brennan) is a freebie from Waltzingmouse Stamps.


The current challenge at Our Creative Corner is to use "one of your Shopping Sins"...that is, something new that you bought without a specific purpose. The woodgrain-patterned paper (Echo Park/Lori Whitlock) is a new sin purchase...I went crazy with woodgrain patterns this year! The ribbon roses are a past sin purchase, in that I bought them maybe 2 years ago because I absolutely had to have them and never used them!

I really enjoyed making my first Card in a Box, and find myself really wanting to make more!Many thanks to everyone for the inspiration. Be sure to check out the beautiful inspiration parade for this kind of fold on Pinterest.

Inspiration/Challenges:
A Day for Daisies: Yellow + ADFD image
Crafts 4 Eternity Recipe Challenge #159: Fancy Folds
Die Cuttin' Divas: Die-cut (paper fence) + Something Old & Something New (I used Old stash ribbon & wood fence, and New paper & technique)
Just B Creative Crazy: Just Because Anything Goes Linky Party
Our Creative Corner: Use one of your Shopping Sins/Something New (woodgrain paper)
Stamp n Doodle: Animal
Sweet Pea Stampers: Flower Power
WordPlay January Challenge: Yellow

Update: This placed in the Top 3 for Crafts 4 Eternity Recipe Challenge #159. Whoo hoo!

Thank you for visiting, and hope you'll join us this week at Pile It On,

Wednesday, January 15, 2014

Anything Goes Sunshine Mail + Valentine's Twist

It's time for a new Sunshine Mail Foundation Challenge (January 15 - February 1). Our theme is "Anything Goes with a twist for Valentines Day" and the only real rule is that you send in at least one card (it doesn't have to be the card you enter in the challenge; Donation guidelines here).    

This challenge is sponsored by Meljen's Designs, so I used her Sweet Little Foxy digi stamp:
I paper-pieced the fox onto a shiny bronze paper, using a white cardstock and a Colorbök patterned orange paper. I added details with Copics and bright orange Liquid Pearls.

I used Core'Dinations cardstock and my Silhouette to cut the Fold & Tuck Flowers by Alaa' K, available at the Silhouette store

The sentiment is from an Inky Antics set, and is heat-embossed in shiny green on a raffia-type paper. I also used an orange burlap ribbon and a fun ladybug-themed lace from my stash. The backing paper is from Graphic 45.

I made the heart border in Sure Cuts A Lot (SCAL), cut it on my Silhouette from an orange cardstock, and added fluorescent orange embossing powder with a Versamark pen. I also made a versoin with smaller hearts, that I used inside:

Mema's Challenge
Inspiration/Challenges:
Card A Day Blog: Valentines
Crafty Hazelnut's Patterned Paper Challenge: Anything goes using PP as a backing / 2nd entry
Mema's Challenge: January BINGO* (second column: Embossing, Dies, Flowers) / 2nd entry
Rogue Redhead Designs #31: Paper Piecing

Update: This was the prize winner for Rogue Redhead Designs #31. Thank you!

Thank you for visiting, and hope you'll join us at Sunshine Mail,

Sunday, January 12, 2014

Spooky Birthday - Celebrating at Pile It On

This week at Pile It On! we're highlighting Holidays/Celebrations. Whether it's current or upcoming, it's always good to have occasional cards in our stash! Our sponsor is Oak Pond Creations, and Kim has unique digis for about any occasion.

I used Edgar the Raven and Mabel Mouse. Last year, the Oak Pond Creations blog had a contest where people suggested names for this image; the winner was Ike. I missed the contest and the freebie, but I couldn't resist buying this fun image to make a card for a friend with a Halloween birthday:
I've been hoarding this raven-printed kraft paper, but I couldn't resist using it! The orange plaid DP is by Graphic 45. For the spiderweb corner embellishments, I cut up a doily by Bird's Cards that I cut on my Silhouette. The card base was cut with a Sizzix die.

If you know me, you know I couldn't resist using black flocking (Sparkly Fluff by OCL) on the raven. I colored the images with Copics, and cut them out with deckle scissors. The raven is pieced in three payer, although you can't really see the wing layer. I added Glossy Accents to his eye-glass. 


Inspiration/Challenges:
    1. Cards Galore Encore #1: Anything Goes
    2. Charisma Cardz #50: Birthdays
    3. Crafter's Cafe #45: Anything Goes
    4. Crafting By Designs: Birthdays
    5. Die Cut Divas: Make it Glitter + die cut (Sparkly Fluff on raven + card base is a Sizzix die, & the spiderwebs with cut with my Silhouette)
    6. Lexi's Creations: Anything Goes
    7. Melonheadz Friends Challenge: Birthday  
    8. One Crazy Stamper: Anything Goes
    9. Stampin' Royalty Challenge #209: Birthdays
    10. Victorine Originals Challenge #75: 3 Layers
    Update: I was one of the prize winners for Crafter's Cafe #45. Whoo hoo!
    Thank you for visiting, and hope you'll join us this week at Pile It On,

    Chinese New Year never-ending card

    My Crafting with Dragonflies teamie Susan is the new coordinator at UnstampaBelles, the blog that challenges you each month to create something without using any stamps at all! Quite a feat, really.

    The January theme at UnstampaBelles is "New beginnings + New product/technique" so I decided to make a 30th birthday card using the new-to-me Never-ending Card technique.

    I decided to make a Chinese New Year card, as it's coming up at the end of January. I used papers from Graphic 45's Bird Song collection.

    Mom and I recently took a class at Scraps of Love with Leslie Foley to make a Never-ending Scrapbook page, and a fellow crafter also showed us how to make a smaller card version. I've never made my own from scratch, however, so I used the Never-ending Card tutorial at Dawn's Stamping Thoughts (she also has a video tutorial here).


    Every time I make a Chinese New Year card, I have a bit of a panic about whether or not the images I'm using are actually Chinese. You'd think I'd be a bit more confident after going through this a few times, but it never hurts to do your research again (well, basically Wikipedia). As I always learn, the "Chinese" calendar New Year is celebrated throughout Southeast Asia, and was recognized by Japan until the late 1800s (Wikipedia again). One reason I was worried is that I'm 99% sure that the papers & stickers I used are Japanese-inspired, but I think it works! The larger images are fussy-cut from actual Chinese New Year gift envelopes that I got from our local Asian grocery. The banners were also cut from these envelopes.

    I had a great time using the Glitter Masking with Outline Stickers technique. It's definitely time-consuming, but worth it.

    The gold paper I used for the backings and the message page is really thin, so when I ran it through my BigShot in an embossing folder, some of the pieces were cut out. But I think it's definitely a happy mistake!

    Inspiration/Challenges:
    The Corrosive Challenges #190: New Beginnings
    Digistamps 4 Joy #83: Glitter/Sparkle
    Make My Monday: (C6) Embossing (heat-embossing on horse and dry embossing on gold paper)
    Quick Quotes #35: A Bright and Shiny New Year
    Unstampabelles: New Beginnings (no stamps!) + Optional Twist: Use new product/technique

    Update: This placed in the Top 3 for Quick Quotes #35! Thank you!
    My mom's friend saw this card and ordered 10 similar cards!


    Thank you for visiting,

    Saturday, January 11, 2014

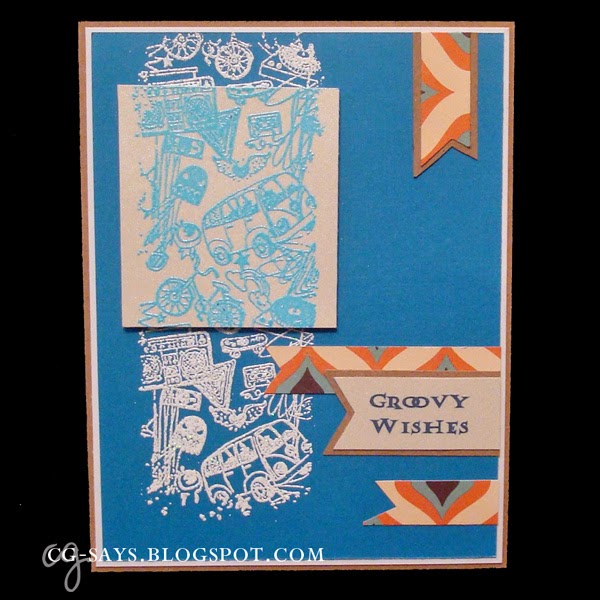
    Simply Groovy

    I've used this stamp, Retro Texture by KaiserCraft, a few times in the past (here and here), and I couldn't resist inking it up for this week's Color Throwdown challenge.
    The stamp is heat-embossed twice: in blue on a shiny white paper, and in glittery white on a darker blue paper. The patterned DP is from October Afternoon.

    I made the sentiment using the typeface Ablefont, and printed it on the same shiny white paper that I used for the image.

    Color Throwdown #274
    Inspiration/Challenges:
    Color Throwdown: Color Combo #274
    Sisterhood of Crafters: Use a new product (DP is new)
    Top Tip Tuesday #118: CAS
    WordArt Wednesdays: Anything goes (must be uplifting)

    Thank you for visiting,

    Grateful Dead flashback

    Here's a "flashback" to a card that I made last year, featuring stamps by KaiserCraft and Studio G, and lyrics from "Ripple" by The Grateful Dead:
    I ended up sending this card to my favorite website client, memoirist extraordinaire Marion Winik. I was happy to find someone who would enjoy it (from reading her work, I know she's enjoyed a Dead concert or two!), as these are some of my favorite lyrics.

    Thank you for visiting,

    Thursday, January 9, 2014

    Golfing Ants

    I've never played golf myself (except for some ill-fated putting lessons in H.S. Gym class), but with family in Arizona and Florida, we know plenty of golfers. This is my first time inking up this Ants on the Green set from G-Rated Rubberstamps:

    The ants are heat-embossed in black, and the little ball is heat-embossed in a glittery white (I also added a border to it with a pen). I filled in some of the details with a glitter pen.

    My mom sent me these Ant Buttons several years ago, and I've only used them once previously. I hand-stitched them onto the card.

    The "scorecard" DP (and backing) is from Pebbles, Inc. and the green patterned paper is from Colorbök. I used Memento ink to stamp the sentiment (from my stash; I think it's from a Hero Arts set), and added some bright green Liquid Pearls for good measure. The corners are notch with a Marvy punch.

    The scalloped circles were cut on my BigShot with a Spellbinders die; I trimmed the one on top to give it a "grassy" look. The green tulle is actually a large piece folded in half, and covered with a ribbon from my stash.

    Mojo Monday #327
    Inspiration/Challenges:
    Crafting from the Heart: Anything Goes / Pearls or Buttons
    Craftyhazelnut's Patterned Paper Challenge: Anything goes using PP as a backing
    Mojo Monday #327: Sketch Contest
    Sweet Stampin: Sport and Fitness


    Thank you for visiting,