 I've received such lovely comments on my recent notelets box that I decided to make another as a gift, and also for the CES Embossing challenge. I promised myself that I wouldn't get distracted by challenges this week and focus instead on making gifts, but I guess this is a good compromise! I want to take a moment to catch ya'll up on my awesome week... I won two incredible challenges (SPCC #100 & Tellen's Place), and am not only honored but overwhelmed by their generosity; the soccer goal digi I requested from Crafty Ann arrived, and it comes as a whole wonderful set (all proceeds go to charity); Jeannie at Polka Cabana mentioned me in her post for her gorgeous tent card (she used the .svg files I created for my tent cards, available here). And that's just a sampling!Anyhoo, for this box I broke out the copper embossing powder from another delicious package of Stampin' Dymonz blog candy (oh! that's another highlight of the week!), and used it for this lovely Koi stamp from Stampin' Up. Before embossing, I colored it with Chinese Orange and added some highlights with a glitter pen.
 Inspiration: CES Challenge #38: EmbossingStamps: Koi stamp from Stampin' Up!, flourish by K&Co., sentiment by StudioGPaper: Hammermill, RecollectionsTools: SCAL, Cricut, Marvy heat tool, Sizzix Texture Boutique & diamonds embossing folderOther: ZipDry glue, Stampendous & ZING embossing powders, Versamark watermark and chalk inks, Sakura glitter gel pen, bakers twine, brad by Kurio
Copics: YR09
 One of my favorite things about our neighborhood is our proximity to the Sherwood Gardens of Guildford. Every Spring they plant incredible tulips of all colors and sizes...this year there were some up to my knees! They weren't "Two-Lips" they were "Two-Hands"! We invited a couple over this year to enjoy it with us, and while chatting we realized that we love geraniums. They make such good "window box" flowers that they are familiar in so many different places in the world...just one of the things that bring us closer together!My friend summed up our shared emotions towards geraniums so beautifully: "They feel like home." I love idea of all of us with geraniums in our windows reflecting our memories of different places... She grew up in Tehran and I in Andalucia, but we still have lots in common.I realized that I know many, many people who feel the same way and so requested a Geranium image on CDAC, my favorite resource. IkesArt (based in Greece) responded immediately, and was gracious enough to work with me to create a pot of geraniums. Please visit her groovy online shop and check out the other geranium images! They are all wonderful, but I had a specific idea in mind...Some time ago, I was moved by the card and the story behind this flowerpots-on-wall card by suzARTe, and swore that I would scraplift the idea immediately. Well, that didn't quite happen, but I finally found the perfect image for it. Thank you, Blog-Pals!
 Inside:
 Back with message section:
 For the wall background, I really wanted to create a stucco look. For the flat parts I simply stamped my watermark ink pad directly onto the paper and heat-embossed it in white. I did the same with the brick stamp, which I made out of a scrap of foam-mounted rubber. It's not cling foam, so it was a bit tricky stamping...plus, I can't believe how well it came out considering I just "eyeballed" it. Sigh, one of these days I will smarten up and stop trying to stamp clear on white...it's like writing in invisible ink!Stamps: Geranium Pots by IkesArt, corner flourish by K&Co., inside sentiment by StudioG, inside sentiment by StampendousPaper: Hammermill, RecollectionsTools: Fiskars papercutter, Marvy heat tool, MS border punch & detailing scissorsOther: ZipDry glue, Stampendous & embossing powders, Versamark watermark ink
Copics:Pots: E08, R02, E11Light pink flowers: RV11, RV23Hot pink flowers: RV04, RV23Red flowers: R59, R27, R29Leaves: G99, YG67, YG03
 I've been keen on making a set of small, one-sided cards ever since I saw the lovely Reading Relish notelets at Jacks Arty Crafty Kreations. A friend just bought a new house, and I liked the idea of her having some pretty yet simple cards that she could use for "new address" cards. She's one of those people to whom art & poetry are as natural & necessary as food & sleep, and I love making things for her. I know she'll love this colourQ combo.
Guess who just got a Sizzix Texture Boutique?! That's right it's me, CG! I just love it, more than I even thought I would. For these, I stamped and embossed the pieces, mounted them to the secondary colors, and then ran them through the embosser with the paisley folder. I can't believe how well that worked! Inspiration:colourQ challenge #86: Real Red, Daffodil, So Saffron, Early Espresso + whiteStamps: Regal Greetings set by {ippity} Stamps, wooden house stamp from Mom, sentiment by StudioGPaper: Hammermill, RecollectionsTools: SCAL, Cricut, Marvy heat tool, Sizzix Texture Boutique & paisley embossing folderOther: ZipDry glue, Stampendous embossing powder, StazOn and InkItUp inks
,
bakers twine,
bradCopics: E47
Although I can't remember how I stumbled upon it (through one of the many inspiring blogs I'm sure; if it's yours, let me know!), as soon as I saw this week's Willow Sketchie Challenge I just had to try it. I felt the same way about the Let It All Hang Out Terrifically Thrilling Thursday (TTT) challenge at Shelly's Images. Here's the result: I bought the Top Hat with Tulips from Shelly and Tulips in Top Hat from Pattie's Creations for my parents' 40th anniversary card, and both are actually custom-made designs requested through CDAC. Thank ya'll again! That is such a super-duper resource.And the back:
 The banners are heat-embossed and the borders are flocked, both in Dandelion.
 Inspiration:TTT at Shelly's Images: Let It All Hang OutWillow Sketchie Challenge May 26th (on the right)Stamps: Top Hat with Tulips from Shelly and Tulips in Top Hat from Pattie's Creations, banner & sentiment stamps from StudioG Paper: Hammermill, the Paper Co.Tools: Crop-O-Dile, Fiskars papercutter, MS detail scissors & border punchOther: ZipDry glue, ZIG glue pen, MS flocking, Stampendous embossing powder, Marvy heat tool, Memento inkCopics: B0000, B00, B23, B28, Y02, Y08, G02, YG03
 Ha ha, my mom's name is Ann and she's very crafty, so whenever I visit the Crafty Ann's site I think of her! I also think of this particular Crafty Ann, of course, whose work I've enjoyed for some time. I've participated in a few of her challenges, but I'm finally entering one with one of her lovely images.I grabbed this lantern digi for my card for the CDAC challenge sponsored by Crafty Ann's, and since it's a freebie I saved it for a challenge like this. I had so much luck heat-embossing it on vellum last time that I did it again, with my new sparkly purple embossing powder. LOVE that stuff! I did the same with the lantern stamp.
 And the back:
 Inspiration: Crafty Ann's Challenge #42: OrientalStamps: Good Fortune Lantern by Crafty Ann's; Lantern and Cherry Blossoms from Asian by Design set by StampendousPaper: Brazzill, Recollections vellum, Staples résumé paperTools: SCAL, Cricut, MS detail scissors, HP printer & inkOther: Sakura & Elmers gel pens, Copic markers, Memento ink, ZipDry glue, Stampendous embossing powder, Marvy heat tool, Versamark & InkItUp inksDownload my Tent Card template for SCAL (please leave a comment and let me know you're using it. And I'd love to see any resulting cards!)
Update 6/9/11: The Lantern Sentiment worked! I'm very pleased to have received a top three placement in the Crafty Ann's Oriental Challenge.
 Another week, another fun bunch of CDAC challenges to choose from! I have so many projects on my plate, but I do loving participating in at least one challenge a week over there; it's such a great opportunity to try digi stamps by different artists.This week's Special Occasion Challenge is sponsored by Zlatoena Designs, with the theme of Birthdays. I loved her happy bunny digi and decided to do some old-fashioned paper piecing (paper piercing?). I also ended up using a lot of decorative paper, which I often don't do because I'm a bit of a hoarder! I'm very happy with how it turned out; it just sort of fell together and I'm glad to have another go-to birthday card.I'm also entering this card in the Jute, Twine or String challenge at My Partner in Crafting Crime (PCC). I've been intrigued by this challenge since it was posted, and have found myself using a lot of the pretty Bakers Twine from my stash this past week, but this is the project I'm entering!Inspiration:CDAC Special Occasion Challenge sponsored by Zlatoena DesignsMy Partner in Crafting Crime Challenge #27: Jute, Twine or StringStamps: Rabbit + Present by Zlatoena Designs; sentiment from Hero ArtsPaper: K&Co., Core'dinations, Brazzill, Recollections, the Paper Co.Tools: Crop-O-Dile, Fiskars papercutter, MS detail scissors & border punchOther: brads from Michaels, Sakura & Elmers gel pens, FB2 Copic marker, Memento ink, ZipDry glue, ZIG glue pen, MS flocking, stash bakers twine
Update 6/3/11: Wow! This won (randomly) the CDAC Special Occasion Challenge.
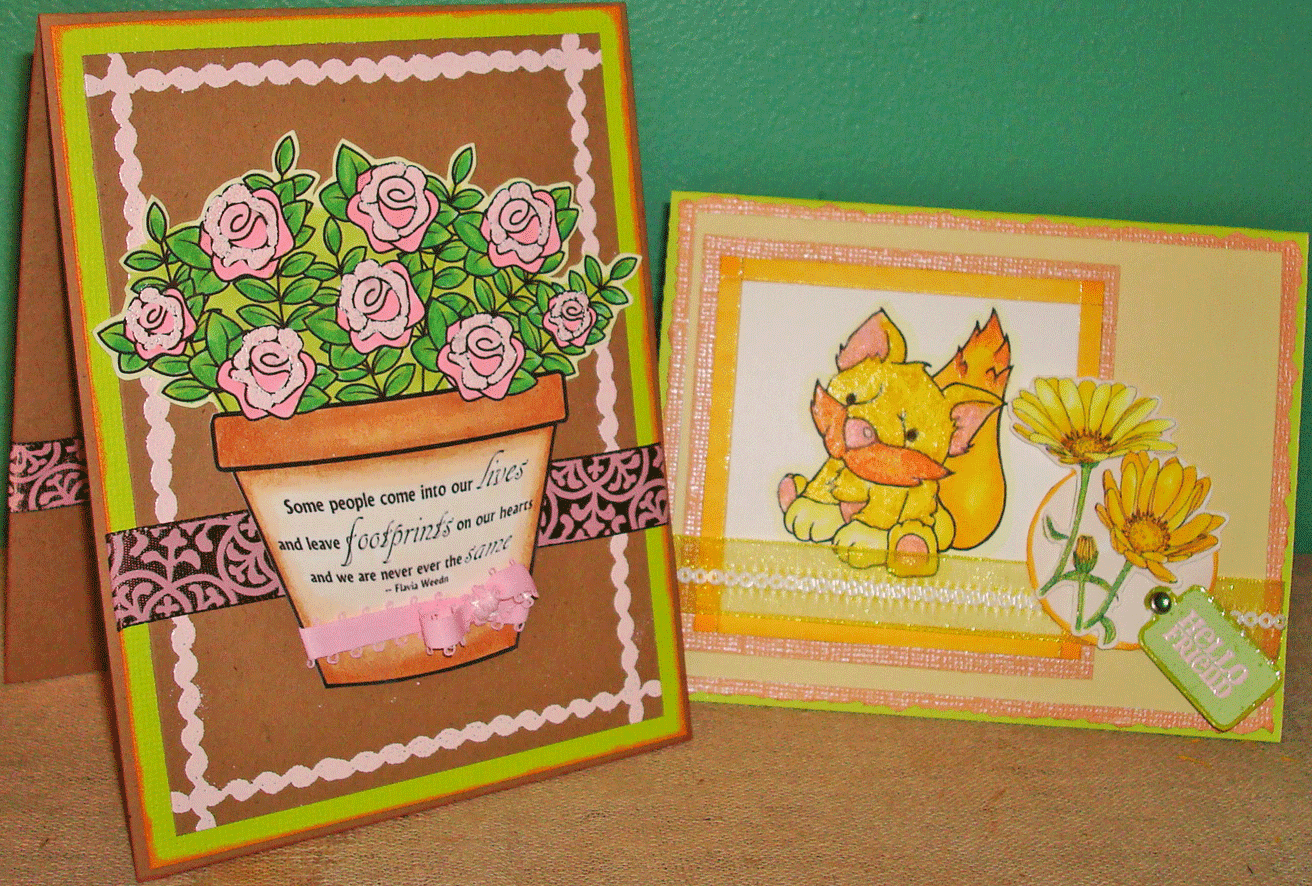
 This week's theme at Mo's Challenge Blog is Distressing, and I wasn't sure if they meant paper distressing or ink distressing, so I incorporated both. Like I needed an excuse to use her adorable images!
I was introduced to this "Joy Fold" technique by the ABC Christmas Challenge blog, and although I didn't make their deadline I did use the idea (& their super tutorial) for this card.
The smaller card is actually a modified version of my tent card template, but my original idea didn't go as planned so it ended up like this!
This week's theme at Mo's Challenge Blog is Distressing, and I wasn't sure if they meant paper distressing or ink distressing, so I incorporated both. Like I needed an excuse to use her adorable images!
I was introduced to this "Joy Fold" technique by the ABC Christmas Challenge blog, and although I didn't make their deadline I did use the idea (& their super tutorial) for this card.
The smaller card is actually a modified version of my tent card template, but my original idea didn't go as planned so it ended up like this!
 I ink-distressed the paper with Ballerina Pink dye ink and a handy-wipe, and also used an emery board to distress the edges of the paper. The rose bouquets were stamped in blue and colored with Copics.

 Digi stamps: Kiesha's Curtain Call and Two Tasha by Mo's Digital Pencil
Supplies: sentiment stamps from Pick a Peck set by Raisin Boat, Rose bouquet stamp by Stampin' Up!, Recollections and Hammermill cardstocks, K&Co. designer paper, Memento, InkItUp! and Versamark inks, ZipDry glue, MS scissors and border punch, Cricut & SCAL, Marvy punch
Copics: rv11, rv23, rv42, yr01, e51, e11, e33, e35, e17, e37, b23, b32, b00, b0000, yg03
This week's challenge at Stamping Dymonz Creative Space is to color this great image, Say What by Tellen's Place Designs (TPD). Thank you for the freebie! And since it's an SD challenge, there are several fun rules, one of which is to use cream-colored lace ribbon. I only had white, so I "creamed" it with Copics. I also let myself be a little bold and added shadows and highlights with my beloved Iridescent Mauve copic. As soon as I saw this challenge, this card idea popped into my head. I can imagine needing a card like this someday! Several people have mentioned that this digi reminds them of their Moms, so I colored her like my Mom. I'm pretty sure this is her current hair color...I can totally imagine her wearing this dress.Inspiration: Stamping Dymonz Creative Space Challenge #2: Working with DigisDigi stamp: Say What by Tellen's Place DesignsSupplies: Recollections, Hammermill and Brazzill cardstocks, Versamark inks, HP printer & ink, RagMop Regular typeface, SCAL & Cricut, birdie stamp from Pick a Peck set by Raisin Boat, border stamp by the Paper Co., Stampendous embossing powder, Marvy heat tool, Simplicity lace ribbon, ZipDry glueCopics: E31, RV23, E33, E51, Y000, C-1, B23, V06, BV04, BV000, BV00, BV08, V17
 I cannot get enough of tent cards! I had so much fun making my first one for the Scrap Shack cardmaking group that I turned right around and made this for the current Tellen's Place challenge.One of the requirements is to use a TPD image, but they have lots of freebies...plus good prices. I had so much fun making this card with their freebie that I bought Mary & Bev, which I've already used for another tent card! I had tons and tons of fun coloring this, and the flags, and think I'll make lots of this card. I'm also crushin' on the color combo of kraft-and-pink. Tying the string onto those hand-cut banners took some doing, but it was so worth it.
 Inspiration:Digi stamp: Gift Mandy by Tellen's Place DesignsSupplies: Hammermill and Recollections cardstocks, Memento ink, HP printer & ink, SCAL & Cricut, VersaMark watermark ink, Stamendous embossing powder, Marvy heat tool, bakers twine, ZipDry glue, MS scissorsCopics: BV04, BV000, BV00, B23, V17, RV04, V06, RV42, RV11, RV23, E000, E17, E02, E50, E47, YR00, YR01, E35, E37Download my Tent Card cut-file template (please leave a comment and let me know you're using it. And I'd love to see any resulting cards!):
.scut2
.svg
Update 5/27/11: Wow, I won!!! More info here. Thank you everyone at Tellen's Place!
 I've been following the Simon Says Stamp and Show blog for a while now, but didn't feel ready to participate in their challenges quite yet. However, I couldn't resist their "Old Wives' Tale" challenge.My favorite Old Wives' Tale is "Don't take the last piece or you'll be an Old Maid." By favorite I mean I've been married for over 6 years and I still hesitate on taking the last piece. I've stood over the last sad piece of cake with many a woman with that saying in her head...So I used the concept to create the front cover of my multi-media art journal for the current theme at the Stampin' Dymonz Scrap Shack Off the Page group. For the flower pattern on the platter, I was inspired by the Cowslip pattern on my Grandma's Spode dishes. The colors are bright and interesting, and I definitely went outside my comfort zone to imitate the painting (sometimes not coloring inside the lines is a good thing!).
 Above is my blank journal, which I made with cardboard scrap from our Sarah-Cynthia-Sylvia-Stout-esque recycling bin. The pages are sanded and distressed with Mustard ink.
 ...and I even made a matching bookmark! The fortune cookies are stamped onto polymer clay, baked, and then shaded with copics.
Inspiration: Simon Says Stamp and Show an Old Wives' Tale
Supplies: Asian by Design & Asian Influences stamp sets by Inkadinkado, sentiment from Regal Greetings set by {ippity} Stamps, Recollections cardstock, Tim Holtz Distress Inks, Martha Stewart detailing scissors and chalk ink, Fiskars papercutter and deckle scissors, Stampendous clear embossing powder, Marvy heat tool, stash twine, polymer clayCopics: E33, E11, E35, FY1, E08, FB2, R59, G02
This is a totally last-minute card, but I couldn't resist combining my new love of tent cards with this week's Scrapmaster's Paradise Color Combo. Plus, I just got my hands on this great image from Tellen's Place Designs! Don't you think they should have a caption contest for this digi‽ ...and the back:
 Color Inspiration: SPCC #100(!): Pacific Point, Pink Pirouette, Rich RazzleberryDigi stamp: Mary & Bev by Tellen's Place DesignsSupplies: Recollections, Hammermill and Brazzill cardstocks, Memento and Versamark inks, HP printer & ink, SCAL & Cricut, sentiment stamp from Pick a Peck set by Raisin Boat, Stampendous frame stamp and embossing powder
Copics: E33, E31, BV00, BV000, BV04, B23, E51, Y000, RV11, YR01, E000, YG03, E17
Download my Tent Card cut-file template (please leave a comment and let me know you're using it. And I'd love to see any resulting cards!):
.scut2
.svg
Update 5/23/11: Wow, I won! What an honor. I'll be guest designing for SPCC as part of the prize. Thank you so much Sammi and friends! And Tellen's Place, for the inspiration.
This week's project for the Cardmaking group at the Scrap Shack is a tent card, which I've never made before. The DT projects are gorgeous, and I just had to jump in and try it, with two stamps I've been itching to use: Gillu's Pretty Girl digi stamp & a banner rubber stamp from the $1 bin. The banners on the background are just stamped and colored, but the hanging ones on the front really are hung onto the string. Thanks to All Things Paper for another fantastic tip!
 The photo on the right is the back...geez, banners make everything look good!
Inspiration:Digi stamp: Pretty Girl by Gillu's GallerySupplies: Relax, Hammermill and Recollections cardstocks, Memento ink, HP printer & ink, SCAL & Cricut, banner stamp from StudioGCopics: RV11, Y08, Y13, Y17, Y02, Y000, E50, E51, E11, E37, E35, E17, YR09,YR04, YG67, YG63, YG03
Download my Tent Card cut-file template (please leave a comment and let me know you're using it. And I'd love to see any resulting cards!):
.scut2
.svg
Although I never thought I'd get into the "Tim Holtz look", I'm having so much fun with the challenges and the crafters at Stampin' Dymonz Creative Space that I find myself really getting into it!The first of her weekly challenges is a 12x12 layout with a travel theme, handmade background and title tag, 3 Tim-Holtz-style embellishments, fiber, and one large photo. I worked on it all week! My layout is about our trip to Florida last year, and the walk I took with my husband down through Venice. This photo is of me goofing around on the big gorgeous trees on the boardwalk. I matted it on a frayed piece of material, but wanted to give it an "aged" look, so I folded it up a bit and then sprayed it with Antique Linen distress ink (got the idea from this great post at iCopic).
 For the background, I started by clear-embossing a plane stamp from my stash. Then I distressed the whole thing in Antique Linen and Mustard, and stamped some more planes in those colors. For a final touch, I used my Stampin' Around wheel that I won from my very first Stampin' Dymonz blog candy! I used Faded Jeans and Peeled Paint (blue and green).I used the template I created for my Dimensional Tag to make a shaker on one side of the tag. I stuck some shells and shark teeth in there (Venice is the "shark tooth capital of the world").
  I didn't have any ephemera, so I grabbed a classic postcard from the internet, printed and distressed it.I stamped the shells onto the "bottlecap" pieces with StazOn and then colored them with Copics (after drying them).Inspiration:Stampin' Dymonz Creative Space Challenge #1: Scrapbook Layout, Tim Holtz StyleSupplies: Stampin' Around Wheel by Stampin' Up!, Shell stamps by Hero Arts, Tim Holtz Distress Inks, Recollections cardstock, Fiskars papercutter and tear edger, Crop-O-Dile II, pop-dots, metal embellishments from Li'l Davis Designs
I was excited to see the Crafty Cardmakers Spotlight Challenge on Inchies, because I really needed an excuse to try this very groovy technique. Folks come up with the most gorgeous, incredible ideas for this simple concept, but I'm pretty happy with how mine turned out too. Thanks for the inspiration! I only used 2 papers (kraft & white) and 4 inks (Peeled Paint, Antique Linen, soft brown, and watermark), plus clear-embossing. There's some emboss-resisting going on as well. For the inchies, I ink-distressed the white pieces with Antique Linen and then clear-embossed the stamp with watermark ink. I had planned on adding some ink afterwards, but the contrast came out so well that I kept it. The mats are inked in corresponding colors.
 Inspiration:Crafty Cardmakers Spotlight Challenge: InchiesSupplies: Asian by Design & Asian Influences stamp sets by Inkadinkado, sentiment from Regal Greetings set by {ippity} Stamps, Recollections cardstock, Tim Holtz Distress Inks, Martha Stewart detailing scissors and chalk ink, Fiskars papercutter and deckle scissors, Stampendous clear embossing powder, Marvy heat tool, stash twine
Update 6/5/11: My goodness, this card won the Crafty Cardmakers Spotlight on Inchies Challenge!
 Between finding excuses to go out into the lovely shady yard this morning, I whipped up this little easel card for the Special Unity Birthday Challenge. The recipe is a Trifecta, in celebration of their 3rd birthday: Birthday or Anniversary theme, 3-inch Square, 3 types of Embellishments. Because one of the rules is to use only Unity/{ippity} stamps and I only have one set (so far!), I decided to go "simple". The sentiment could be for many occasions...only it would be a perfect wedding/anniversary card. I used Antique Linen Distress Ink to create the emboss-resist technique for the flourishes; I stamped and gold-embossed the sentiment after the ink dried. I strung a string of faux pearls (that was pretty...strung a string!) off some inty brads for the front border. I sewed some other pearl beads onto the inside piece, then finished it with a brocade ribbon.
 Inspiration:ATU Trifecta Challenge: Birthday OR Anniversary, 3-inch Square, 3 types of EmbellishmentsSupplies: Regal Greetings set by {ippity} Stamps, Recollections and Hammermill cardstocks, Simplicity decorative braid, ZipDry glues, Fiskars papercutter, MS detailing scissors, Versamark watermark ink, Stampendous embossing powders, Tim Holtz Distress Ink, loose & strung pearls from stash, mini brads from Gary M. Burlin & Co., needle & bead thread
 So I've been wanting to enter a challenge at the Kraft Outlet for a while now, and I finally managed it! I had so much fun making my pink-and-kraft CDAC card that I decided to build on some of those ideas for this card.I also used this week's lovely Mojo Monday sketch, but made the card a tall 4x6 because that's what I imagined for this design.I stamped the kraft border with watermark ink and dried it with my heat tool. I sewed some pink-embossed flowers onto it with various buttons. Yes, all the buttons are sewed on: it's a thing of mine. The sentiment is stamped in chalk ink.I was able to get those nice bows with the fork trick; I used my big salad fork since the ribbon's so wide. Incidentally, later that evening my husband walked by my work table and said, "OH it's a crafting fork, isn't it‽"
  Inspiration:Make It Monday with Kraft Outlet: Buttons & Bows ChallengeSketch: Mojo Monday 190Supplies: rubber stamps from Stampin' Up!, Recollections cardstocks, CelebrateIt ribbon, Versamark watermark & chalk inks, ZipDry glue, Fiskars papercutter & corner embossing punch, MS detailing scissors, needle & thread, Making Memories buttons, Stampendous embossing powder & sentiment stamp
 After the creative whirlwind last week that was the Stampin' Dymonz 10-day Tag Challenge, I'm having some trouble going back to good ole cardmaking! As always, there is plenty of inspiration at this week's CDAC challenges. I started with the Embellishment challenge sponsored by Shannon's Sentiments & the Sketch Challenge sponsored by DigiDrawn. Not only did I have a great time making them, I'm very happy with how they came out.
  For this card, I tried my hand at "warping" the sentiment in Photoshop, with okay results. I need to practice that.... I added some pink, heat-embossed detail to the flowers by using a Versamark watermark pen.
Inspiration:CDAC Embellishment Challenge sponsored by Shannon's SentimentsSupplies: Digi stamps by Shannon's Sentiments (thank you for the freebies!), silicon border stamp by My Mind's Eye, Recollections, Brazzill and Hammermill cardstocks, Celebrate It and Offray ribbons, ColorBoz pigment ink, ZipDry and ZIG glues, Fiskars papercutter, MS detailing scissors, Versamark watermark ink, Stampendous embossing powder, Adobe PhotoShop & Indesign, HP printer & inkCopics: Y000, Y08, Y17, Y04, E02, RV21, YR04, YG03, G07, E000
 Despite appearances, part of this Sketch challenge was K.I.S.S. (Keep It Simple Silly), and I kinda did. You know, kinda. I really wanted to use the freebie Daisy image by DigiDrawn for the corner element, so I used her Fox digi to complement it.Inspiration:CDAC Sketch Challenge sponsored by DigiDrawnDigi stamps: Fox and Daises by DigiDrawn (thank you for the freebies!)Supplies: Hammermill cardstocks, Celebrate It ribbon, Versamark watermark ink, ZipDry and ZIG glues, Fiskars papercutter and deckle scissors, MS detailing scissors, Pop-dots, Stampendous fun flock and embossing powders, Adobe PhotoShop & Indesign, HP printer & ink, Recollections bradCopics: Y000, Y08, Y17, Y04, E02, RV21, YR04, YG03, G07, E000
 It's day 10 of the Tim Times Ten Grand Give-A-Way Challenge at the Stampin' Dymonz blog; well, actually today's day 11, but Dymonz has kindly given us a few extra hours today to finish our final project:
- make a Brag Book of the nine tags that you have created over the last nine days
- must be bound
- tags must be in the order in which they were created
- display/provide the recipe for each tag
- at least one cut from a die-cutting device
- a cover with a sentiment and an image stamp and the acrylic paint resist technique

 Okay, asking me to make a book is sort of like asking an intern to alphabetize the files: whatever the end result, at least you've kept me busy for an extended length of time! Looking over the Official Rules, I realized that at some point I forgot about the "Tim Holtz" look; I really didn't mean to, I just don't have a great understanding for his style yet and tend to get a little overzealous once an idea pops into my head. But I'm really just participating for the fun of it, and for the personal challenge. Be sure to check out everyone's projects; I'm truly in awe!
 I just had to make a piano-hinge book for the tags. If you know me, you'll understand. This is also an easy-peasy way to create interior pockets: just glue the edges of the pages. I whipped up some tags with the recipes in InDesign, something I love to do, and InDesign makes it so fast. Couldn't help but make the bullets little diamonds!I must admit that the recipe for the cover gave me some trouble: it must contain a sentiment and an image stamp and the acrylic paint resist technique. Um, I've never heard of the acrylic paint resist technique. I do enjoy the emboss/resist technique, but the acrylic paint is a much different medium than distress ink! The only acrylic paint I have is a Cranberry Paint Dabber that I got in a Blog Candy bundle...from Stampin' Dymonz! Thank you! I also have her to thank for introducing me to the bolder colors of Distress Inks, with the Marigold ink pad that came in the same candy.I pulled out my letter stamps, and they were a breeze to use. Thanks to a nice big block, I was able to stamp "Tim x Ten" with one press, after inking with three colors of distress inks. Then, I restamped it with Watermark ink and clear-embossed it. I masked the image stamp, and after the piece was dry I colored it with Copics. This just seemed like the perfect stamp!
 It's day 9 of the Tim Times Ten Grand Give-A-Way Challenge at the Stampin' Dymonz blog, and I must tell you that I've had just a lovely day, making this tag and cleaning house. The latter is not my forte, so having this tag to work on made it much more pleasurable! Dymonz gave us another super recipe:
 - create a dimensional tag
- at least two elements must lift up off the page
- the edges of the tag should be inked
- use at least one dimensional flower
- use at least 3 buttons
For the flower, I decided to try the glimmer mist acetate flower I saw while researching how in the heck to make an inked acetate tag for day 7. I used the same orange glimmer mist on the brad and buttons.
Although I did make the 3 sizes of tags in SCAL, I only cut the templates on the Cricut, and traced-and-cut the actual tags pieces. Of course, I did this before I decided to make the shadow-box, so the squares are actually hand-cut with a ruler, a finger-knife, and an apparently ever-improving eyeball. Go cg, Go cg! You know it's the mojo from you, my readers!
Did I already mention that I've spent the day burning plastic & bleaching the kitchen? I might be a bit loopy. :) My husband was kind enough to take photos of this tag, including these awesome close-ups: I sewed the buttons onto the top layer, and colored the foam tape with matching copics.
 Supplies: Flowers & Butterfly rubber stamp from Stampin' Up!, Rose cut file from PaperFacesDesigns, sentiment stamp from Hero Arts, CraftSmart & Memento inks, Core'dinations & Hammermill cardstocks, scarp acetate, Tattered Angels Jack O'Lantern glimmer mist, ZipDry & ZIG glues, WalMart buttons, Offray ribbon, MS detailing scissors, SCAL & Cricut, Marvy heat tool, Stampedous embossing powder, pop-dots, Michaels craft yarn, Crop-O-Dile, Scotch foam tape
Copics: G02, YG03, G07, Y000, FY1, YR09, YR12, YR04, Y17, Y02
![cg says [something loudly]](https://blogger.googleusercontent.com/img/b/R29vZ2xl/AVvXsEj0FPmCZqXj2-YcQaqnchsA3zKcMX4MIsNrt-Q1wM9gJSyUJH_a6g_V1m_JKR0tKEOGU6F1AFBv8al43phB58tEMIPcT3G0wXzmJpswV9I5mFB7zOhpv8a8dpEAR6i9uS0mkOQKp_pC6PE/s1600/blogheader.gif)
 I've received such lovely comments on my recent notelets box that I decided to make another as a gift, and also for the CES Embossing challenge. I promised myself that I wouldn't get distracted by challenges this week and focus instead on making gifts, but I guess this is a good compromise!
  Inspiration: CES Challenge #38: Embossing


