Showing posts with label A Day for Daisies. Show all posts

Sunday, January 20, 2019

Horses of the Sea -- Pilin' on ALL the Animals

The themes this month at Pile It On are Land Animals and/or Sea/Water Animals. You can choose one or both themes, and you may enter the challenge as many times you like, as long as you are inspired by at least one other Challenge theme. We're sponsored by A Day for Daisies, and I used the lovely Seahorse.

I used the font GoodDog for the Rumi quote: "You are not a drop in the ocean. You are the entire ocean in a drop."The frame is a die/embossing set from Cuttlebug. I filled it with blue glitter, confetti stars, and glass beads. I also used some real fishing net. I decorated the inside too.

http://trystampinontuesday.blogspot.com/2019/01/challenge-391-ends-jan-27th.html
Inspiration/Challenges:
Cuttlebug Mania: (Tue) New + dies [shaped confetti in shaker]
Do-Al(l) Kreatives #25: (P1) Think Twice [two seahorses]
Make My Monday (Mon) #87 Use Words/Sentiment [Rumi quote]
Paper Shelter Challenge: (Wed) Use Digital Image
Simon Says Stamp Monday Challenge: (Mon) Recycle [frame is made from scrap cardboard; die-cut seahorse is made from a soda can]
Try Stamping on Tuesday: (Tue) Mix It Up Challenge [Sketch]

Update: This was chosen as a Top 3 for TSOT #391!


Thank you for visiting! Hope you'll join us at Pile It On,


Sunday, January 6, 2019

Pilin' on the Soulful Animals

Happy New Year! Our first challenge of the year at International Art & Soul is Cats & Dogs, and the theme this month at Pile It On is Land Animals. I'm busy these days with the best Christmas gift ever, but my MIL was visiting and I got a bit of time to go through my stash and make a project.

The background is made from one piece of plaid-patterned paper. I used Spellbinders circle dies to cut the rainbow, inked the pieces separately, and inlaid it. The fence (Memory Box die) is the only piece I didn't ink.

The sentiment image is a clear stamp that I heat-embossed in white on black paper. The pawprint paper is a scrap from my off-cut stash.

The squirrel and bird were cut with a Cuttlebug die from glittery white foam. I added glitter embossing powder to the chipboard plaid cat.

I decorated the inside with more plaid patterned paper & another Spellbinders die.


Inspiration/Challenges:
2 Crafty Critter Crazies #20: (P1) Anything Goes with a Critter
Crafty Hazelnut's Patterned Paper: (P1) Anything Goes with Patterned Paper
International Art & Soul: Cats & Dogs
Pile It On: Land Animals
Scrapy Land Challenges: Anything Goes with Die Brand SL sells (Spellbinders)


Thank you for visiting! Hope you'll join us at Pile It On,


Sunday, April 15, 2018

Springtime Memories -- Pilin' on the Pencils

The theme this month at Pile It On is Think Small (Children, Baby animals, Tiny embellishments, Small-sized projects) with the mid-month, optional bonus theme of Pencils. The only really rule is to be inspired by more than one papercrafting challenge. We're sponsored by A Day for Daisies, and I used their Girl Horse Ride digi stamp.


http://cheerfulsketcheschallenge.blogspot.nl/2018/04/april-challenge.html
Inspiration/Challenges:
Addicted to Stamps and More #287: Make Your Mark
Cheerful Sketches Challenge Blog: Sketch
Double D Challenges: Twine
Kleuren Met Potloden: Coloured Pencils + Spring
Little Red Wagon #441: Shine, It's Your Day
Pile It On: Small and/or Pencils
Simon Says Wednesday: Texture


Thank you for visiting! Hope you'll join us at Pile It On,


Sunday, April 17, 2016

Pilin' on the Doodles

The theme this fortnight at Pile It On is Doodling. We're sponsored by A Day for Daisies, so I doodled on her beautiful Princess Penny digi stamp!


The sentiment is by the always-generous Paulette at TLC Creations. In Photoshop, I made the background black and the text white, and printed it on pink paper. I cut it into a fish-tail banner, and added some stripes by hand. I used the same pink paper for the background & her dress. Using a flowing ink pen, I doodled in each piece of her dress, adding color to some portions with a neon pink gel pen.

The hot pink bow (so bright!) came in a prize package from The Paper Girls. I used 2 dies to create the frame from a reflective silver cardstock.


http://stickitdown.blogspot.ca/2016/04/april-card-team-reveal.html
Inspiration/Challenges:
A Day for Daises #145: Add Lace + ADFD image
The Corrosive Challenges: Girls, Ladies, Women
The Crafty Addicts: Girly
Crafty Catz: Monochrome
Fab 'n' Funky: Girly and Pretty
Paper Minutes: Ribbons
Stick it Down: Sketch


Thank you for visiting & inspiring my crafting! Hope you'll join us at Pile It On,


Sunday, June 28, 2015

Pilin' on the National Seaside

The theme this week at Pile It On is to Use your Nation's flag colors (as main colors; other colors are fine), and we're sponsored by A Day for Daisies. I used the freebie that ADFD offered this fortnight for its Piece or Pierce challenge. The card design was inspired by The Pink Elephant's Card Sketch Challenge.


The Shell Baby is printed on a water colored-patterned paper, and the big shell is pieced from one double-sided DP. I used papers from Graphic45 for the background. I love the kraken-patterned paper! The sentiment is from the same paper set. The white piece is cut from a mulberry paper & embossed with a border folder on my BigShot. I added a bit of blue distress ink on the bubbles.

I used a very thick foam to attach the image to the card: scrap foam weather-stripping, actually! The sentiment pieces & white background are popped with regular 3M foam tape. I machine-pierced the border and went over it with an awl to widen the holes. To embellish the card, I added some actual fish-netting & real sea-shells.

Challenges/Inspiration:
A Day for Daisies #124: Pierce or Piece + ADFD image
Craft It Up & Link It Up Linky Party by Craftin Desert Divas: Red, White, Blue
Crafty Creations: Red, White and/or Blue
Eureka Stamps #146: Paper Piecing
Jo's Scrap Shack: Red, White & Blue
The Pink Elephant Monday Card Challenge: Sketch
Ruby's Rainbow: At The Seaside

Update: This was chosen as a Top 5 for Eureka Stamps #46!

Thank you for visiting & inspiring my crafting! Hope you'll join us at Pile It On,


Sunday, February 15, 2015

Pilin' on the Butterflies

Our theme this week at the Pile It On Challenge is Butterflies. We're sponsored by A Day for Daisies and I used their sweet Butterfly D digi stamp to make a birthday card.


The embossing folder & border stamp are from the "Taste of India" set by Sheena Douglass that came free with an issue of Simply Cards & Papercraft. I embossed a blue frosted Core'dinations cardstock and sanded it to show the lovely designs. I backed it onto a teal paper & used Stickles to make a border. I stamped the border on a green frosted cardstock, heat-embossed it in olive green, sanded the edges, and added strips of double-sided tape which I covered in glitter. The butterfly is printed twice, once on a textured white paper for the base, and again on a white cardstock. I fussy-cut the top butterfly and colored it with Copics and gel & glitter pens.

TMS #287
Color Throwdown #329
Challenges/Inspiration:
A Day For Daisies: Glitter + ADFD image
Color Throwdown #329: Aqua, purple, red, green + inspiration photo
Craft for the Craic: Birthday or Anniversary
Everybody-Art-Challenge #311: Baker's Twine
Penny's Paper-Crafty: Embossing
Perfectly Rustics: Wings
Southern Girls #104: Winged Things
Tuesday Morning Sketches: Sketch #287


Thank you for visiting & inspiring my crafting! Hope you'll join us at Pile It On,

Sunday, April 20, 2014

DP-free at Pile It On

This week at Pile It On! we're challenging you to create your project without any DP (Designer Paper). You may make your own patterned paper, however.

We are sponsored this week by A Day for Daisies, and I was able to use their adorable Baby Giraffe:

click to enlarge
I've had the Poppy rubber stamp set by Sheena Douglass for many years, but it's fairly large so I haven't used it very often. But I thought it would be really fun with this image. Imagine a jungle of poppies! I stamped directly onto the printed image sheet, and colored everything with Copics. I added some detail with gel and glitter pens.

I used this lovely, large die for the card base and orange layer. It's actually a bright orange that I embossed and inked with a lighter orange chalk ink. The cloud was cut on my Silhouette Cameo using a cut file from Bird's Cards (thanks Bird, you always seem to have just what I'm looking for!) and I used a finger dabber to ink the edges with another chalk ink (VersaMagic). The sentiment rubber stamp was stamped with Versamark ink and heat-embossed with two orange powders. I added some bright orange Liquid Pearls to the outer border, and finished the card with some blingy flowers.

For the message section on the inside, I used a smaller die from the same set as the card base:

Inspiration/Challenges:
  1. Crafty Bloggers Network April Challenge: Die Cuts or Embossing
  2. Delightful Challenges: Include a flower
  3. Fab 'n' Funky #212: Flowers
  4. Get Inky! Challenge #12: Die Cuts
  5. Hiding in my Craft Room: Flowers
  6. Just B Creative Crazy: Linky Party Anything goes
  7. Party Time Tuesdays: Die Cuts
  8. Quick Quotes: Project with Stamping
  9. Red Rubber Inspirationals: Back to Nature
  10. Simon Says Stamp: Animals
Update: This was the Prize Winner for Get Inky! Challenge #12!

Thank you for visiting, and hope you'll join us this week at Pile It On,


Sunday, January 19, 2014

How now, brown cow! - Card in a Box

Click images to enlarge
This week at Pile It On we want to see wood items and themes (one of my favorites...which is why I chose it!). Our sponsor is A Day for Daisies, so I combined our challenge with their "Yellow" challenge to make this project featuring Cow in a Dress from ADFD.My wooden items are the Wood fence, Woodgrain DP, and Fence die cut.

The moment I saw the lovely Card in a Box at Calla Lily Studio, just yesterday, I knew I had to make one right away! There's a great written tutorial at Splitcoaststampers, but I took her suggestion and made the smaller version by Stampin T! (video tutorial). However, I trimmed my card down to be 5.5 inches tall, to fit in an American/A2 envelope.

Here's the card all closed up:
It was fun to design this as a card and as a box. I added some gold Stickles to two of the corners for a little balance. I decorated a little clothespin to hold it down for this photo; it really wants to pop up!

And here it is as a box:
I typed up the sentiment, printed it on shiny yellow paper (Recollections), and heat-embossed it in gold (Stampendous). I colored the sweet image with Copics, and used a yellow gel pen for the ribbons on its legs.

I received the wood fence from Linda as part of a City Crafter swap some time ago. I cut it down for this project, and painted with white Crackle Paint.


The Garden Fence cut file (designed by Claire Brennan) is a freebie from Waltzingmouse Stamps.


The current challenge at Our Creative Corner is to use "one of your Shopping Sins"...that is, something new that you bought without a specific purpose. The woodgrain-patterned paper (Echo Park/Lori Whitlock) is a new sin purchase...I went crazy with woodgrain patterns this year! The ribbon roses are a past sin purchase, in that I bought them maybe 2 years ago because I absolutely had to have them and never used them!

I really enjoyed making my first Card in a Box, and find myself really wanting to make more!Many thanks to everyone for the inspiration. Be sure to check out the beautiful inspiration parade for this kind of fold on Pinterest.

Inspiration/Challenges:
A Day for Daisies: Yellow + ADFD image
Crafts 4 Eternity Recipe Challenge #159: Fancy Folds
Die Cuttin' Divas: Die-cut (paper fence) + Something Old & Something New (I used Old stash ribbon & wood fence, and New paper & technique)
Just B Creative Crazy: Just Because Anything Goes Linky Party
Our Creative Corner: Use one of your Shopping Sins/Something New (woodgrain paper)
Stamp n Doodle: Animal
Sweet Pea Stampers: Flower Power
WordPlay January Challenge: Yellow

Update: This placed in the Top 3 for Crafts 4 Eternity Recipe Challenge #159. Whoo hoo!

Thank you for visiting, and hope you'll join us this week at Pile It On,

Wednesday, June 26, 2013

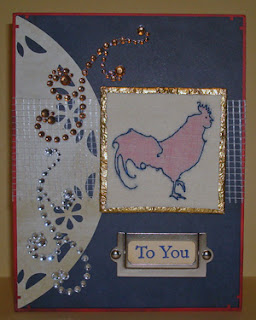
Rooster of Freedom

We live in a neighborhood in North Baltimore City, and although it is mostly quiet, residential community, it definitely has a "city" vibe. So the arrival of a rooster, who makes his presence known starting at about 4:30AM, has been the source of some local excitement. Like many U.S. cities, Baltimore has loosened its agriculture laws recently in response to fresh-food efforts and increased understanding of safe livestock handling. The woman who takes care of our dogs & iguana while we travel lives just a bit north of us and keeps several chickens in her relatively-small backyard. I think this practice is still common in many parts of the world, but it's not a familiar sight around here. Yet!

So far, no one's saying who the rooster belongs to... Which is mostly fine with me, since I'm sure some people aren't as smitten with him as I am, except that he gets out & about. Three kids followed him into our yard last week; we live on a corner, so I tend to tune out street sounds, but you can't ignore a child's cries of "Catch that chicken!" They pointed out the rooster under the bushes in our front yard, and, after convincing them that I did not, in fact, need them to catch the chicken for me, the little guy made a run for it with the kids hot on its trail. I'm assuming they all had a great time, because every child should get to chase a chicken at some point, and Mr Rooster was back on duty the next morning. But I did wish I could call the owner and let them know. My husband, however, is convinced that it's just a loose street-rooster. Which is also fine with me, because if you can survive the Baltimore Rats, you can survive anything.

Just to round off this long story, I'd like to note that I always think of the Portuguese legend of the Rooster of Barcelos, and that whenever I hear a rooster crow some part of me thinks, "An innocent man has gone free."

Anyway, I feel like this rooster has become the unofficial mascot of our neighborhood, so when I saw the freebie at A Day for Daisies, I just had to use it!


I printed the digi twice: once on fabric, and once on plain paper. I used a blue thread to stitch the outline; I think it came out pretty well, considering I've never done this before. I wanted to add some color, so I colored the plain paper piece and placed the material directly on top of it. I adhered the fabric onto the paper by running the paper through my sticker machine.

The gold "frame" is actually a Rolo wrapper; my husband saved it for me, and it was perfect for this project. I just glued the fabric-covered piece onto the square wrapper and folded over the corners.

The papers are from a Tim Holtz paper pad set. I cut the doily with the "Flower" Mini Lucky 8 Punch from We R Memory Keepers. The sentiment stamp is from a Crafters Companion/Beatrix Potter set, and is stamped in a bright blue on manila paper. I added a bit of Antique Linen distress ink, and put it in the metal frame and attached it to the card with the brads. The card was finished with some Dry Wall tape and adhesive gem flourishes.

Inspiration/Challenges:
A Day for Daisies Challenge #72: Nature + ADFD digi (thank you Tammy for this great freebie!)
Craftin Desert Divas: On the Farm
Delicious Doodles Challenge #41: Stitch it!
The Paper Nest Dolls Challenge: Animals
Paper Playtime: Red, White & Blue
Seems a Little Sketchy: Sketch

PS: Check out my 4th Blogoversary Blog Candy, through July 9.
Thank you for visiting,

Thursday, May 9, 2013

Rosey Snails

Mother's Day (in the U.S.) is only 4 days away, and that means I'm of course rushing to make cards! I bought this great digi, A Mother's Burden by A Day for Daisies, last year but I didn't manage to finish the card in time. I just made this just in time this year, though!


The polka-dot embossed Kraft paper is heat-embossed with glitter (Kaleidoscope embossing powder), so in real life it has quite a pink shimmer. I actually made it for a different project that didn't pan out, but I couldn't throw it away.

I really like this month's Color Challenge at Stamp and Create: Bright Pink, Turquoise, Lime Green, Brown (or Black). It gave me an excuse to use three of my favorite craft items: hot pink embossing powder, lime green Liquid Pearls, and turquoise chevron washi tape.

The scalloped circles and leaves were cut in my BigShot with Spellbinders dies. The sentiment stamp is from a Fiskars set. The corners of the white background are rounded with scalloped scissors, and the green banner is edged with a glitter pen.

The image is colored with Copics, mostly with Fluorescent Pink (FRV1), and is even brighter in person! The image is attached with an Action Wobble, so mom and the kids wiggle a bit! (All my projects featuring Action Wobbles are archived here.)


Inspiration/Challenges:
A Day for Daisies Challenge #69: Use Something Lace~y (Scalloped circles)
Shopping Our Stash #100: Mother's Day or Pink (All the papers are from my stash/off-cuts box)
Stamp and Create May Challenge: Color Combo (Bright Pink, Turquoise, Lime Green, Brown OR Black)
Technostamper's Monday Lunchtime Challenge: Sketch #262
Wobble Wednesday Challenge #53: Anything Goes + Action Wobble

Thank you for visiting,

Friday, March 15, 2013

Swingin' into Spring with Sunshine Mail

Today begins a new Sunshine Mail Foundation Challenge (March 15 - April 1). The only real rule is that you send in at least one card (Donation guidelines here).

Our theme is Swing into Spring, and we're sponsored by A Day for Daisies digi stamps. It's such a fabulous, unique digi stamp company, and the Sunshine Mail DT was lucky enough to be able to choose their own images for this challenge. I used Boys Love Trees:


The background is embossed with my Darice embossing folder (if you follow my blog, you know I can't get enough of this embossing folder). I printed the sentiment (TLC Creations) and then embossing it by lining it up in the folder. Then I just fussy-cut it out and popped it up with foam. The sheer rainbow ribbon is from my stash.

The image is colored with Copics. I made the image background in several steps: First I colored the blue portion & texturized it with Blender solution & cloth. The I painted the tree with Crackle Paint (Ranger), and added Flower Soft to the leaf sections. The boys are cut out and glued on to top for a little dimension.


Inspiration/Challenges:
Celebrate the Occasion #103: Spring Is In The Air
Crafting for all Seasons #47: Spring
Crafty Ribbons #40: One for the Boys
Crafty Sentiments: Hello Spring
Delightful Challenges: Here's one for the Boys
Little Miss Muffet Challenge #56: Boys Only


Thank you for visiting & hope you'll join us for the Sunshine Mail Foundation Challenge,