Showing posts with label Top Tip Tuesday. Show all posts

Monday, July 15, 2013

Cupcake Cutie

Oh how I love tutorial challenges! I rarely actually get around to entering them, but I thought that the Circle Step Card and/or Circles/Hexagons challenge at Top Tip Tuesday was perfect for a birthday card for our niece.


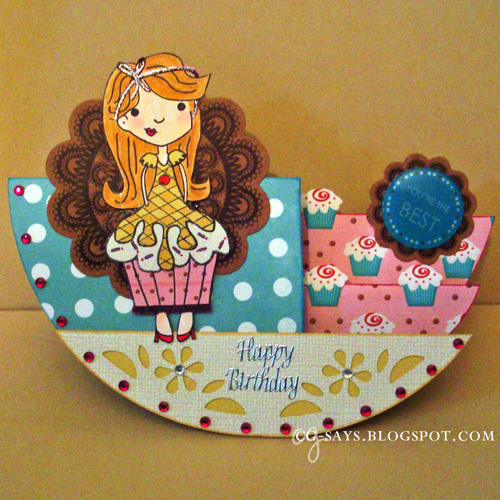
The "Cupcake Girl" clear stamp is from my stash; I know it was made by someone in Arizona, but sadly it doesn't say on the package. I've ended up loving this stamp more than I thought I would; it's so much fun to paper-piece (you can see another version here), and is easy to personalize. The dress, frosting, and wrapper are all pieced on from different papers, and the body & hair is a 100% Hammermill. I colored the image & dress with Copics, and added detail with Sakura glaze pens.

I made the base with Echo Park's double-sided Teal Small Dot DP (the inside is striped). The cupcake paper is from Digi Doodle Doo's free . I cut out some more tiny cupcakes and glued them on top of the paper to add dimension. The Cupcake Girl's wrapper is stamped on a digi paper I made by enlarging the same cupcake paper.

The bottom, flower-patterned portion is made from a textured, white-frosted yellow Core'Dinations cardstock. I punched the pattern with the "Flower" Mini Lucky 8 Punch from We R Memory Keepers, and backed it with the the yellow side. I used both sides for the frosting & dress on the Cupcake Girl.

The patterned kraft medallions die cuts are from my stash; I splurged on $2 worth of them at Scraps of Love, and I've been hoarding them for over 6 months! The 3D "You're the Best" epoxy sticker on the small doily is also long-hoarded. I embellished the card with adhesive gems and a silver "Happy Birthday" sticker.


I think our niece will like this card, as her family likes to bake!


Color Throwdown #250
Inspiration/Challenges:
Color Throwdown #250: Teal, Kraft, Hot Pink, Light Yellow
Quick Quotes: Add Dimension to your project
Top Tip Tuesday Challenge 105: Hexagons and/or Circles (and Circle Step Card tutorial)
Word Play Saturday: Birthdays

Thank you for visiting,


Saturday, March 23, 2013

Hop hop hop!

I really liked the theme of this week's Squigglefly challenge: Card that depicts a Song. I thought that this stamp plus a wobble would be great for a "Bunny Hop"-inspired card. And since this is for my nieces, I went ahead and put two bouncin' bunnies on there (both are attached with Action Wobbles)!


The dance instructions are from the actual back of Capitol Record's "The Bunny Hop" compilation LP, posted by LORAC! on Flickr. I added a bit of color of Copics and some of the violet ink I used to distress everything.

The bursts are cut with a die from an a•muse studio set. I generated the sentiment with the font LD Music.

I'm entering this into the Top Tip Tuesday Challenge with some tips on applying 3D embellishments:

TOP TIP:
Use your sticker machine to add flocking and paper piece your image.


Here I have my bunnies all cut out, and my supplies at the ready.

I ran the bunnies & tummies through the sticker machine – image side down – and started by covering the tummies with white flocking.


I took the bunny off of the sticker paper and adhered the tummy & ears. I use a tray to catch all the extra fluff, so I just cover it and press to get a nice even layer.
TOP TIP #2:
Here I used superfine Flower Soft from there "Teddy Bear" collection; it works fine with the sticker machine, but best with a wet adhesive like Tacky or, my favorite, a ZIG  glue pen.

I glued the tale piece back on. I put everything together before adding the final touches with Glossy Accents (because it takes a while to dry).


Top Tip #3:
Glossy Accents works best for Flower Soft and heavy elements. I also used it to adhere the microbeads to the button and well as the left-hand corner of the card.

I made the little bows from rafia using the fork technique and, I swear, a Cake Breaker/Cake Fork.

Inspiration/Challenges:
Anything Goes Challenge #88: Seeing Double
Cutie Pie Challenge: Easter
In the Pink #17: Spring/Easter + Pink
Melonheadz Friends Challenge: Easter or Spring
Squigglefly: Card that depicts a Song ("The Bunny Hop")
Tammy's Scrappin Corner: Easter
The Pink Elephant Monday Card Challenge: Easter
Top Tip Tuesday #97: Funny creation/ TIP


Update: I was chosen as "Top Tipper" for Top Tip Tuesday's ROFL Challenge!


Thank you for visiting,

Sunday, January 1, 2012

Pile It On for the New Year!

I'm so pleased to be ringing in the New Year with Pile It On's first challenge of 2012! Our Anything Goes theme is sponsored by Simon Says Stamp, so I know you'll want to join us!

Boy, we have a talented bunch at Pile It On, made even better with the addition of our fabulous new teammates. Our whole team is participating this week, and even your favorite volunteer (er, me) joined in with this altered box (originally packaging for delicious cheese).

Here are my challenges for this project:
Pile It On #01: Anything Goes
Colour Create Challenge #86: Blue, Silver & White + Embossing
Paper Pretties #186: Ring in the New Year
Top Tip Challenge #66: Anything Goes

Stamps: Pretty Pendants & matching SVG files by SP & Company, frame by Fiskars, sentiment by Hero Arts, Freeform font (2s slightly modified)
Paper: Recollections (two versions of silver paper & glitter cardstock), Core'dinations
Tools: Zip Dry & Tacky glues, red double-sided tape, Marvy heat tool, stamp block, Cricut & SCAL
Embellishments: Offray ribbons, silver elastic, stash brads, Stampendous & Recollections embossing powders, Elmer's glitter pen, tissue paper flowers, Tattered Angels glimmer mist (Granite), Copic marker for edging (Royal Blue)

Thank you everyone, and here's to a great year of crafting!

Wednesday, September 14, 2011

Hey Baby

I'm almost embarrassed to mention that I won the Top Tip prize for Top Tip Tuesdays' Birthday/Easel Card challenge (thank you! Love Stamp&Create), but obviously not embarrassed enough to skip their challenge this week, which is Birthday Time. The theme is described as 'Happy Birthday' or a project to congratulate/celebrate a BIRTH.

I decided to make a Baby card with help from the sketch and Mellow Yellow theme at the Pixie Cottage. I've been a little blue lately (season change) but I've also been been thinking a lot about babies. This hasn't necessary made me less blue, but it's led to several cute cards!

Speaking of being blue, I hope you'll send some good thoughts to everyone at Stampin' Dymonz Scrap Shack, who is enduring a hectic move due to the recent storms. The Shack has really inspired me; for example, I learned how simple it is to manipulate soft, hot shrink plastic, like I did for this embellishment, on their Off the Page forum

Thank you for the inspiration, everyone! I had lots of fun making this. This adorable baby digi was given to me as a RAK (Random Act of Kindness) from Tellen's Place Designs. Thank you!


Friday, September 9, 2011

Top Tip twisted easel box card

I love the challenges, and especially all the tips, at Top Tip Tuesday and just had to participate in their Birthday Celebration. Happy 1st Birthday, Top Tippers! There are plenty ways to win lots of prizes:
  1. Enter an easel card or an easel box into the Challenge (deadline: 9/13)
  2. Leave a tip on your blog
  3. Visit a DT blog and leave a comment on there
  4. Leave a comment for another challenger on their blog
  5. Visit the TTT Facebook Page, 'like' the page and then tag us on a picture of your creation
I did them all! Hope you'll at least make a card for the challenge, as I'd love to see your take. Here's my Twisted Easel Box Card:

The bird was paper pieced; boy, those eyes were tiny!
I made matching embellishments & buttons with shrink plastic. The branches are stamped in brown StazOn on Bright White plastic, then edged with a green Copic; the flowers were stamped on one side on clear plastic with black StazOn and then colored with Copics on the rough side.

Here's my tip:
I love making matchboxes, but I worry about crushing when I mail them.The top piece can fold down flat (when the box is taken apart), but it's easy enough to get the bottom, slide-out portion to fold flat as well: Before gluing the box together, add diagonal folds to the inside sides. Glue the flaps onto the opposite sides, where you'll affix the brads, to add support (you can add paper on top of this to hide the flaps). If you use wet glue, I find that binder clips come in really handy to keep everything together during drying.


Inspiration: Top Tip Tuesday Easel Card Box Challenge

Stamps: Blubird by Carolyn Shores Wright for Stamps Happen, Inc., Great Impressions, K&Company
Paper: Core'dinations, stash, Hammermill
Tools: Fiskars papercutter, stamp block, MS detailing scissors, Sizzix Texture Boutique & embossing folder, Crop-O-Dile, Marvy heat tool
Other: ZipDry glue, StazOn inks, Offray ribbon, Copics, stash eyelets & baker's twine

Update 9/13/11: Wow, I won Top Tipper for this challenge! Can't wait to spend my $25 gift certificate to Stamp and Create!

Thursday, July 14, 2011

Retro Vintage Shabby-Chic

I've really been inspired to craft today, and made these two cards. I'm distressing machine now that I have my handy paper distresser. Oh Tim Holtz, you are so much wiser than your years!

This week's combos at the Color Throwdown and colourQ are really challenging & really wonderful, and I had lots of fun pulling out some long-hoarded papers from my stash and just letting the card come together (with a little help from the sketches at Top Tip Tuesday/Robin's Fetish and Mojo Monday!)


I haven't had much luck taking photos today: everything either looks washed-out or technicolored. But I'm pleased with how the colors match the challenges' in real life. The card above uses mostly paper from the 5&Dime October Afternoon collection (wow, it really came through for me with this otherwise challenging combo).

When I saw the classic-black rotary phone image, I just had to make a "missing you" card. I covered the phone image with Glossy Accents to create a faux-epoxy embellishment. It looks & feels really cool, but it took hours to dry.

Totally off the crafting subject, I love that the classic-black rotary phone not only evokes a retro feeling to me, but also feels vintage. My mom (Ann, because she actually has a name other than Mom, much to my dismay!), was telling me about some children who were scoring low on standardized tests that used images of rotary phones. What 4-year-old now would recognize a rotary phone?! Which makes me feel...experienced.

Inspiration: Color Throwdown #150, Top Tip Tuesday/Robin's Fetish Sketch
Stamps: StudioG, Paper Studio, sentiment from Regal Greetings set by {ippity} Stamps
Paper: Recollections, Core'dinations, 5&Dime
Tools: Marvy heat tool, Fiskars papercutter, Tim Holtz scissors & paper distresser,
Other: ZipDry glue, Stampendous embossing powder, Gary M. Burlin & Co. brads, Making Memories buttons, Simplicity thread & needle, Versamark & Stampin' Up! inks, Glossy Accents


This card is all about the paper: each piece has its own wonderful texture. The medallions are heat-embossed with silver and colored with Copics.
The sentiment is actually a (clear) horizontal stamp
that I partially inked and stamped to fit into the circle frame. Um, yeah, that took a little doing! But I'm pleased with the result.

Inspiration: ColourQ #93, Mojo Monday Sketch #199
Stamps: Hero Arts, Paper Studio, K&Co., large medallion from stash (thank you Spotlight Challenge)
Paper:
Recollections, Core'dinations, handmade from stash
Tools:
Marvy heat tool, Fiskars papercutter, Tim Holtz scissors &
paper distresser
Other: ZipDry glue, ZING embossing powder, Versamark ink, Copic pens, Offray ribbon, pop-dots

Wednesday, July 13, 2011

Vintage Candy

I was very happy with my inchie-themed card inspired by the Spotlight Challenge, but I was floored when I won. Thank you, Vix, Cazro & all! I don't really pay attention to the possible prizes when I choose a challenge, but I do remember seeing this one with its prize of a stamp grab-bag and thinking, how totally awesome. I had a choice between "colouring kinda stamps or arty type randomness ones," and of course I picked the latter! I expected a few flourish-y stamps, but WOW I got a really fun mix of vintage-y motifs.
As soon as I saw this beach flapper stamp, I knew I had to use it for a few challenges I've been saving up: the Paper Players color combo, Top Tip Tuesday's sketch (by Karen's Doodles), and the Folded-Paper Frame theme at Stampin' Dymonz Scrap Shack (hosted by Joynana). I was especially inspired by Joynana's take on having the flaps open & close.

Tip: Ticket Corners
This card really comes together because of the inverted corners. I was talking to Mom about the cute ticket digis from When the Scrap Hits the Fun, and she told me about about making "ticket corners" with a hole punch. Just punch a semicircle from the edge:

It's so easy and the result is super-fun. Thanks for the tip, Mom!

Inspiration:
Color: Paper Players #55
Sketch:
Top Tip Tuesday #42 (by Karen's Doodles)
Theme: Folded-Paper Frame at Stampin' Dymonz Scrap Shack (hosted by Joynana)

Tutorial: Folded-Paper Frame at Splitcoaststampers

Stamps
: rubber stamp from stash (thank you Spotlight Challenge), sentiment from Studio G
Paper:
Dots & Stripes from Echo Park, Core'dinations, Recollections
Tools:
Sizzix Texture Boutique, Fiskars papercutter, Tim Holtz scissors & paper distresser, hole-punch
Other: ZipDry glue, Versamark & StazOn inks, Pink Paislee twine
, watercolor pencils, shells