Showing posts with label step card. Show all posts

Tuesday, March 1, 2016

Inspired by a Song at the Crafter's Cafe

The Crafter's Cafe Challenge theme is Inspired by a Song. We're sponsored by The East Wind, SLS LinesLacy Sunshine, and DS4J.

I was inspired by the song "Stray Cat Strut" by the Stray Cats, and this "Rebel Alley Cat" digi stamp  from The East Wind worked purrfectly.

Following the song's lyrics, I made the cat orange & black with flocking. The base-card is a black, pre-embossed cardstock, but the teal & brick papers are dry-embossed with a Sizzix folder. The guitar is metal charm that I colored with a red enamel; I attached it with a star-shaped brad & Glossy Accents. The sentiment is inspired by the song as well.

Inspiration/Challenges:
Polkadoodles #8: Tic Tac Toe (Top Row: Charm, Animal, Sentiment)
Show Us Your Pussies: Lucky Kitty (this guy definitely has more than 9 nines!)
Wags 'n Whiskers #172: Furry Friends
WordArt Wednesdays: Anything Goes (3rd entry)

Thank you for visiting & hope you'll join us at The Crafter's Cafe,


Tuesday, August 5, 2014

Gnome Place like Home -- Step Cards with Crafting with Dragonflies

This fortnight at Crafting with Dragonflies we're challenging you to make a Center- or Side-step Card. We have two sponsors, Handmade Harbour and Make It Crafty, and I used this whimsical Mushroom House digi stamp by Make It Crafty.


The Gnome with Toadstool digi stamp is a freebie from Spyder's Corner (thank you!) and I generated the sentiment myself (although I'm certain I've seen it as a stamp somewhere). The images are colored with Copics markers with details in glitter and gel pens. The googly-eyed ladybugs are brads from Michaels that I trimmed and glued on with Glossy Accents. I used a Martha Stewart punch for the corners.

Inspiration/Challenges:
City Crafter Challenge #223: Home Is Where The Heart Is (include a house)
Crafty Cardmakers: Fancy Folds
Fitztown Challenge: Step Card

Update: I was the lucky winner for Fitztown Challenge!

Thank you for visiting, and hope you'll join us at Crafting with Dragonflies,

Monday, July 15, 2013

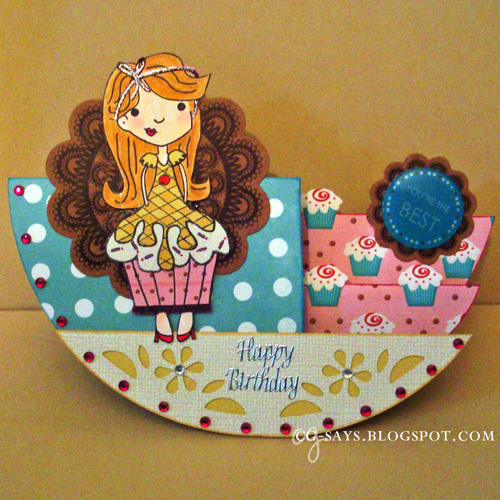
Cupcake Cutie

Oh how I love tutorial challenges! I rarely actually get around to entering them, but I thought that the Circle Step Card and/or Circles/Hexagons challenge at Top Tip Tuesday was perfect for a birthday card for our niece.


The "Cupcake Girl" clear stamp is from my stash; I know it was made by someone in Arizona, but sadly it doesn't say on the package. I've ended up loving this stamp more than I thought I would; it's so much fun to paper-piece (you can see another version here), and is easy to personalize. The dress, frosting, and wrapper are all pieced on from different papers, and the body & hair is a 100% Hammermill. I colored the image & dress with Copics, and added detail with Sakura glaze pens.

I made the base with Echo Park's double-sided Teal Small Dot DP (the inside is striped). The cupcake paper is from Digi Doodle Doo's free . I cut out some more tiny cupcakes and glued them on top of the paper to add dimension. The Cupcake Girl's wrapper is stamped on a digi paper I made by enlarging the same cupcake paper.

The bottom, flower-patterned portion is made from a textured, white-frosted yellow Core'Dinations cardstock. I punched the pattern with the "Flower" Mini Lucky 8 Punch from We R Memory Keepers, and backed it with the the yellow side. I used both sides for the frosting & dress on the Cupcake Girl.

The patterned kraft medallions die cuts are from my stash; I splurged on $2 worth of them at Scraps of Love, and I've been hoarding them for over 6 months! The 3D "You're the Best" epoxy sticker on the small doily is also long-hoarded. I embellished the card with adhesive gems and a silver "Happy Birthday" sticker.


I think our niece will like this card, as her family likes to bake!


Color Throwdown #250
Inspiration/Challenges:
Color Throwdown #250: Teal, Kraft, Hot Pink, Light Yellow
Quick Quotes: Add Dimension to your project
Top Tip Tuesday Challenge 105: Hexagons and/or Circles (and Circle Step Card tutorial)
Word Play Saturday: Birthdays

Thank you for visiting,


Inspired by an Evening with a Friend

My dear friend visited us the other day, and we spent a lovely summer evening marveling at the fireflies (neither of us grew up with them), and watching a concert by The Arcade Fire on TV. I wanted to make him a "thank you" card, so I used the chorus of their song "The Suburbs":

The color/pattern scheme was inspired by my friend's pajamas! They consisted of blue-and-white houndstooth-patterned flannel pants and a burgundy sleeveless undershirt. I don't know, I just loved the combo!

I used the Circle Step Card Tutorial at Top Tip Tuesday, and the Distressed Houndstooth Overay digital paper by Mel Stampz. The lyrics are set in the font Droplet Lite and cut out with IO dies. I made the city-topped half-circle in SCAL. The cityscape svg cut files are from my digital stash.

I added a strip of adhesive pearls that I colored with a Fluorescent Yellow Copic marker. Because the top of the strip was also sticky, I first covered it with glow-in-the-dark glitter. It's meant to reference those fabulous fireflies!

I'm entering this into this week's Top Tip Tuesday challenge, but with a Tip, not for theme. Here's my tip:
Formatting text to fit in dies
I like to type up my own text, print it out, and use my metal dies to cut out the shapes. To ensure that the text will fit into the shape, I use Text Boxes to help me design.
Here's how to do this in Word (these instructions are for Word 2004 for MAC, but should translate to other similar programs):
  • Measure your die.
  • Go to Insert/Text Box. Double click on the box and a format box will pop up:
    click to enlarge
  • In the "Colors and Lines" tab, select "No Fill" and "No Line". Go to the "Size" tab and put in the dimensions you want. 
  • Now you should be able type in your text and choose fonts. I recommend centering the text, depending on the die. For these cloud dies, I know that the top is smaller than the bottom, so I can adjust for that with line breaks.
  • Print out the text, giving yourself plenty of margin space. Use low-tack tape to line up the die over the text. Cut the die from the larger sheet of paper, and run it through your die cutting machine. Presto!

Many thanks to Annette at Top Tip Tuesday for the tutorial and inspiration!

Update: This was chosen as the Top Tip at Top Tip Tuesday #105.

Thank you for visiting, and Happy Crafting,