Saturday, March 23, 2013

Up Up and Away!

Believe it or not, I wanted to keep this project simple...! But it's for Mom, and I always like to pull out all the stops for her. Plus, so gave me these gorgeous Graphic 45 papers!


The washi-ribbon-twine section on the bottom was inspired by a card I saw at A Consuming Passion.


It's a big card, at 6x6. I even decorated the inside:


Inspired by the Matching Card & Envelope challenge at Art Impressions, I used some of the same DP and elements to decorate a 6x6 petal envelope:


The stamps (sentiment & vine) are from a Country Companions/DoCrafts set.


Inspiration/Challenges:
Art Impressions Challenge #105: Matching Card & Envelope
Cards by Lady Anne / Stamp Challenge: Anything goes + Stamp
Created With Love: Button Up
Creative Creations Challenge Blog: Things with the letter B (Balloon, Button)
Penny's Paper-Crafty #119: Gingham/Checks
Sassy Studio Designs: Paper Piecing


I had so much fun using this Art Impressions limited-edition Stamp:


Art Impressions pledges to donate 100% of all proceeds of the 2013 Limited Edition stamp to the Obediah Fund, which will support Open Arms International's Kambi Teso outreach. This collector's stamp will ONLY be available from November 20, 2012 to May 20, 2013! After May 20, the molds will be destroyed and it will never be sold again.

Hope you'll consider purchasing this fun stamp for a great cause!


Thank you for visiting,

Hop hop hop!

I really liked the theme of this week's Squigglefly challenge: Card that depicts a Song. I thought that this stamp plus a wobble would be great for a "Bunny Hop"-inspired card. And since this is for my nieces, I went ahead and put two bouncin' bunnies on there (both are attached with Action Wobbles)!


The dance instructions are from the actual back of Capitol Record's "The Bunny Hop" compilation LP, posted by LORAC! on Flickr. I added a bit of color of Copics and some of the violet ink I used to distress everything.

The bursts are cut with a die from an a•muse studio set. I generated the sentiment with the font LD Music.

I'm entering this into the Top Tip Tuesday Challenge with some tips on applying 3D embellishments:

TOP TIP:
Use your sticker machine to add flocking and paper piece your image.


Here I have my bunnies all cut out, and my supplies at the ready.

I ran the bunnies & tummies through the sticker machine – image side down – and started by covering the tummies with white flocking.


I took the bunny off of the sticker paper and adhered the tummy & ears. I use a tray to catch all the extra fluff, so I just cover it and press to get a nice even layer.
TOP TIP #2:
Here I used superfine Flower Soft from there "Teddy Bear" collection; it works fine with the sticker machine, but best with a wet adhesive like Tacky or, my favorite, a ZIG  glue pen.

I glued the tale piece back on. I put everything together before adding the final touches with Glossy Accents (because it takes a while to dry).


Top Tip #3:
Glossy Accents works best for Flower Soft and heavy elements. I also used it to adhere the microbeads to the button and well as the left-hand corner of the card.

I made the little bows from rafia using the fork technique and, I swear, a Cake Breaker/Cake Fork.

Inspiration/Challenges:
Anything Goes Challenge #88: Seeing Double
Cutie Pie Challenge: Easter
In the Pink #17: Spring/Easter + Pink
Melonheadz Friends Challenge: Easter or Spring
Squigglefly: Card that depicts a Song ("The Bunny Hop")
Tammy's Scrappin Corner: Easter
The Pink Elephant Monday Card Challenge: Easter
Top Tip Tuesday #97: Funny creation/ TIP


Update: I was chosen as "Top Tipper" for Top Tip Tuesday's ROFL Challenge!


Thank you for visiting,

Tuesday, March 19, 2013

Bonnets & Butterflies

I have several adorable Easter/Springtime stamps so I figured I better make the most of them! This time I inked up a new-to-me stamp from a Penny Black set (I've used other stamps from the set before, but not this one). I stamped it three times: once on the green background (cut with a Spellbinders die), once for the colored portions, and once for the the bunny pieces. I ran the bunny pieces through my sticker machine and covered it with white flocking. I also added from superfine white Flower Soft on its tail.


The corner embellishment is a chipboard piece that I covered with pink embossing powder, and them added Glossy Accents and covered it with glass microbeads.

I inked the doily blue with chalk ink, and cut out some tiny butterflies from the DP. After cutting them out, I painted the butterflies with Creative Medium to make them more durable.

Fairy Tale Challenge #63

Inspiration/Challenges:
Craftin Desert Divas: Easter
Craft Your Passion: Ribbons or Lace
Fairy Tale: Photo Inspiration
Sketch Saturday: Sketch
Try It On Tuesday: Hats & Easter Bonnets
Thank you for visiting,

Monday, March 18, 2013

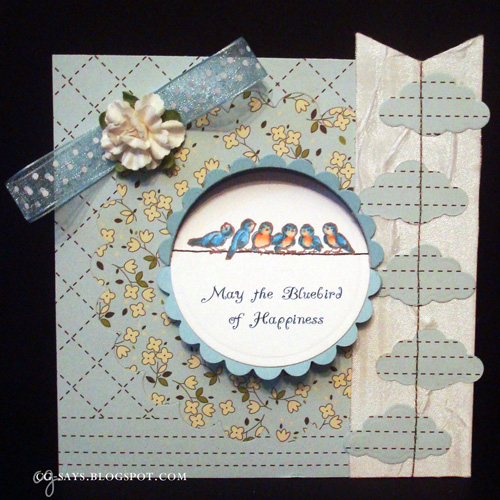
Flippin' Happy Bluebirds

I was so thrilled to win the Wobble challenge at Art Impressions with my Dr Seuss card, and even more thrilled to win a $10 GC to their store; although perhaps my best "prize" was how much my nieces enjoyed receiving it!

I've admired AI's "Fronts & Backs" line for quite some time, so I just had to buy this cute group of birds and make a Notch Swing Card (Does anybody recognize this technique and know it's proper name? I know I must have seen it somewhere.)

I made little notches (they need to be a bit bigger than slits) in the card, and tucked the image circle into them. It easily swings...


...to reveal the bird's backs and the rest of the sentiment:


Inspiration/Challenges:
Inky Impressions Challenge #101: Add Blue for Colon Cancer Awareness

Really Reasonable Ribbon: flowers and ribbon
Rhedd & Rosie's Challenge Blog: Birds
Simon Says Stamp: Sketch #1 
Sparkles Forum March Challenge: Birds
Tando Creative Challenges: Flowers

Thank you for visiting,

Friday, March 15, 2013

Swingin' into Spring with Sunshine Mail

Today begins a new Sunshine Mail Foundation Challenge (March 15 - April 1). The only real rule is that you send in at least one card (Donation guidelines here).

Our theme is Swing into Spring, and we're sponsored by A Day for Daisies digi stamps. It's such a fabulous, unique digi stamp company, and the Sunshine Mail DT was lucky enough to be able to choose their own images for this challenge. I used Boys Love Trees:


The background is embossed with my Darice embossing folder (if you follow my blog, you know I can't get enough of this embossing folder). I printed the sentiment (TLC Creations) and then embossing it by lining it up in the folder. Then I just fussy-cut it out and popped it up with foam. The sheer rainbow ribbon is from my stash.

The image is colored with Copics. I made the image background in several steps: First I colored the blue portion & texturized it with Blender solution & cloth. The I painted the tree with Crackle Paint (Ranger), and added Flower Soft to the leaf sections. The boys are cut out and glued on to top for a little dimension.


Inspiration/Challenges:
Celebrate the Occasion #103: Spring Is In The Air
Crafting for all Seasons #47: Spring
Crafty Ribbons #40: One for the Boys
Crafty Sentiments: Hello Spring
Delightful Challenges: Here's one for the Boys
Little Miss Muffet Challenge #56: Boys Only


Thank you for visiting & hope you'll join us for the Sunshine Mail Foundation Challenge,